
Connecting a Form and a Shop Page - Other Maker's Input
This is going to be a very niche post, but there are a few people who have asked about it and in certain circumstances it could be incredibly time saving. This is how I used a Squarespace Form as an input, Google Sheets to process and output a CSV, then imported that into a Squarespace Shop page. The specific use I had for the system was allowing other makers to input their details to be included in a browsable list on my website. Initially it was just planned for the run up to Christmas, as I had more demand than I could manage in the time left and other makers had work to sell, but it’s minimal effort for me to do it again now.
Other people who were interested were community studios and clubs, looking to use their existing website to easily allow their members to upload details to a mini profile or shop relink page (like I did for mine), but I’m sure there are plenty of other ways this could be used too.

This will all be easier with a degree of proficiency with spreadsheets and HTML, but I’ll do my best to explain it such that it’s not required. If these aren’t something you feel comfortable with at all, then I’ll tell you how to do the absolute minimum and still get this to work. I would recommend reading the whole thing even if you just want the simple one as it might not make sense otherwise, but there is a usable spreadsheet template at the end of this post.
The Shop Import
I’ll start at the end and work backwards, as each step is informed by the next step in the process. The last part of the sequence, and therefore the best place to start, is the Squarespace Shop CSV Input.

I would recommend that you start by making the shop page you want in Squarespace (I use the URL other-makers-[month-year] to make it easy to keep track of things, but you could call it whatever you want. I would then make a listing in the shop as a template. If there’s any content you want repeated on each listing (I had a little disclaimer on mine) then add this now, as it’ll make it easier in the next stage.
Once you’re happy with your template listing, select it in the Products page of your Squarespace editor, and export it. You’ll get a CSV file (essentially a basic, single page spreadsheet) with a series of headings and the specific details for that one listing. You can copy and paste it into a Google Sheets document, but first here are the important headings and what they do:
Product Type - This doesn’t matter much for me, but could do if you were looking to have something that could be purchased and would need shipping added [e.g. ‘SERVICE’]
Product Page - The specific part of the URL that refers to the shop. It’s essential that this matches an existing shop page on your website, but you can just duplicate the one from your exported template. [e.g. ‘other-makers-dec21’]
Product URL - A unique and URL suitable (as in, no spaces, uppercase or special characters) name for the listing. [e.g. ‘old-forge-creations’]
Title - The name each listing will show to the customers when they browse [e.g. ‘Old Forge Creations’]
Description - The text of the listing. This will be expressed as HTML here, meaning it’s possible to do all the formatting within the spreadsheet if you are comfortable with HTML and the options are far more limited if not. [e.g. ‘<p class="">Description: Colourful wheelthrown stoneware mugs, tumblers, planters, and bowls. Handmade in my small studio in Surrey UK</p>’]
Price - I set my price to zero, because I don’t want anyone to mistakenly think they can buy through my website. You might want to do something different. [e.g. ‘0’]
Stock - How many are available. I set mine to infinite, this is also to prevent confusion with people thinking they are sold out because they appear to be on my shop (this is the downside to using a shop platform for this [e.g. ‘Unlimited’]
Categories - These can be shown at the top of the shop page, and used to filter the results, so have a lot of potential for improving the customer experience. Think of the sort of things your viewers might want to know about a seller’s options (price, shipping, etc) and add those to this part [e.g. ‘Ships: UK, Ships: Europe, Ships: Rest of the world, £10 - £20, £20 - £30’]
Visible - Use this to make listing visible or hidden on the shop page [e.g. ‘Yes’]
Hosted Image URLs - The most important part. This allows Squarespace to automatically import multiple images for each listing, which is a massive timesaver. They HAVE to be direct image links (as in, they end in a filetype like .jpg and point directly at an image). If you have direct links separated with a space, the images will be automatically imported and added. [e.g. ‘https://i.imgur.com/nWe9mU0.jpg’]
That’s basically all you’d need to have for each maker on the uploadable CSV. So the next thing to consider is how you go from the form output to this.

I’m explaining these backwards as they make more sense when you know where you’re trying to get to, so I haven’t got to the point where you use the form to generate a Google Sheets document yet. However, I would suggest doing all of this inside the automatically generated Sheets doc, and that isn’t produced until the form is set up (so just read this part, don’t do anything for a moment). The Sheets doc will be produced with a single sheet (the pages/tabs at the bottom) which will be automatically added to as new form submissions are entered.
I would suggest adding a new sheet called something like ‘Relink’ and using it as an intermediate step between the data from the form submissions and the formula in the output page. It’s not a requirement, but if at any point you change one of the form fields then it starts a new column for everything after the edit. This will then mean your formulae point at the wrong cell and this can be frustrating to correct without the intermediate step (which would still need to be corrected, but would be trivially easy and fixes all references to a cell at once).

All you’d do to start is go to cell A1 and use the formula =Sheet1!A1 then drag that to fill the required number of columns. If at any point you did need to edit the input form and it started a new column for the data afterwards then you’d just change the linked cell. One note here, when the form adds data to the sheet, it does it by inserting new rows rather than filling in the rows already there. This means that the new rows won’t automatically appear in the Relink sheet even if you dragged the formulae down far enough that it seems like they should. You just need to select and drag the formulae down each time you process a new set of inputs.
The Formulae
So now you have a Google Sheets doc with ‘Sheet1’ (form data) and ‘Relink’ (form data, but relinked). You need to make a third sheet, which I would call ‘Output’.

If you haven’t already made your shop page and template listing, do that now, then export them. Copy that data and paste it into the Output sheet.
Now, we just need to get the form data to match up to the Squarespace product headers. I’ll explain the basic idea for the formulae here, then give examples for the form inputs afterwards
Product Type - Doesn’t need to change, no formula needed
Product Page - Doesn’t need to change, no formula needed. If you’ve used a number for it, Google Sheets might try and increase it by one for each new row though, so watch out for that.
Product URL - This has to be lowercase and without spaces. I used the formula =LOWER(SUBSTITUTE([cell reference]," ","-")) with the Cell Reference pointing to the cell with the Business Name
Title - Direct link to the cell with the Business Name
Description - This is where you can make it as complicated as you want. For reference I used the formula:
='Other Refs'!$A$1&"Description: "&Relink!I1&'Other Refs'!$B$1&"Located: "&Relink!E1&'Other Refs'!$B$1&"Price Range: "&Relink!G1&'Other Refs'!$B$1&Relink!F1&'Other Refs'!$B$1&Relink!H1&'Other Refs'!$B$1&"<strong>Website: "&'Other Refs'!$C$1&Relink!C1&'Other Refs'!$D$1&Relink!B1&"</a></strong></p>"&'Other Refs'!$C$1&Relink!D1&'Other Refs'!$D$1&Relink!D1&"</a>"&"</p><p class=""></p><p class=""><strong>Please note: This is a listing for a maker that is in no way affiliated with Old Forge Creations, and is not a personal recommendation or endorsement. Please use all of your usual excellent judgement and sense when clicking through any link on this page.</strong></p>"
Which would output:
<p class="">Description: Colourful wheelthrown stoneware mugs, tumblers, planters, and bowls. Handmade in my small studio in Surrey UK</p><p class="">Located: United Kingdom</p><p class="">Price Range: £10 - £20, £20 - £30, £30 - £40, £40 - £50, £50 - £100</p><p class="">Ships: USA, Ships: Canada, Ships: UK, Ships: Europe, Ships: Rest of the world</p><p class="">Shop: Own Website</p><p class=""><strong>Website: <a href="https://www.oldforgecreations.co.uk/"> Old Forge Creations</a></strong></p><a href="https://www.instagram.com/oldforgecreations/"> https://www.instagram.com/oldforgecreations/</a></p><p class="></p><p class="><strong>Please note: This is a listing for a maker that is in no way affiliated with Old Forge Creations, and is not a personal recommendation or endorsement. Please use all of your usual excellent judgement and sense when clicking through any link on this page.</strong></p>
That is almost certainly excessive for what you want, but the logic is the same regardless. If you need certain snippets of HTML that include characters (like “) which will be interpreted by the spreadsheet as part of a formula, you might have to put them in a separate sheet and reference them ('Other Refs'!$A$1 is used to call in the text <p class="">). Essentially, you can add as many things to the text as you want using references to cells and text within double speech marks, which are strung together with ampersands (&). As you have your example listing with formatted text, you can copy most of it and just change the few bits that will be different between listings. Alternatively, there is a simple template below.
Price - Doesn’t need to change, no formula needed
Stock - Doesn’t need to change, no formula needed
Categories - Call in the text from any inputs that can be used as categories. My formula was =Relink!F1&", "&Relink!G1&", "&Relink!H1 with those three references being shipping countries, price ranges, and shop type.
Visible - Doesn’t need to change, no formula needed
Hosted Image URLs - Direct link to the cell with Image URLs
Input Form
Now you just need to put together an input form with those in mind. Make a page on your website, and add a form to it. You’ll get a range of types of Fields, but mainly you want Text/Text Area, Checkbox, and Select fields.

My Inputs were:
Business Name: This is to identify each maker, and used for the page URL. I used a Text field.
Shop URL: Link to the maker’s shop. Emphasising the need for the link to be correct (full URL starting with https://) is key here if you don’t want to be going back and fixing the inputs. I used a Text field.
Instagram URL: Same as Shop URL
Country You’re Based In: This was added to the Description, so it didn’t matter how it was formatted or written. I used a Text field.
Countries You’ll Ship To: This was one of my inputs that fed directly into the Categories (the clickable filters at the top of the shop). If you make the wording descriptive and concise enough to work as a Category (I went with ‘Ships: USA, Ships: UK’ etc, as then they get grouped alphabetically too) then no additional editing is needed, these can just be inserted straight into the Categories column. I used a Checkbox field.
Price Ranges: Same as Countries You’ll Ship To
Type of Shop Platform: Also used as a Categories filter, but I used a Select field (the dropdown menu type) to limit to just one option.
Describe Your Work: Added to the Description, so no specific requirements needed. I used a Text Area for more editing space.
Image URLs: As with the other URLs, these have to be right to work. A full link starting with https:// and ending with .jpg/.png is needed, but if those criteria are met then the images will import and upload automatically. I used a Text Area to give more space for people to look at the links they were submitting, and as clear a description of what was needed as possible. My text is here if you want to use something similar:
This is the most important thing to get right! I need DIRECT image URLs. They should end in .jpg or .png (or other viable image types). If you are in any doubt whatsoever about whether your links are suitable, please try uploading your images to a site like Imgur and getting the DIRECT links (not Image link) from there. Some platforms don’t give direct links easily, so don’t trust that just because it looked like an image and you clicked ‘Copy Image Address’ that you actually have the correct link.
Making It Work For You
I realise this is almost certainly too messy as a starting point, so here is a simplified example spreadsheet. This follows the same logic, but doesn’t try to do as much. You should be able to use this as it is, or you can add to it. Please save a copy of the spreadsheet and edit that rather than requesting access to edit the template.
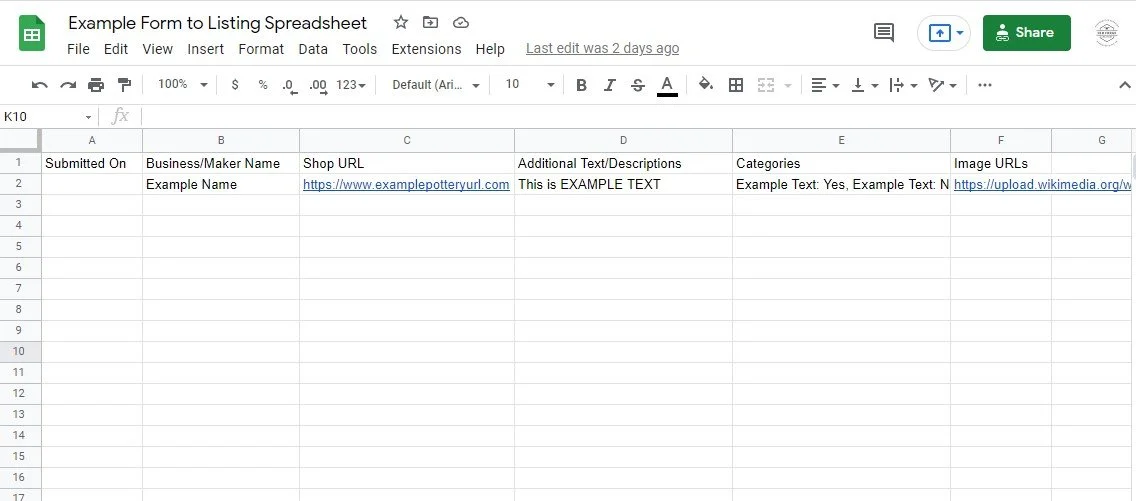
If you want to use it as it is, you need to set up a form on your website that outputs to a Google Sheets document (under Storage, link it to Google Drive) and have the 5 input fields:
Business/Maker Name
Shop URL
Additional Text/Descriptions
Categories
Image URLs
They would all be Text/Text Area fields other than Categories, which should be a Checkbox field using the approach I described above.
You could either copy the sheets across to the new Sheets doc that is created and do the whole thing inside the one document, or copy the data from the form output into the example spreadsheet. Once the data is in the first sheet tab, you’d need to select the row of cells in the Relink sheet and drag down to duplicate the formulae. Then do the same in the Output sheet. You will also need to change the text under the Product Page header (in the Other Refs sheet) to match whatever your shop page is titled.
At this point it should be ready to export (File - Download - Comma Separated Values .csv) and upload (go to your Squarespace Inventory and click Import). If everything has gone to plan, you should see a set of complete imported listings.
Hopefully this made sense and was possible to follow. I know it’s not simple or straightforward, but it can be worth the effort setting it up the way you want as it becomes a very easy process once that part is done.