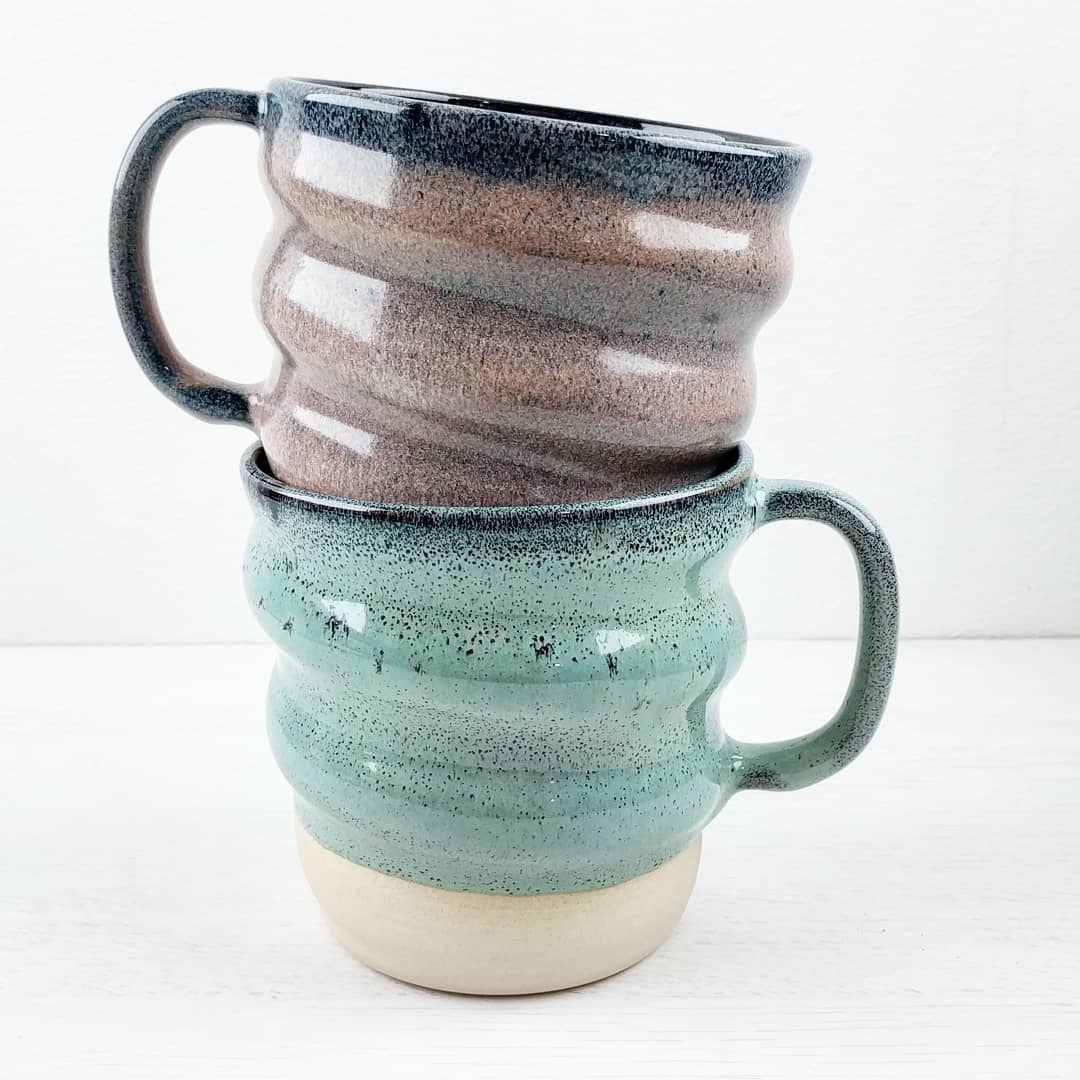
How To Make Comfortable Mug Handles
In this post I’m going to give a quick overview of handles generally, then go deeper into why I feel that certain handle designs are comfortable and others aren’t. I’m going to be looking at this practically, but there are plenty of aesthetic or stylistic reason to design handles differently. There’s no right way to do it, and whatever suits you and your work is best.
Basics - Techniques
There are quite a few techniques used to make handles. The variation is similar to the many different ways you could make the mug body, and a lot of people will use the same process for both due to practical and aesthetic considerations.
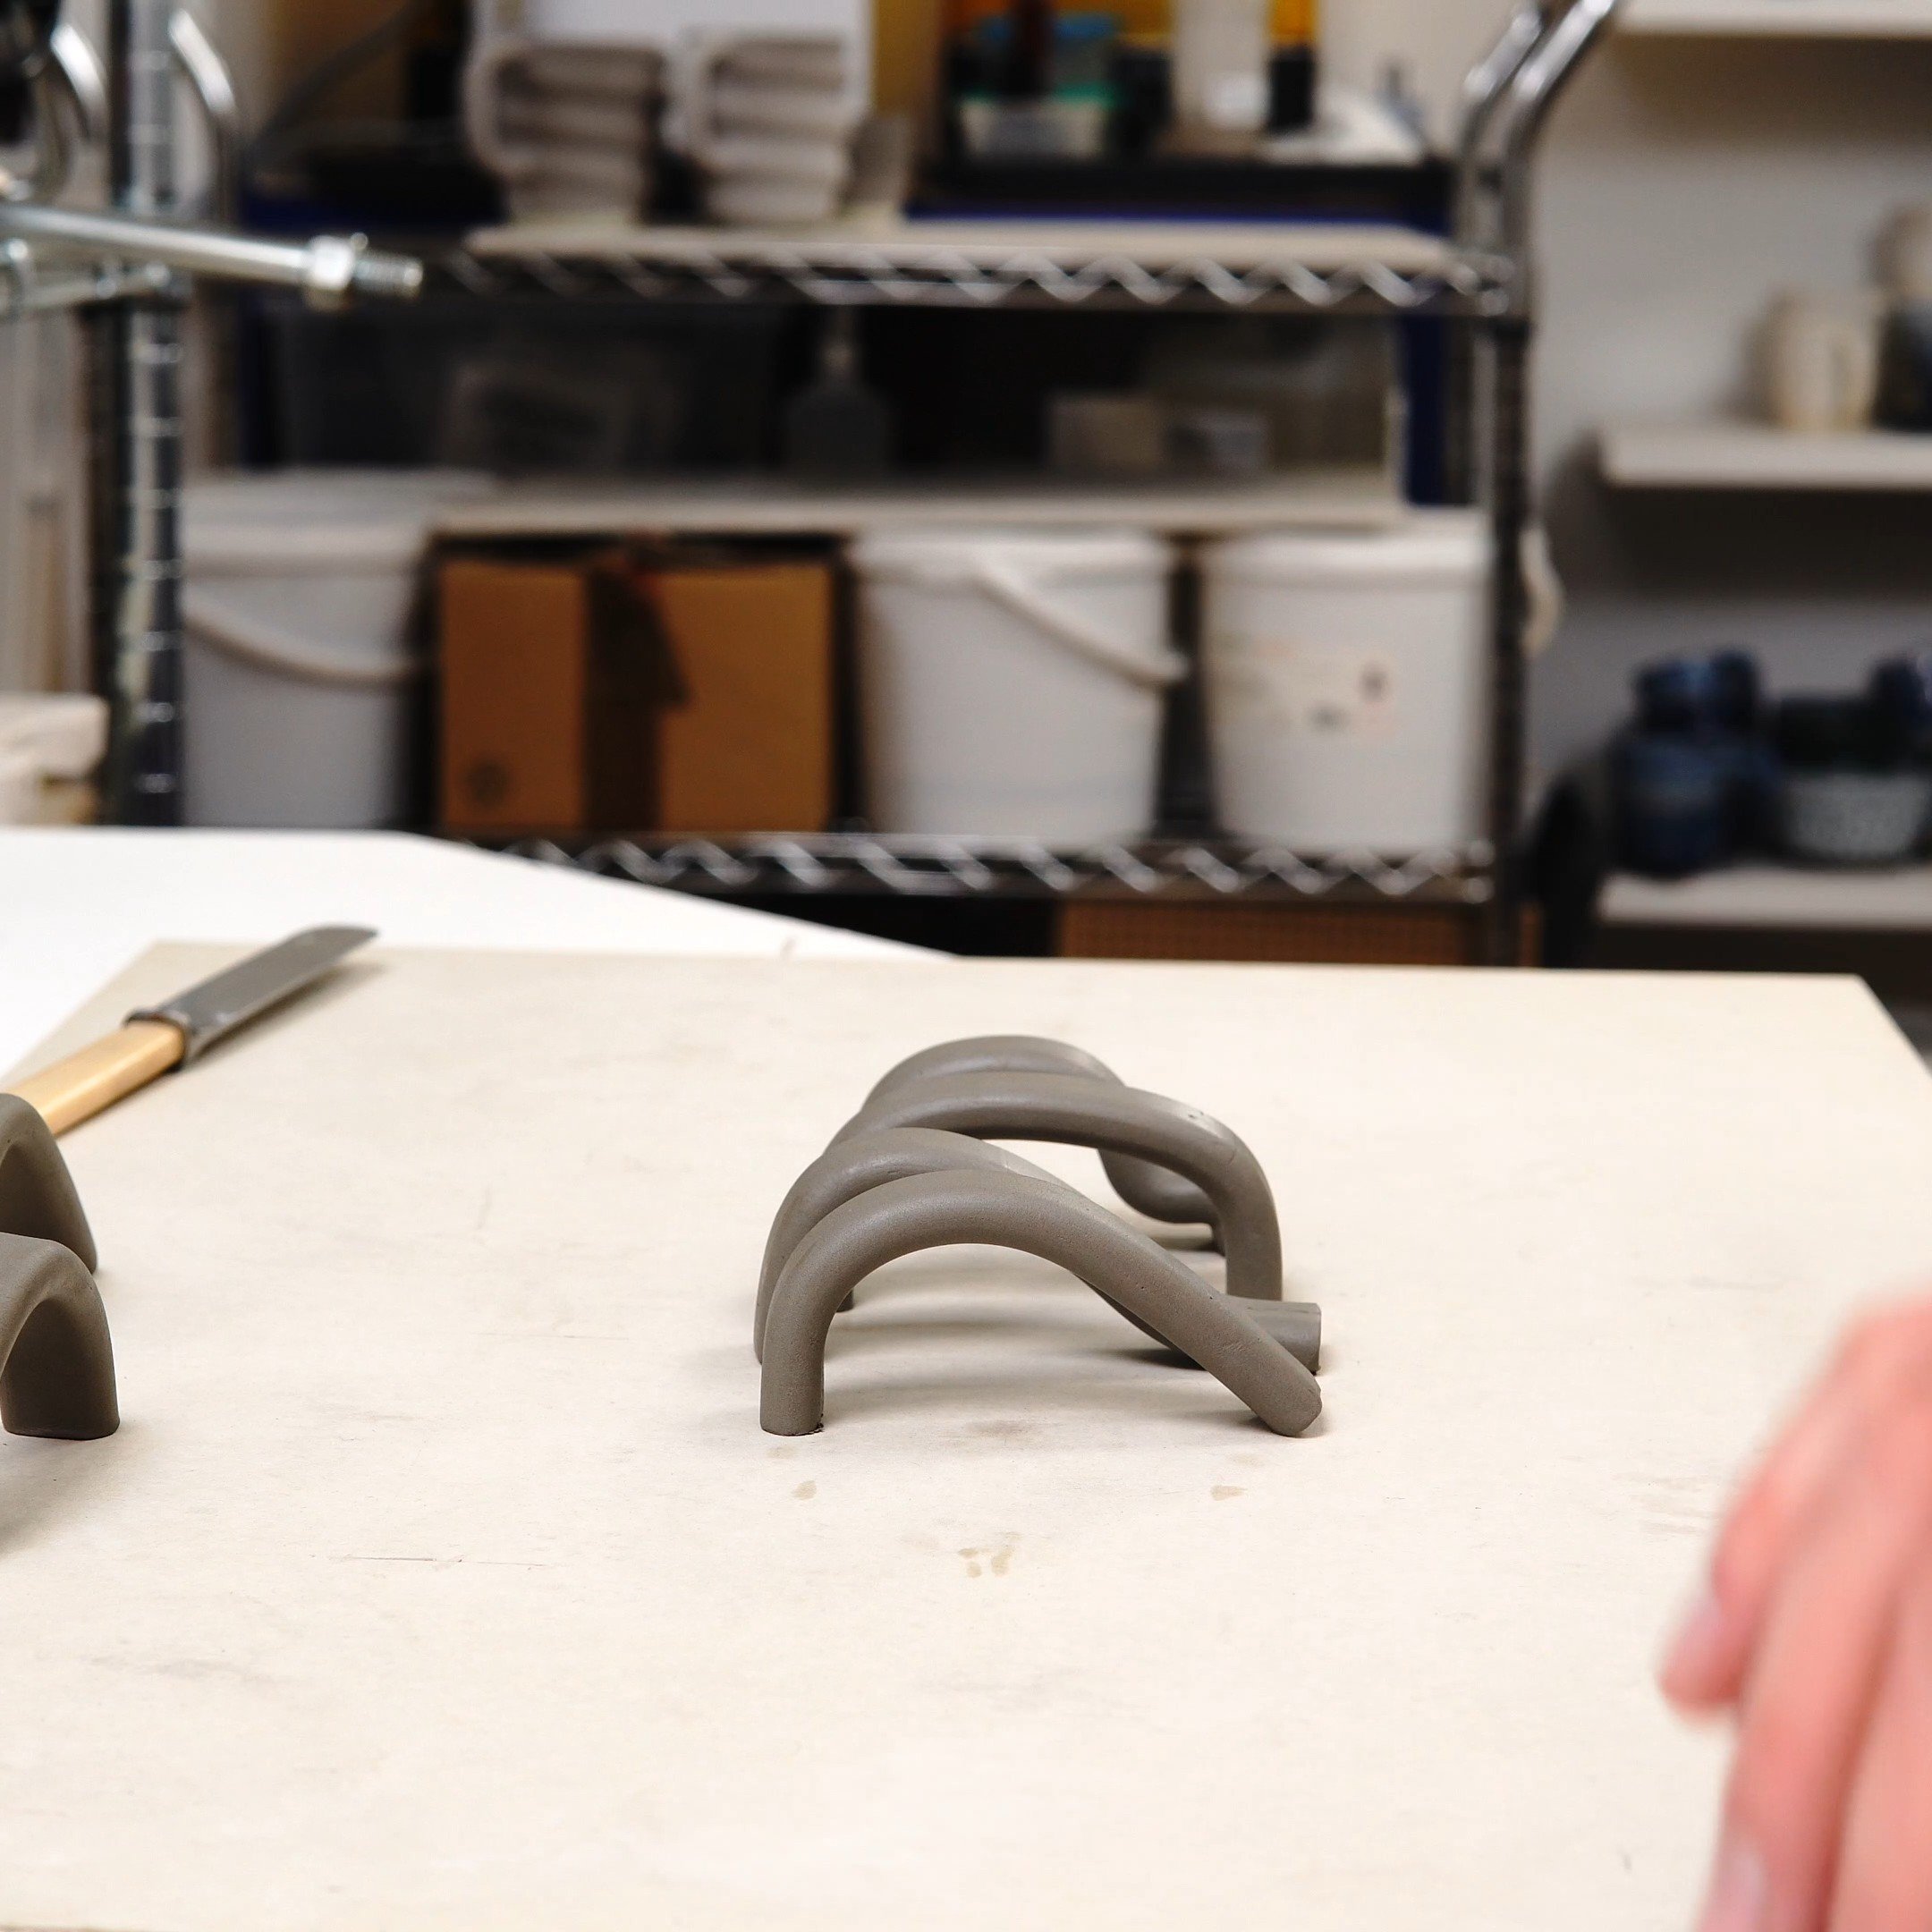
Pulled Handles - Starting with a larger block of clay, a repetitive pulling motion gradually stretches and thins the clay. The handles are typically attached to the pot at the start or part way through the handle making process, with the final pulling being done directly from the mug. They can be pulled separately and attached later.
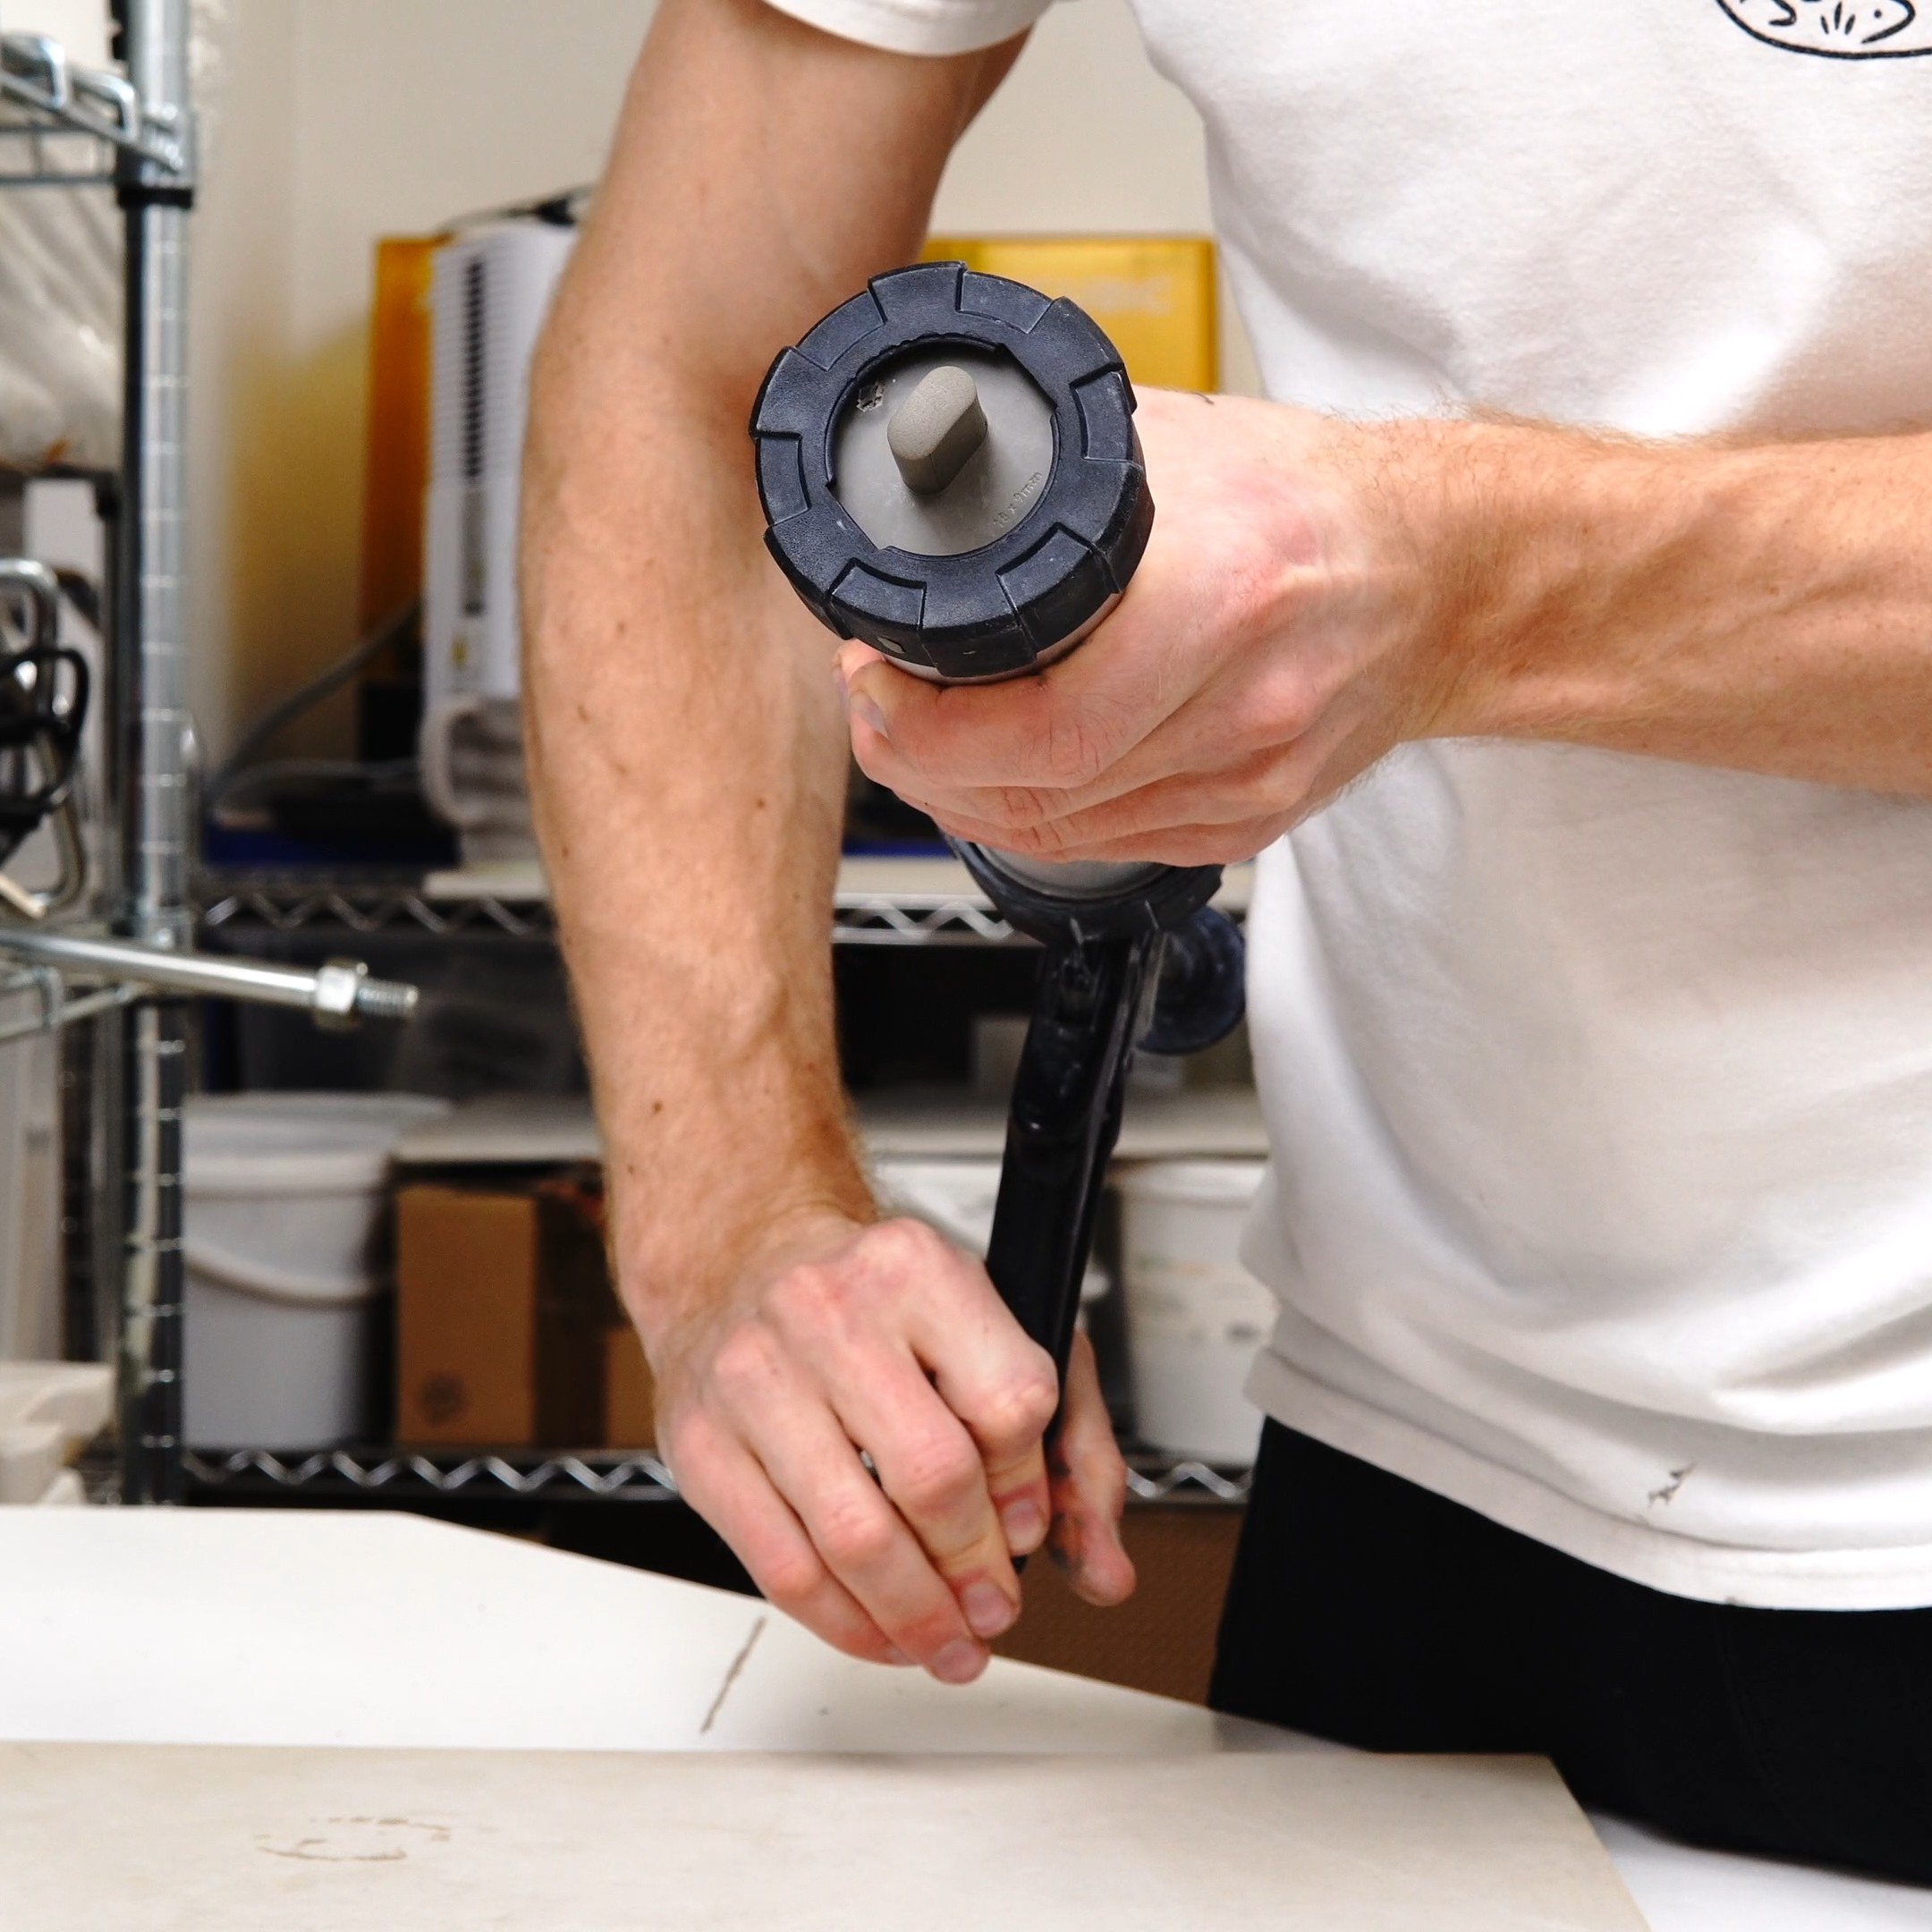
Extruded Handles - An extruder is a device that applies pressure to a container filled with clay and forces it out of a shaped die, producing a long length of clay with a consistent cross section. Extruders can be large and wall mounted, or smaller and hand-held. By using a die that’s the shape you want the final handle to be, you can quickly make multiple identical handles. I use this extruder with my own die design.
Slab Built Handles - Generally, this is done by taking a slab of clay, and cutting a strip to be the handle. It can be a straight bar of clay, or cut into a more complex shape.
Cast Handles - Slipcasting is the process of putting liquid clay into a plaster mould and letting it set to become solid. Press moulding is a similar process, but uses plastic clay pressed into mounds rather than liquid clay. There are very few limitations to complexity given the right mould design, so particularly ornate handles can be made this way.
Handbuilt Handles - Handbuilding involves shaping the clay by hand. It can be rolled into a coil first, or shaped directly from a ball of clay. There are no tools required.
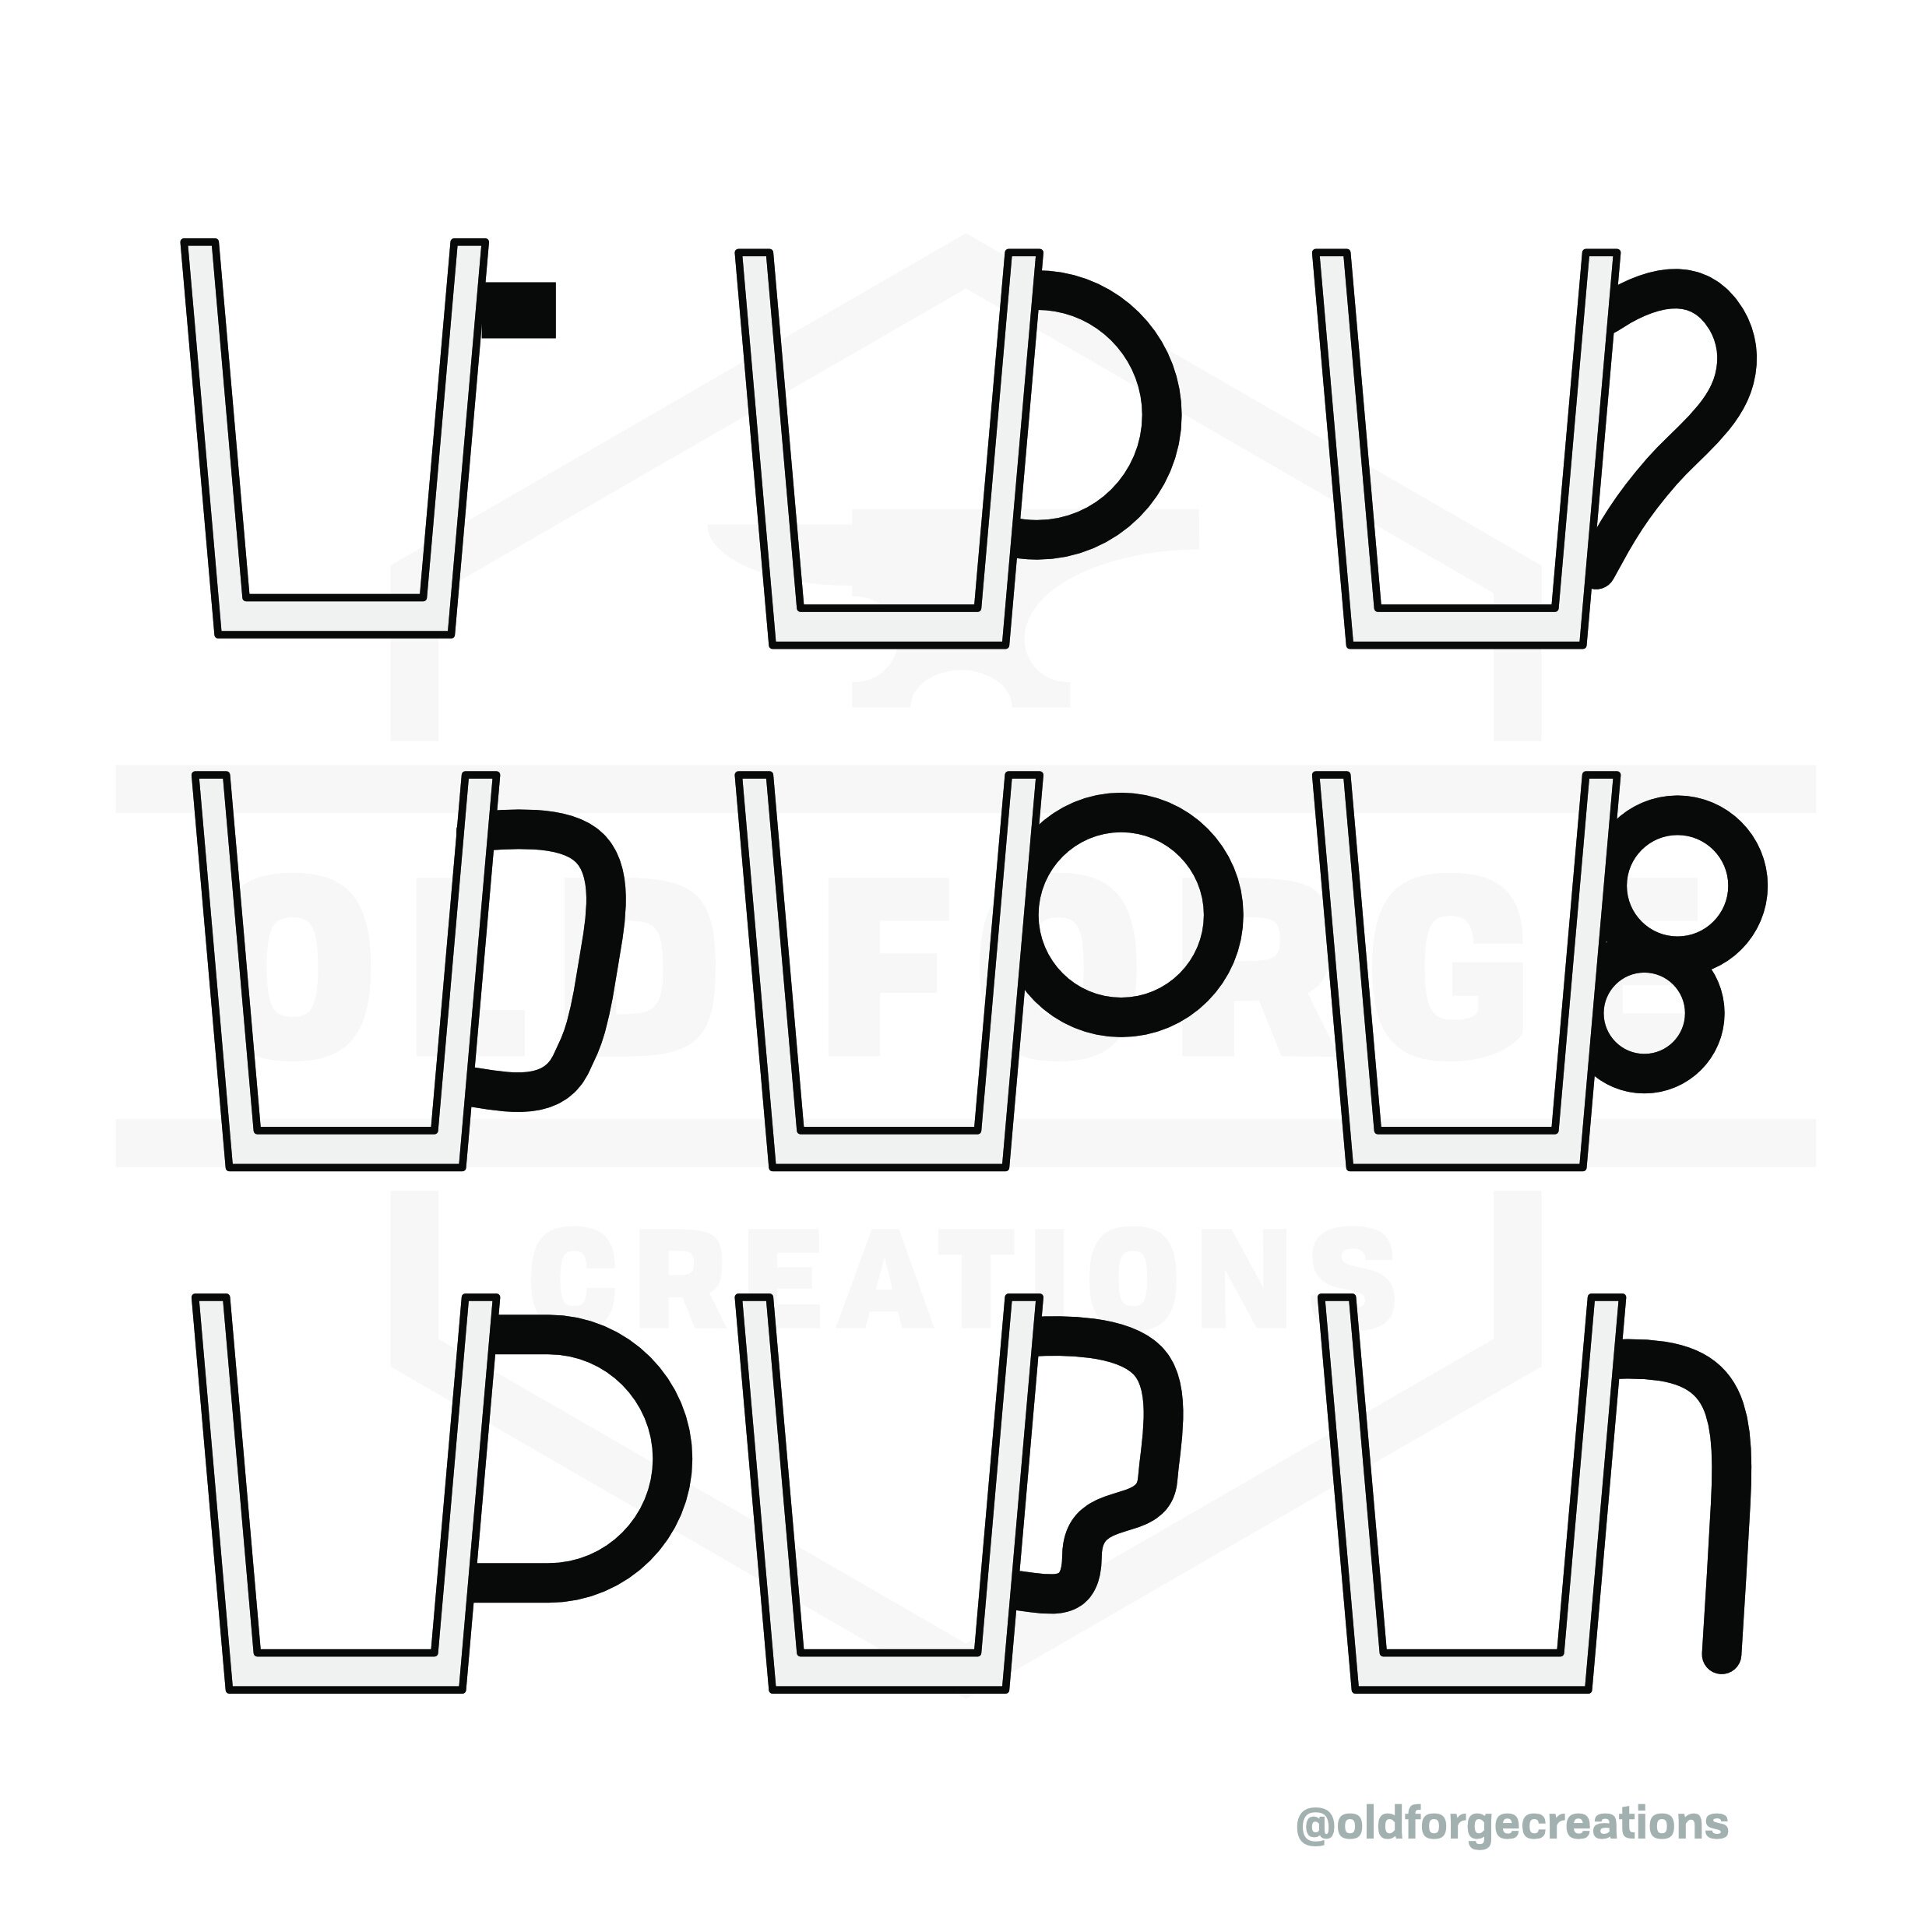
Basics - Shape
There are a few common shapes for handles.
Lugs - A solid lump handle that is held by pinching.
C Shape - A continuous curve
? Shape - A loop at the top that curves back and attaches at an acute angle at the base
D Shape - A handle with two distinct bends
O Shape - A complete circle
These basic shapes can then be added to or altered to make a variety of other shapes.
Basics - Size
Handles will be designed to allow a certain number of fingers into the loop, from small one-finger loop handles up to D shaped handles big enough for all fingers. The shape choice will affect the options for comfortable sizes, as some shapes scale up better than others. The number of fingers inside the loop is partly a design choice of the maker, but the user can decide to hold it in a different way than was intended.

Basics - Combining These Elements
There are several combinations of technique/shape/size that go together better.
For example, a pulled handle will normally be made in such a way that it has a smooth curve. This lends itself more to the C-Shape or ?-Shape. These shapes work well for 1-2 finger handles. It would be far less common to see anyone try to pull a 4 finger D-Shape handle.
Conversely, it’s easier to get discrete bends on an extruded handle, so they lend themselves to the D-Shape. The D-Shape can more easily be extended to 3-4 fingers, so you’re more likely see that combination with extruded handles.
Basics - Attachment
Handles have to be attached to the mug (unless you do something like slipcasting as one piece) and this attachment is the biggest weak point. A lot of beginners will have issues with handles cracking and falling off the piece entirely, as there are quite a few ways it can go wrong.
Scoring and Slipping
Sometimes clay really wants to stick to other clay, and sometimes it doesn’t. A large part of this is how dry and smooth the surface is. When we go to attach handles, they’re often on leather hard and ribbed smooth pieces, which makes it a lot harder for the handle/slip to adhere. Scoring the surface cuts through the smooth layer and gives the handle a better surface to bond to with less of a clear fault line to break along.
Slip is liquid clay. This rehydrates the scored surface slightly, making the two pieces of clay more able to blend together. The goal is to get as close to the clays behaving like they were made from a single piece as possible, and the slip aids in that transition from one to the other.
Pressure and Movement
Scoring and slipping are great ways to prepare the surfaces to blend together into a single lump, but they won’t do that if they’re just lightly touched together. It’s pressure and slight movement between the pieces that translates into the clays bonding.
Backfilling/Blending
Depending on your handle design, you might have sharp angles between it and the mug body. These can be an issue with glazing as they can trap air bubbles. One solution is to backfill any gaps with more clay, and to blend handles smoothly into the body. If you prefer the look of sharp angles, then you can address the issue when glazing by brushing a little glaze into the angle before dipping.
Shrinkage
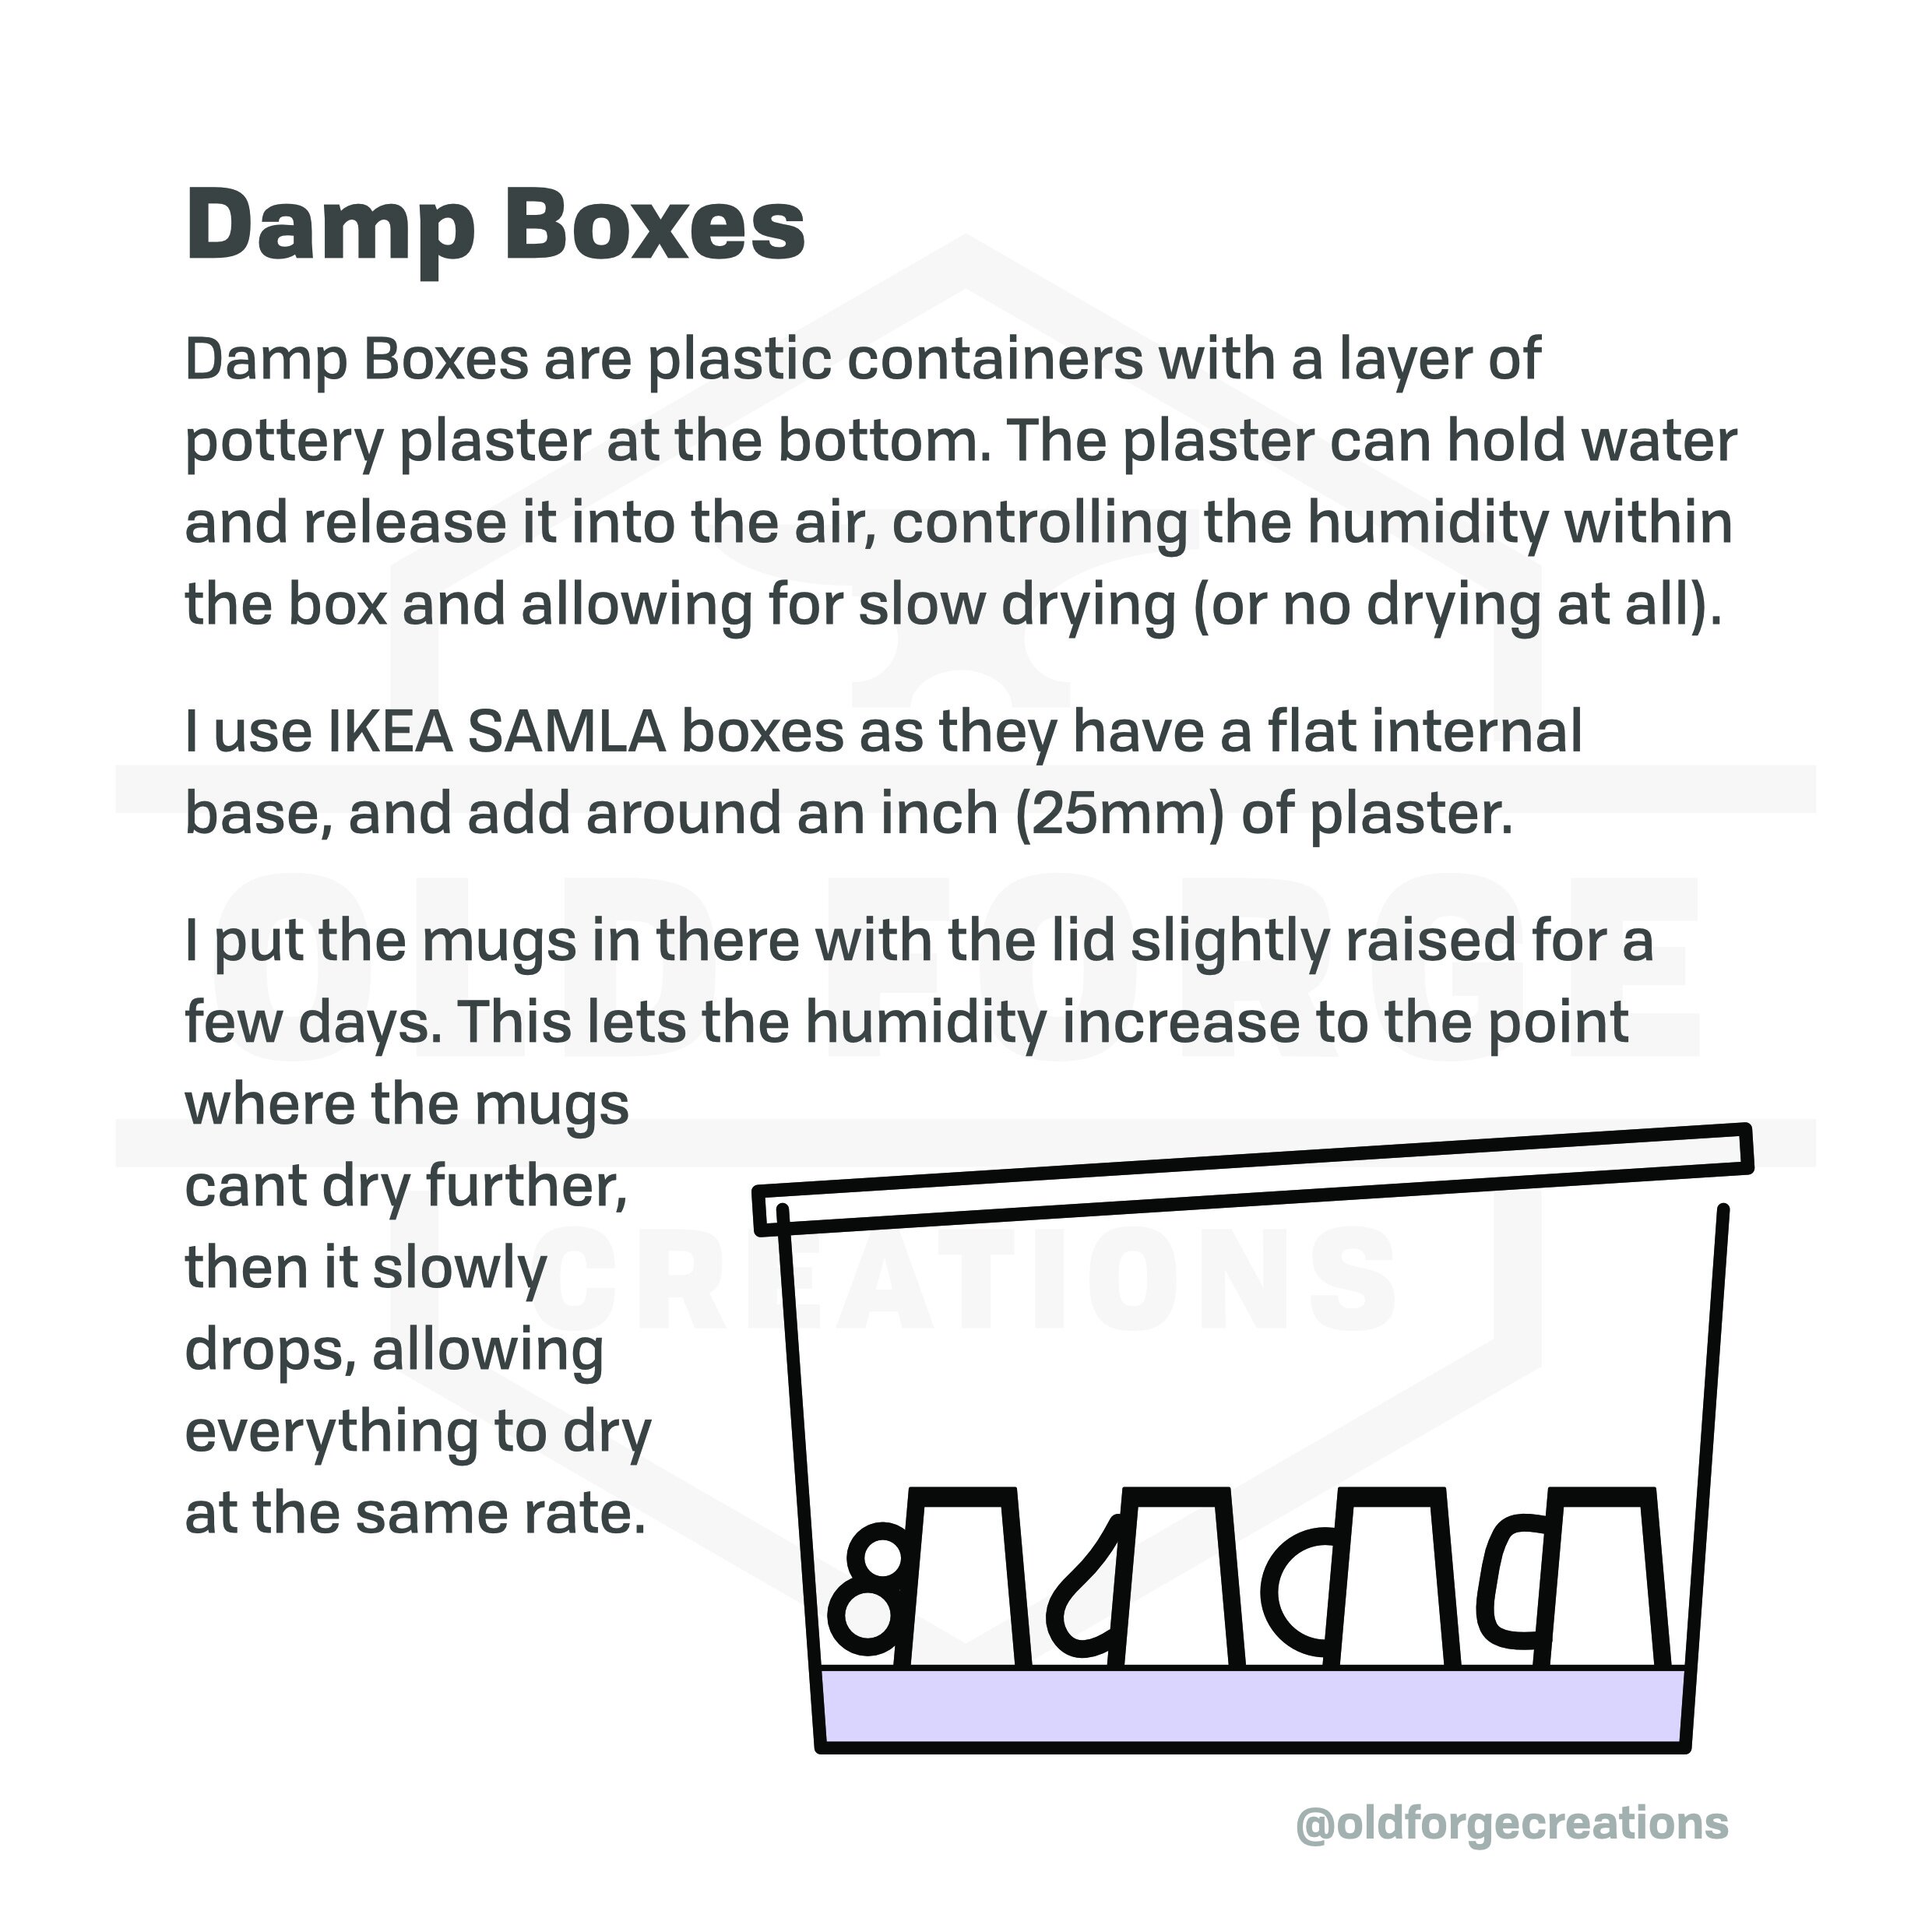
This is the number one factor in handles cracking and falling off. Clay shrinks as it dries. This affects handles in two ways.
The first is the relative dryness of the body and handle. We are interacting with them at a point in their shrinkage, they will both have a predetermined amount more shrinkage to go.
If you attach a handle at one dryness (and therefore with a certain shrinkage left to go) to a body at a different dryness (and with a different shrinkage), at some point that difference will need to resolve itself. Usually, this is through the handles cracking or falling off. There’s almost nothing you can do about it, because the stress is predetermined by the mismatch in dryness.
The solution here is very simple, just get the handles as close to the dryness of the body as possible before attaching them. This might mean a delay while you leave one covered and one uncovered for a few hours, but it’s better to take a little longer at that stage than have to start over completely.
The other shrinkage issue is as they dry. The clay shrinks as water evaporates, and the handles have a far larger and more exposed surface, so there’s a very high likelihood of uneven shrinkage if the drying process isn’t controlled. Even if the clay will shrink the same amount in total, if one section does it before the other then there will be an issue.
The solution here is also quite simple, just don’t let the mugs dry quickly. Leave them in a mostly sealed container or covered in plastic to dry over the course of a few days. This prevents any dramatic difference in drying rate and limits any issues.

You can control the level of moisture in the clay and handle, and the way they dry. Learning to do this is one of the most important parts of joining pieces of clay, because without effectively controlling these factors means you’re entirely at the mercy of the randomness of natural drying rates. Damp boxes are a great way to do this.
Deeper Dive
This is where it starts to get a bit more fun. I want to do a little bit of a deep dive into handles. People far more intelligent than me have been thinking about handles for millennia, so this won’t be groundbreaking, but hopefully covers some aspects that aren’t commonly discussed.
Also, a note to say that I do have a little formal education on some of these topics, but it was close to two decades ago. I’m no expert, and I might misuse terms. If you spot something, please let me know in the comments. (There are some things, like the distinction between mass and weight, where I might use the terms colloquially rather than scientifically. I want this to be broadly understandable, and I won’t be referencing Newtons even if it is the correct SI unit!)
Before I go any further I wanted to share this video of Pete Pinnell talking about handle design. He raises so many interesting points, some of which are contrary to what I’m about to say. Namely, I’m going to try and work out how to make the most comfortable handle design and he discusses how sometimes that’s not the appropriate answer. It’s still worth knowing how to make a comfortable handle, even if you decide not to!
Skip to 8 mins in for the discussion on comfort, although the whole video is great
Centre Of Gravity
The centre of gravity (COG) is the average position of the mass, and is the point from which the mug would balance in any direction. It’s very simple for a basic mug, being pretty close to the middle of the inside (slightly towards the base and handle). This changes with more complex mug shapes, and with uneven wall/base thickness, but generally we’re looking at the COG being somewhere near the geometric centre of the mug body.
Most mugs will hold somewhere near the same weight of liquid as they themselves weigh. So a 500g mug will probably have a capacity of around 500ml, giving a total mass of 1000g when full. This doesn’t have huge implications for the COG, as this new mass is fairly centred on the mug mass when the mug is upright, but it could affect the COG more when the mug is in use and tipped.
Leverage
Leverage is a description of the way forces balance in a system where there are three points of contact. The most common example of leverage is a seesaw (teetertotter in the US), with a pivot in the middle and a weight at either end.
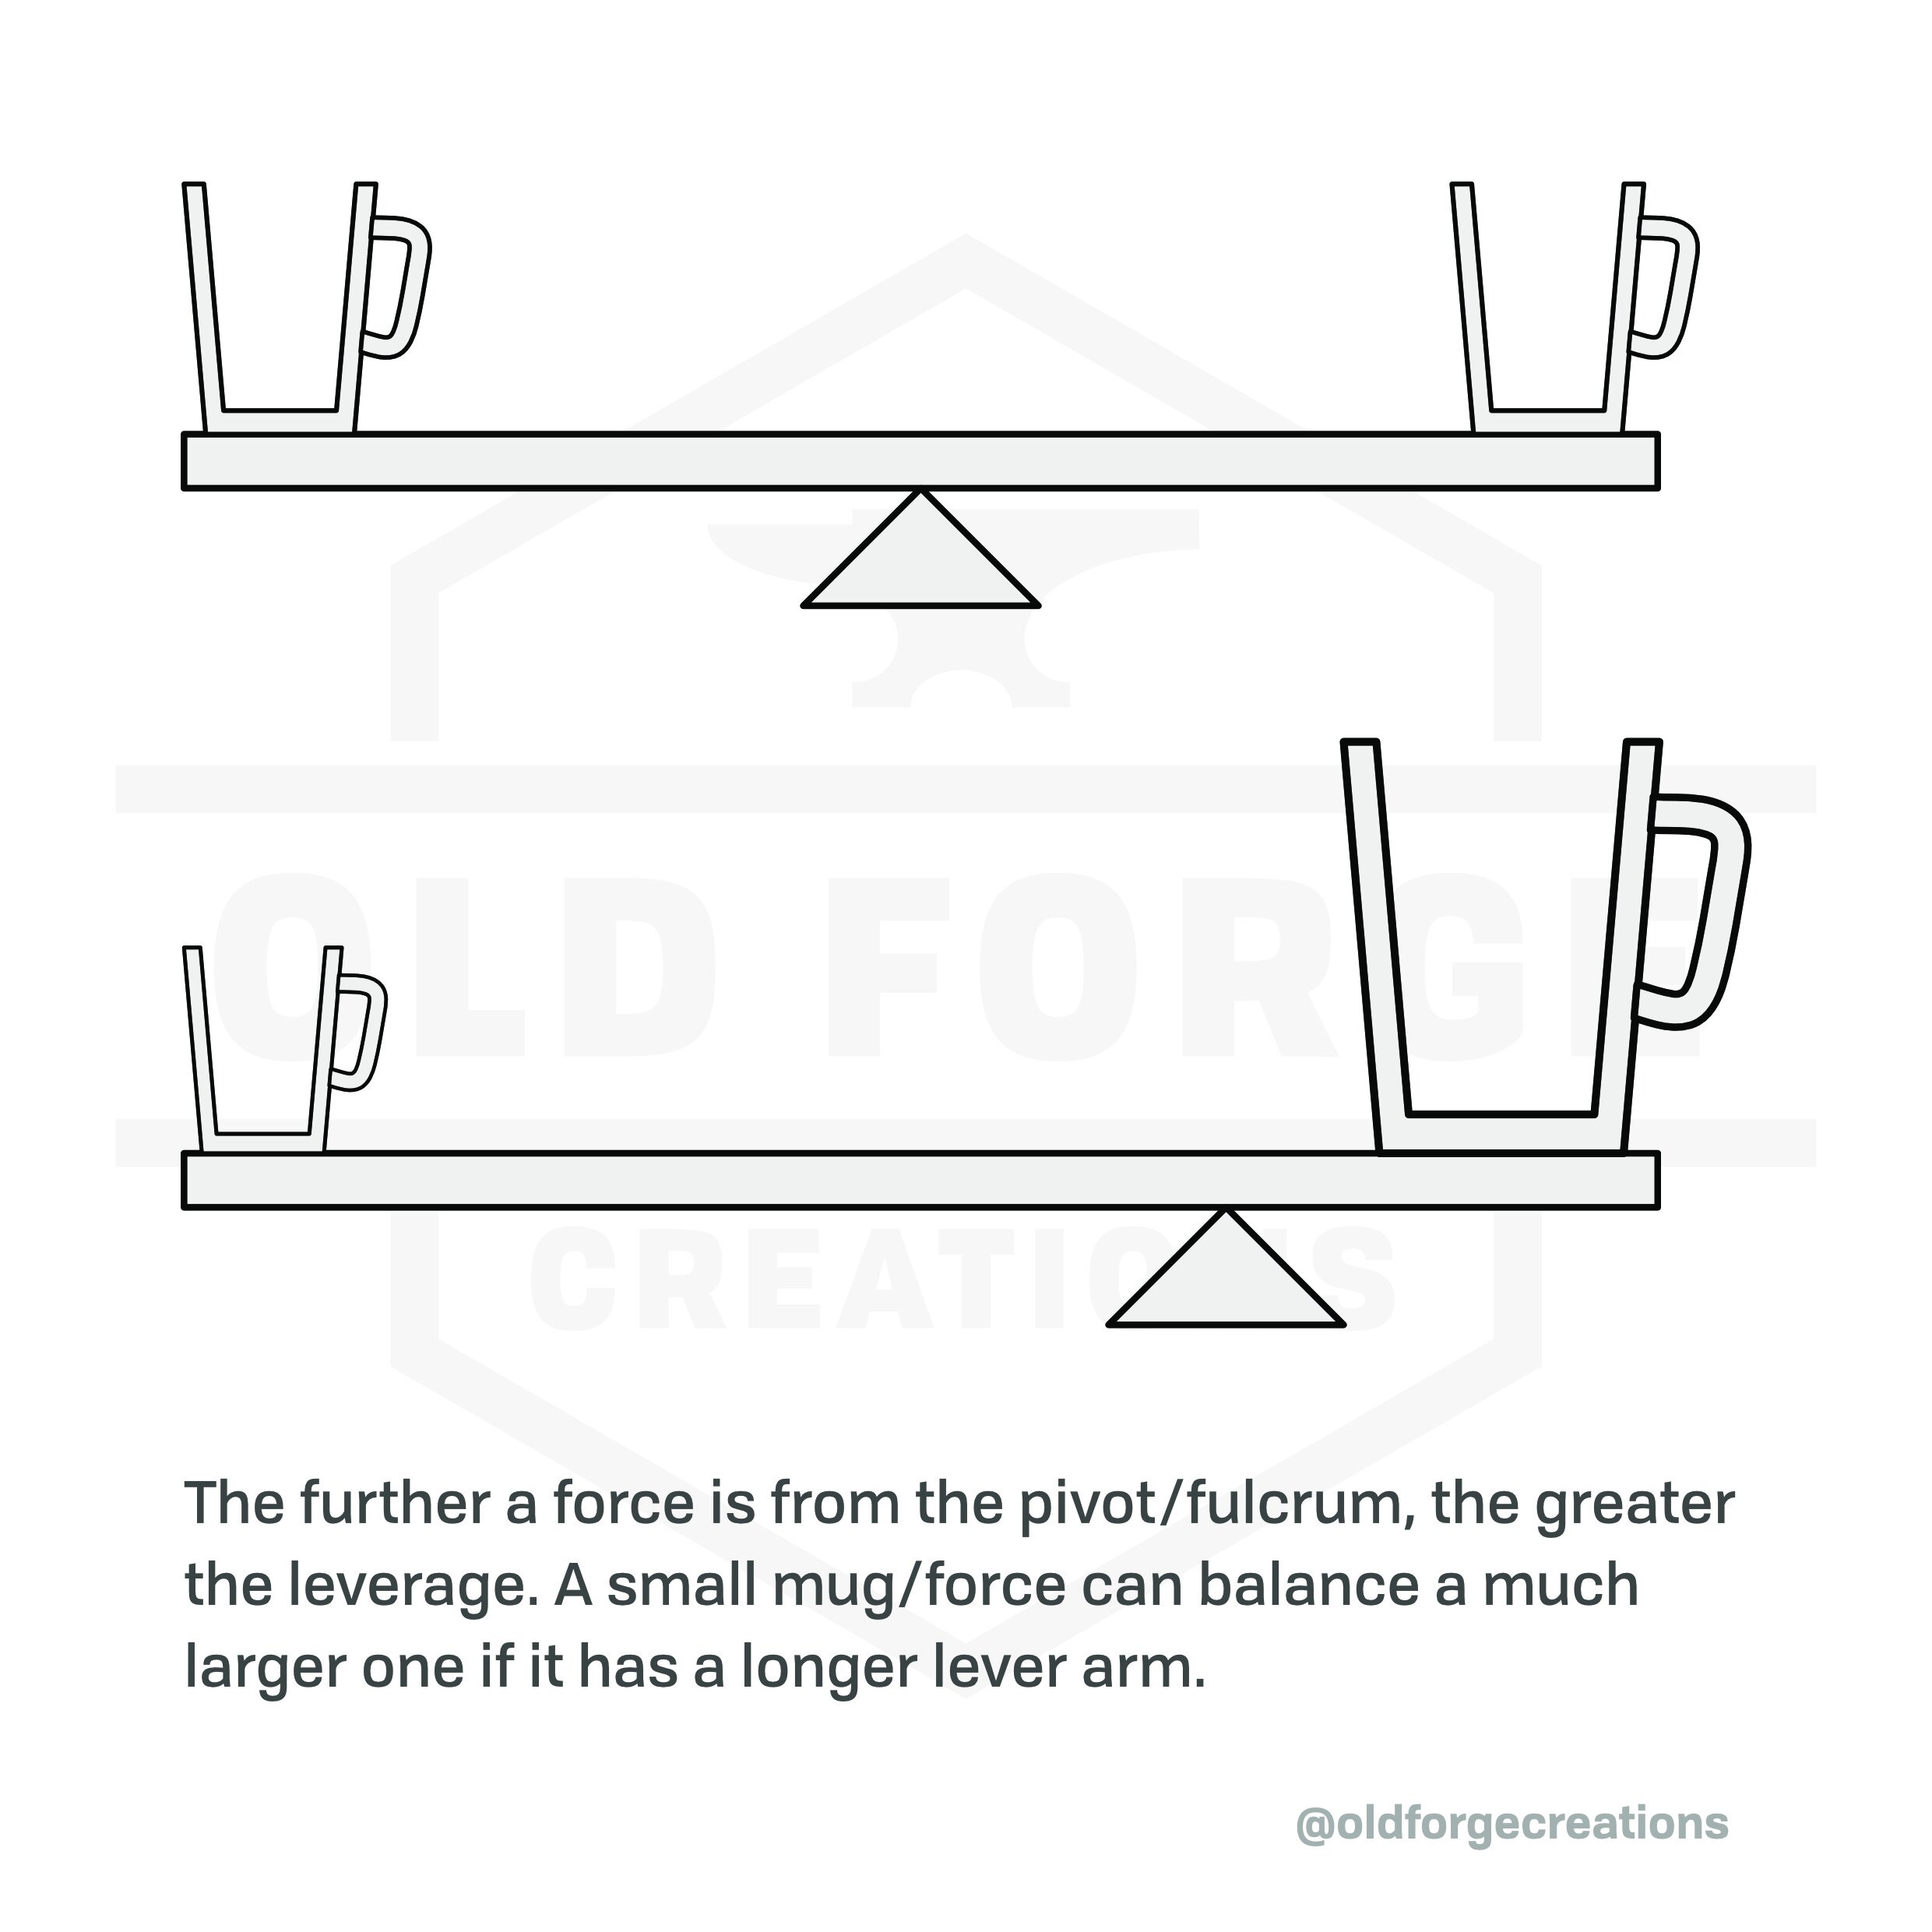
Leverage is a very simple calculation in a balanced system. On either side of a stationary pivot/fulcrum, you have a distance and a force. These multiply together, and both sides balance out. If a hypothetical seesaw had one arm 4x longer than the other, a 20kg toddler could balance an 80kg adult on the shorter arm. The calculation is just force x distance = force x distance (20 x 4 = 80 x 1).
The longer the lever arm, the more leverage that force has, and the greater its effect will be on the other side of the pivot.
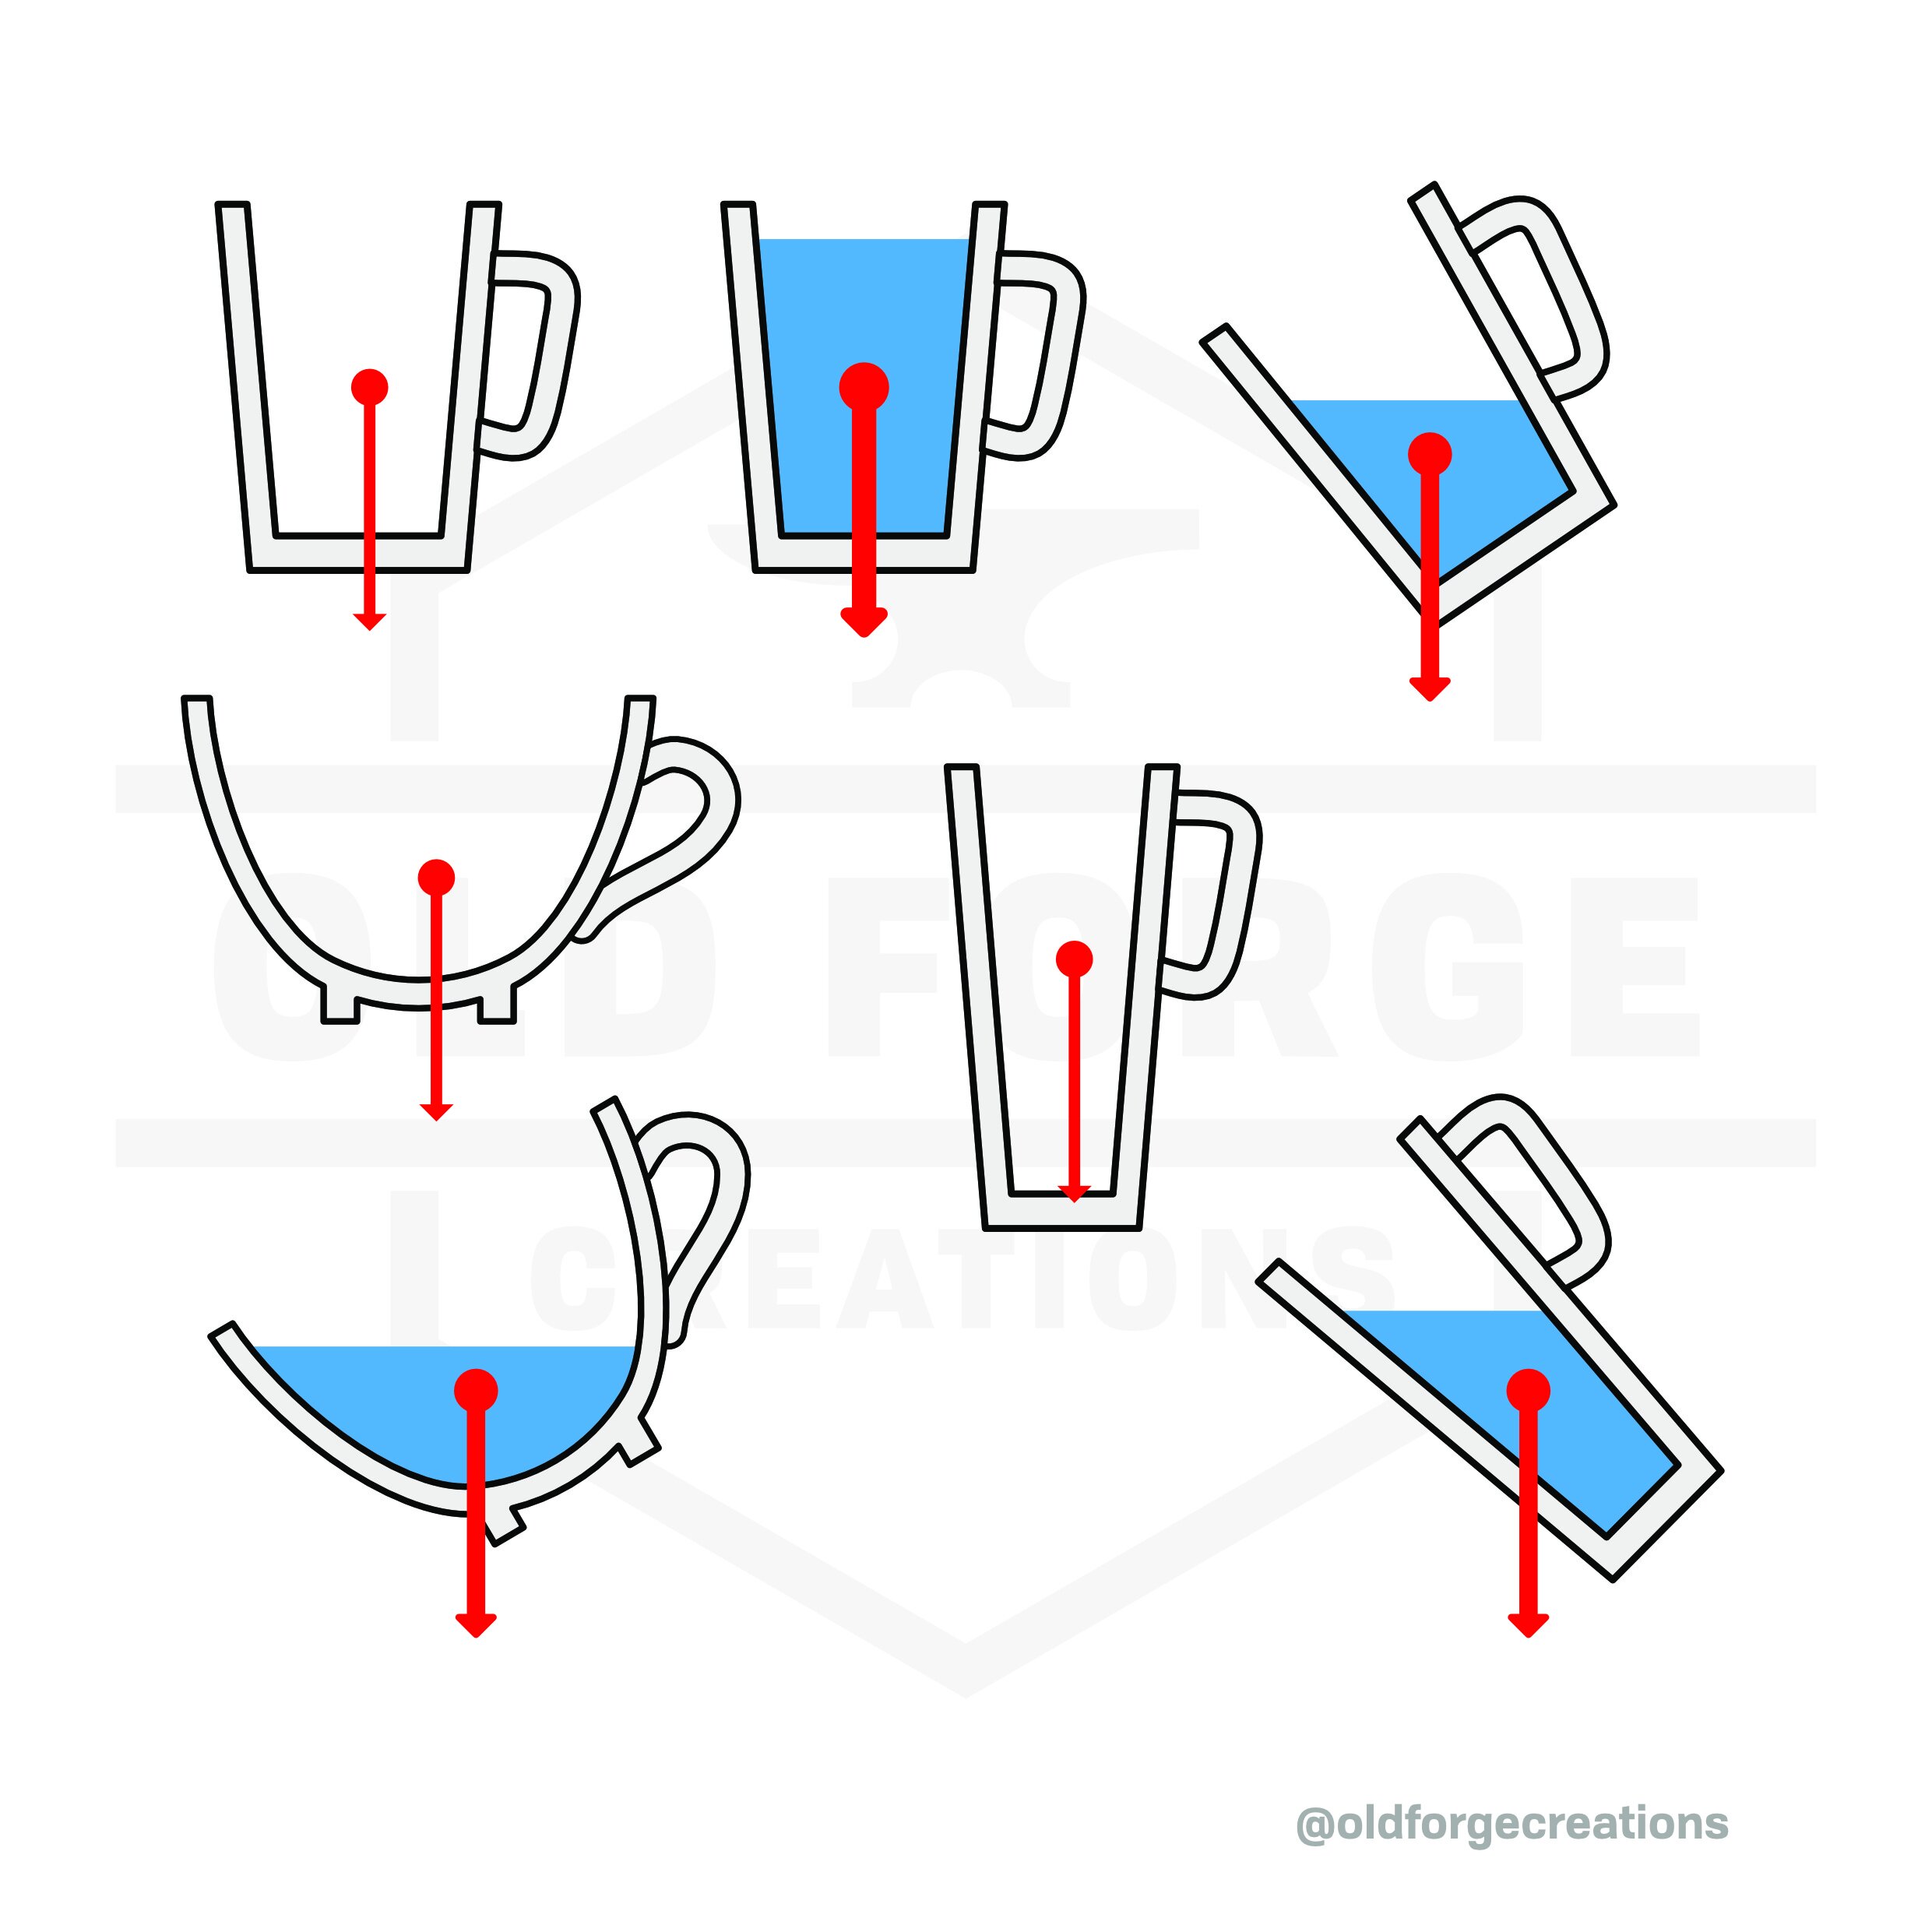
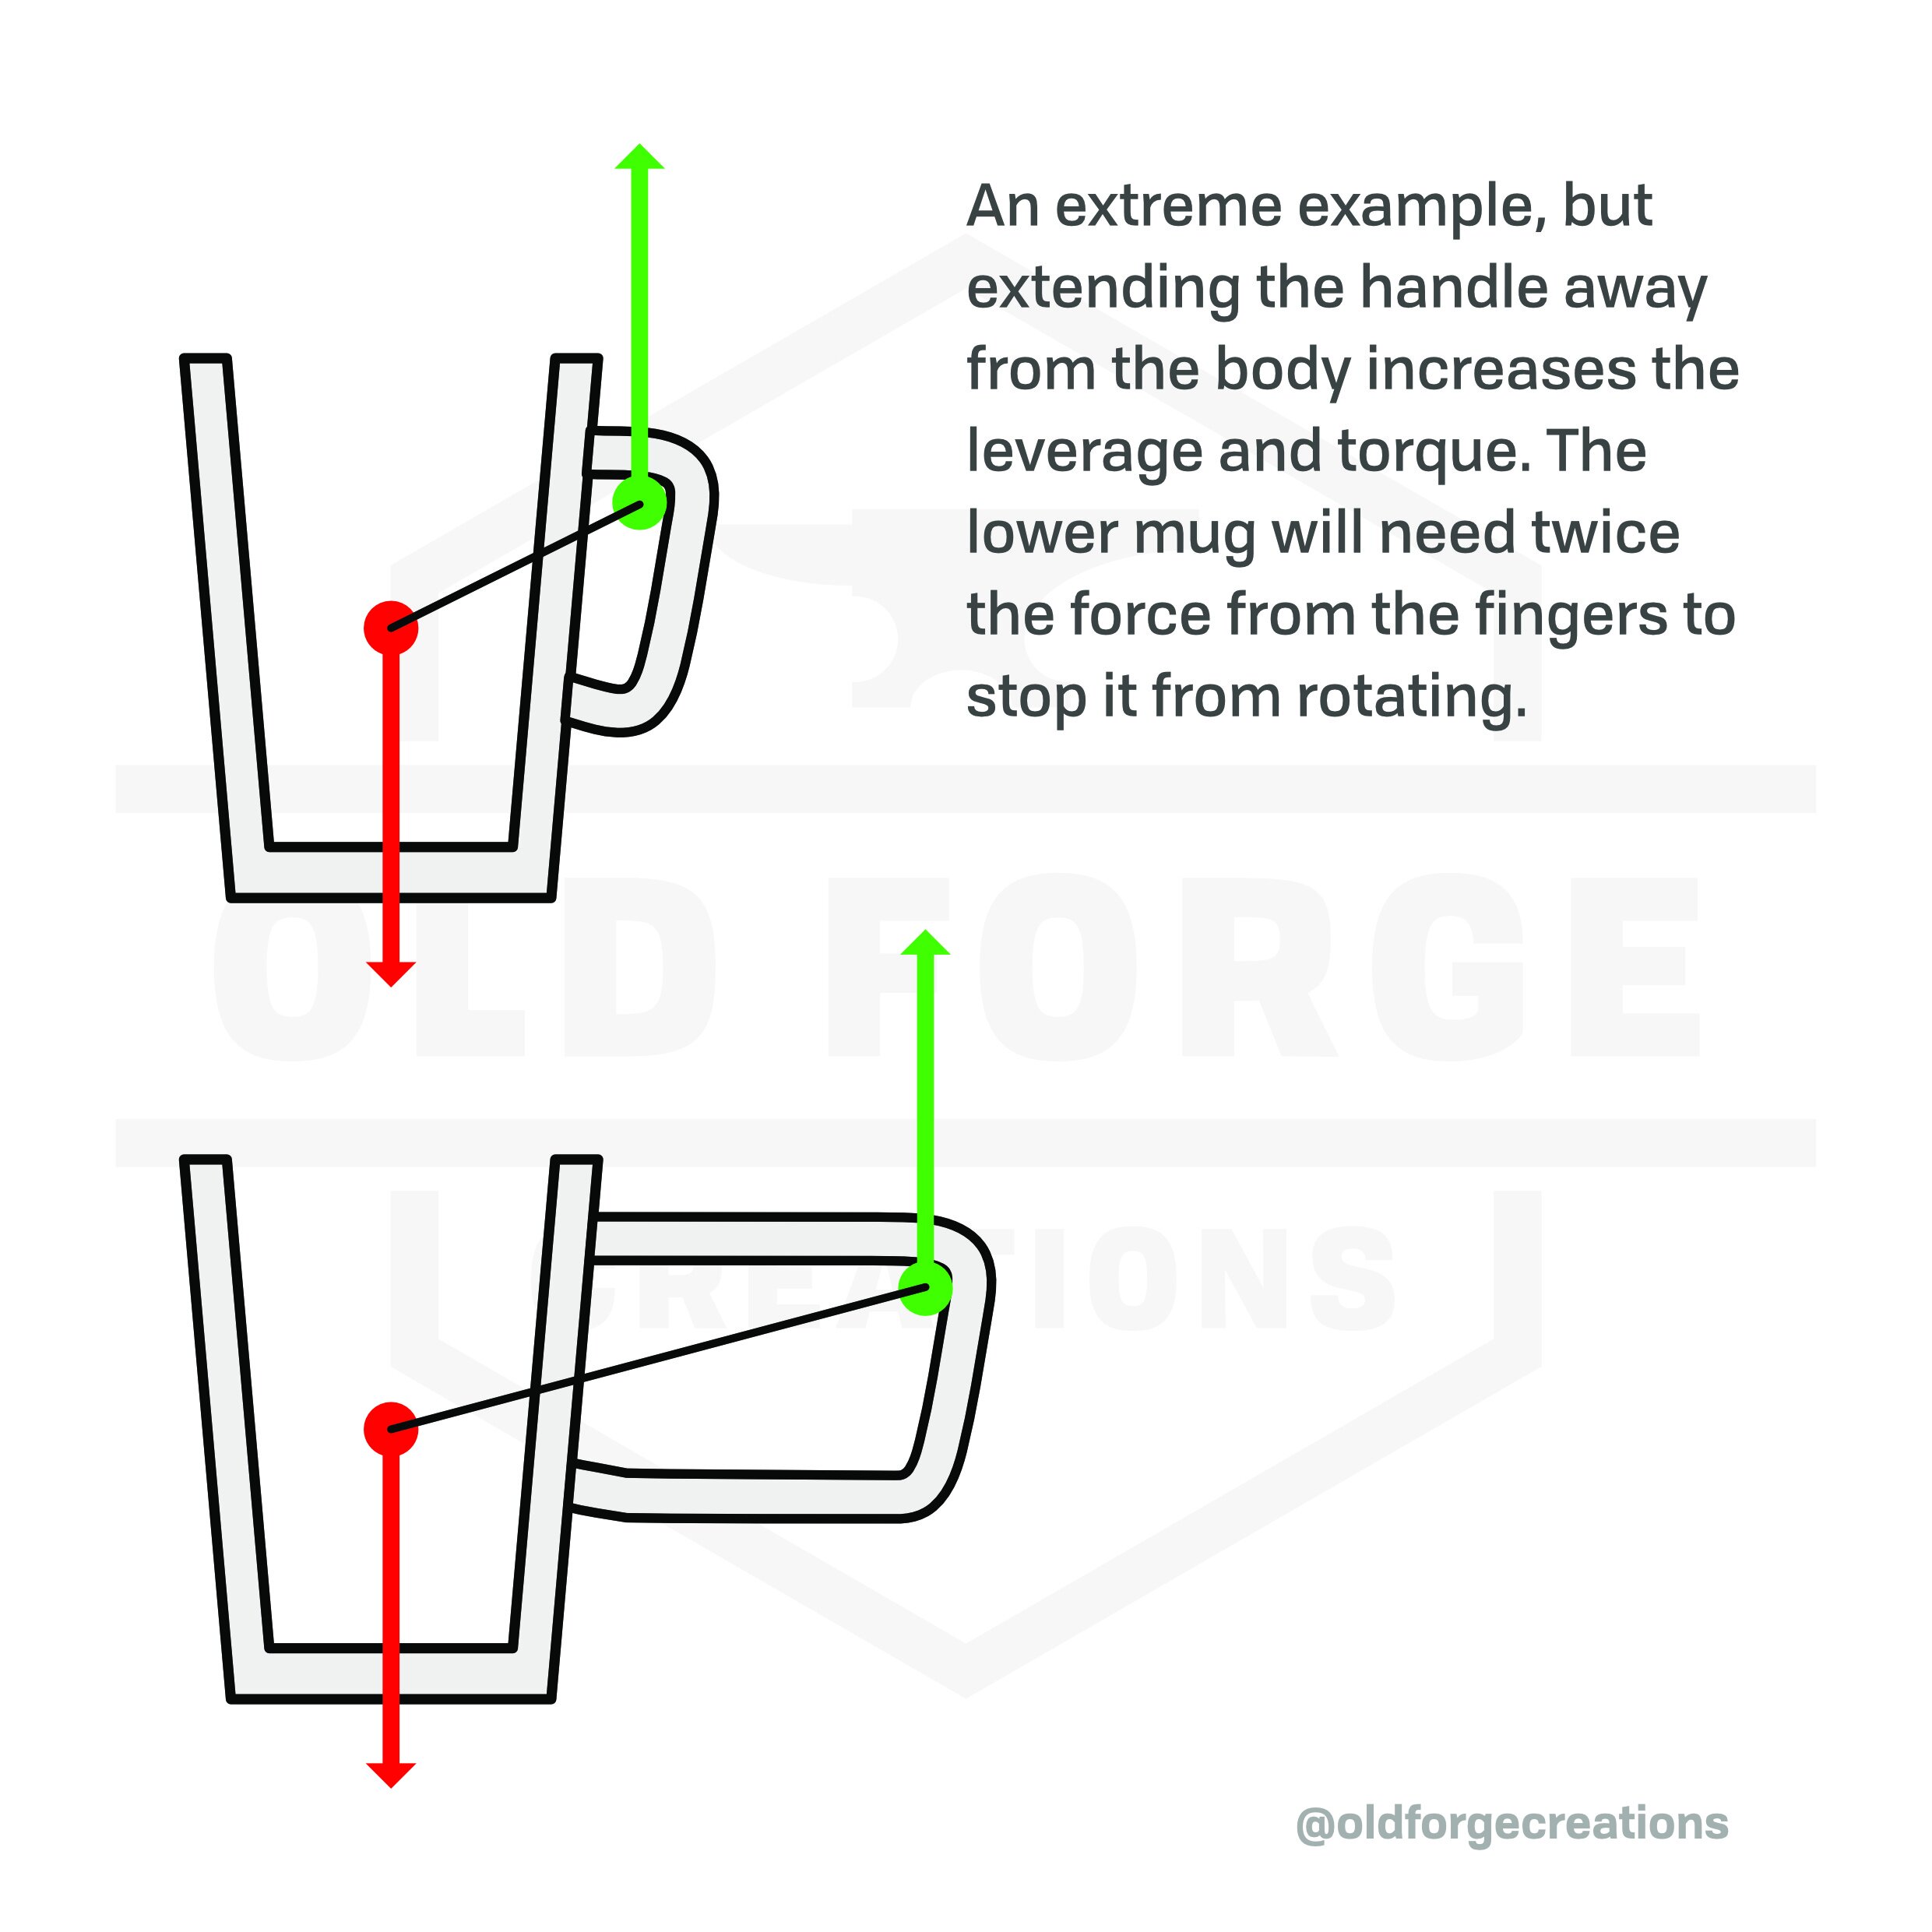
In our case, one force is the weight of the mug and liquid, and the other two points are where the hand has to apply pressure to the handle to stop it from tipping. The distance between these three points determines the relative force required to keep the mug still. It’s a slightly simplistic view, but if you imagine the top finger as the pivot and the lines between the COG and lower finger as a seesaw that’s been bent ~90°, you get a pretty good idea of the forces.

There is potentially 4x more pressure on the fingers in the bottom right example than the bottom left, despite the mug being the same size and weight. In order to balance this greater force, the top finger has to increase the force it applies by the same amount.
With a close two finger grip (the bottom right example), the leverage can be 4x (and that’s a conversional mug design, a wider cup could be even higher). That means for a mug with a mass of 500g, the amount of force that the lower finger is having to apply inwards is the equivalent of 2000g. You can see this in action here, where as the lower contact moves down the handle, the amount of lateral force decreases significantly.
It’s worth taking a moment to consider this. From the perspective of a hand holding a mug, most of the force required to hold the mug stable is to stop it from tipping rather than to support the weight. This is purely leverage, with the hand having to work at both the top point and bottom point of contact to counteract each other and keep the mug still. A handle design with unfavourable leverage can double or more the forces applied to the fingers for the same mug weight.
The forces in the system have to cancel each other out, otherwise the mug would move in one direction or another. The handle design doesn’t change the end result (a stable mug), just the effort require to achieve it.
Torque
Torque is leverage applied to a rotating point. Returning to the example of the seesaw, the torque is the rotational force viewed from the perspective of the pivot. The same logic applies, where a longer arm has more leverage and can apply more force.
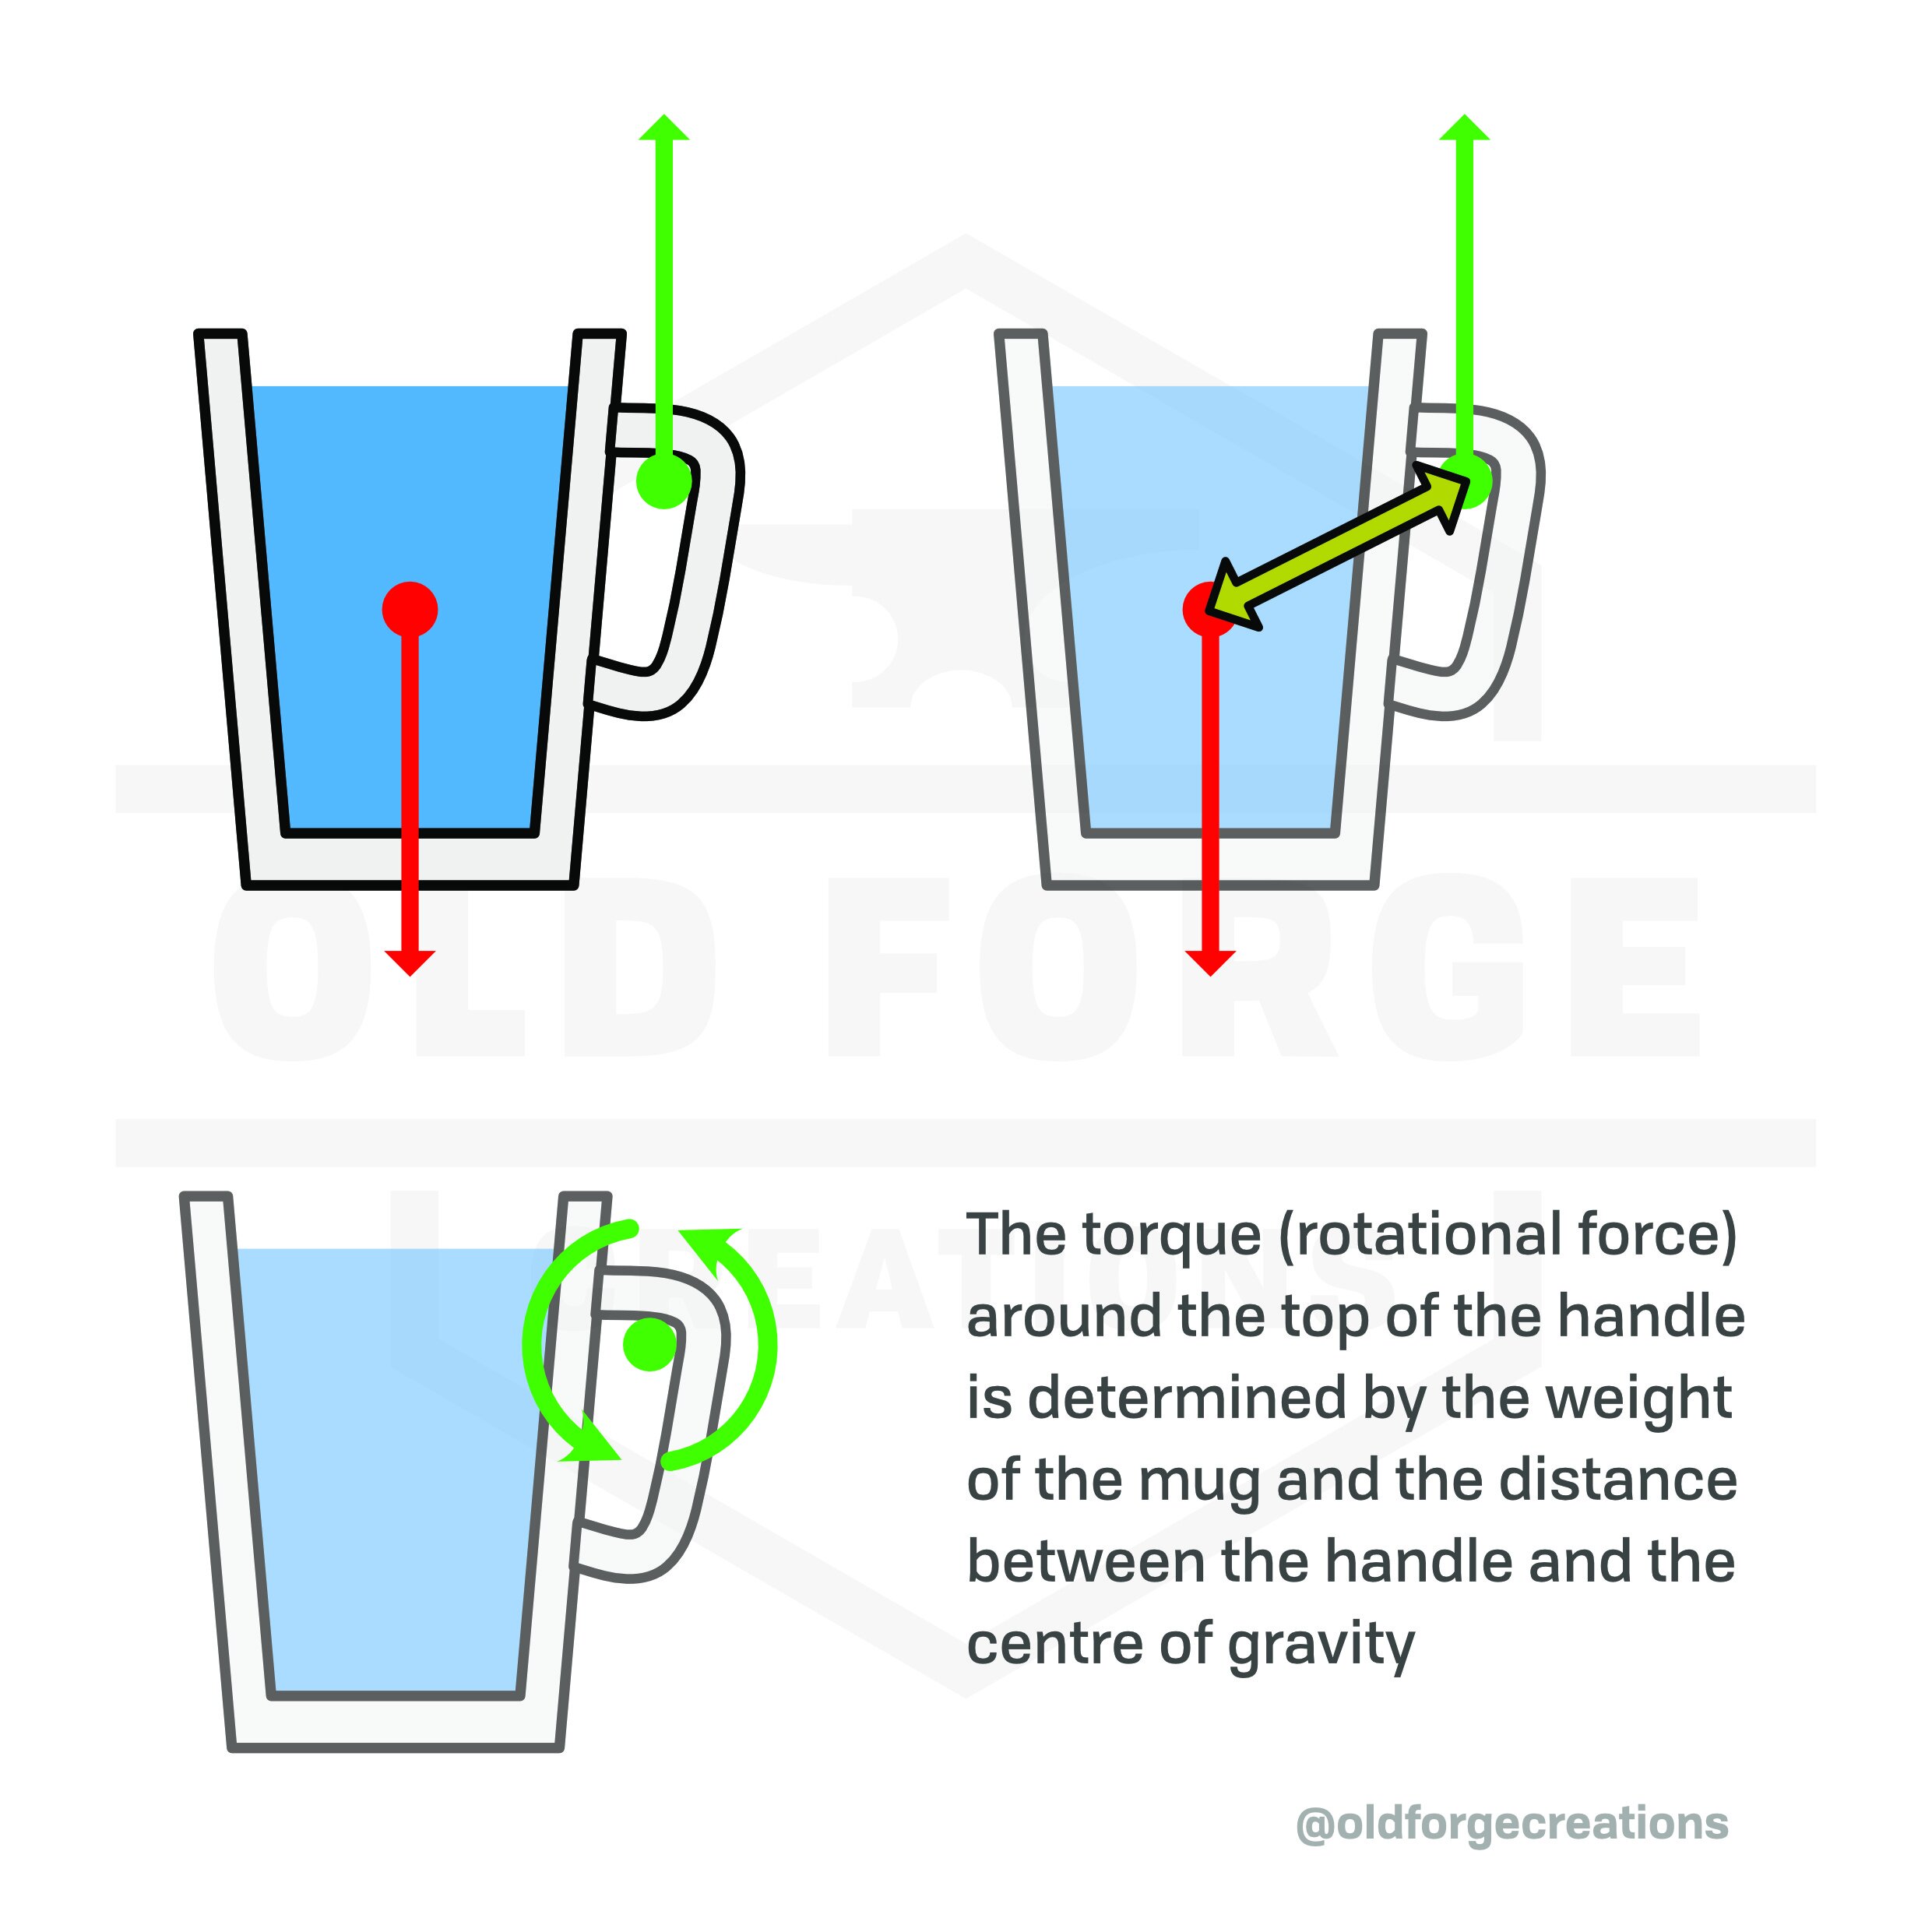
It won’t be a huge difference for most handle designs, but stylistically extended handles can easily double the amount of torque, which doubles the force required to counteract it.
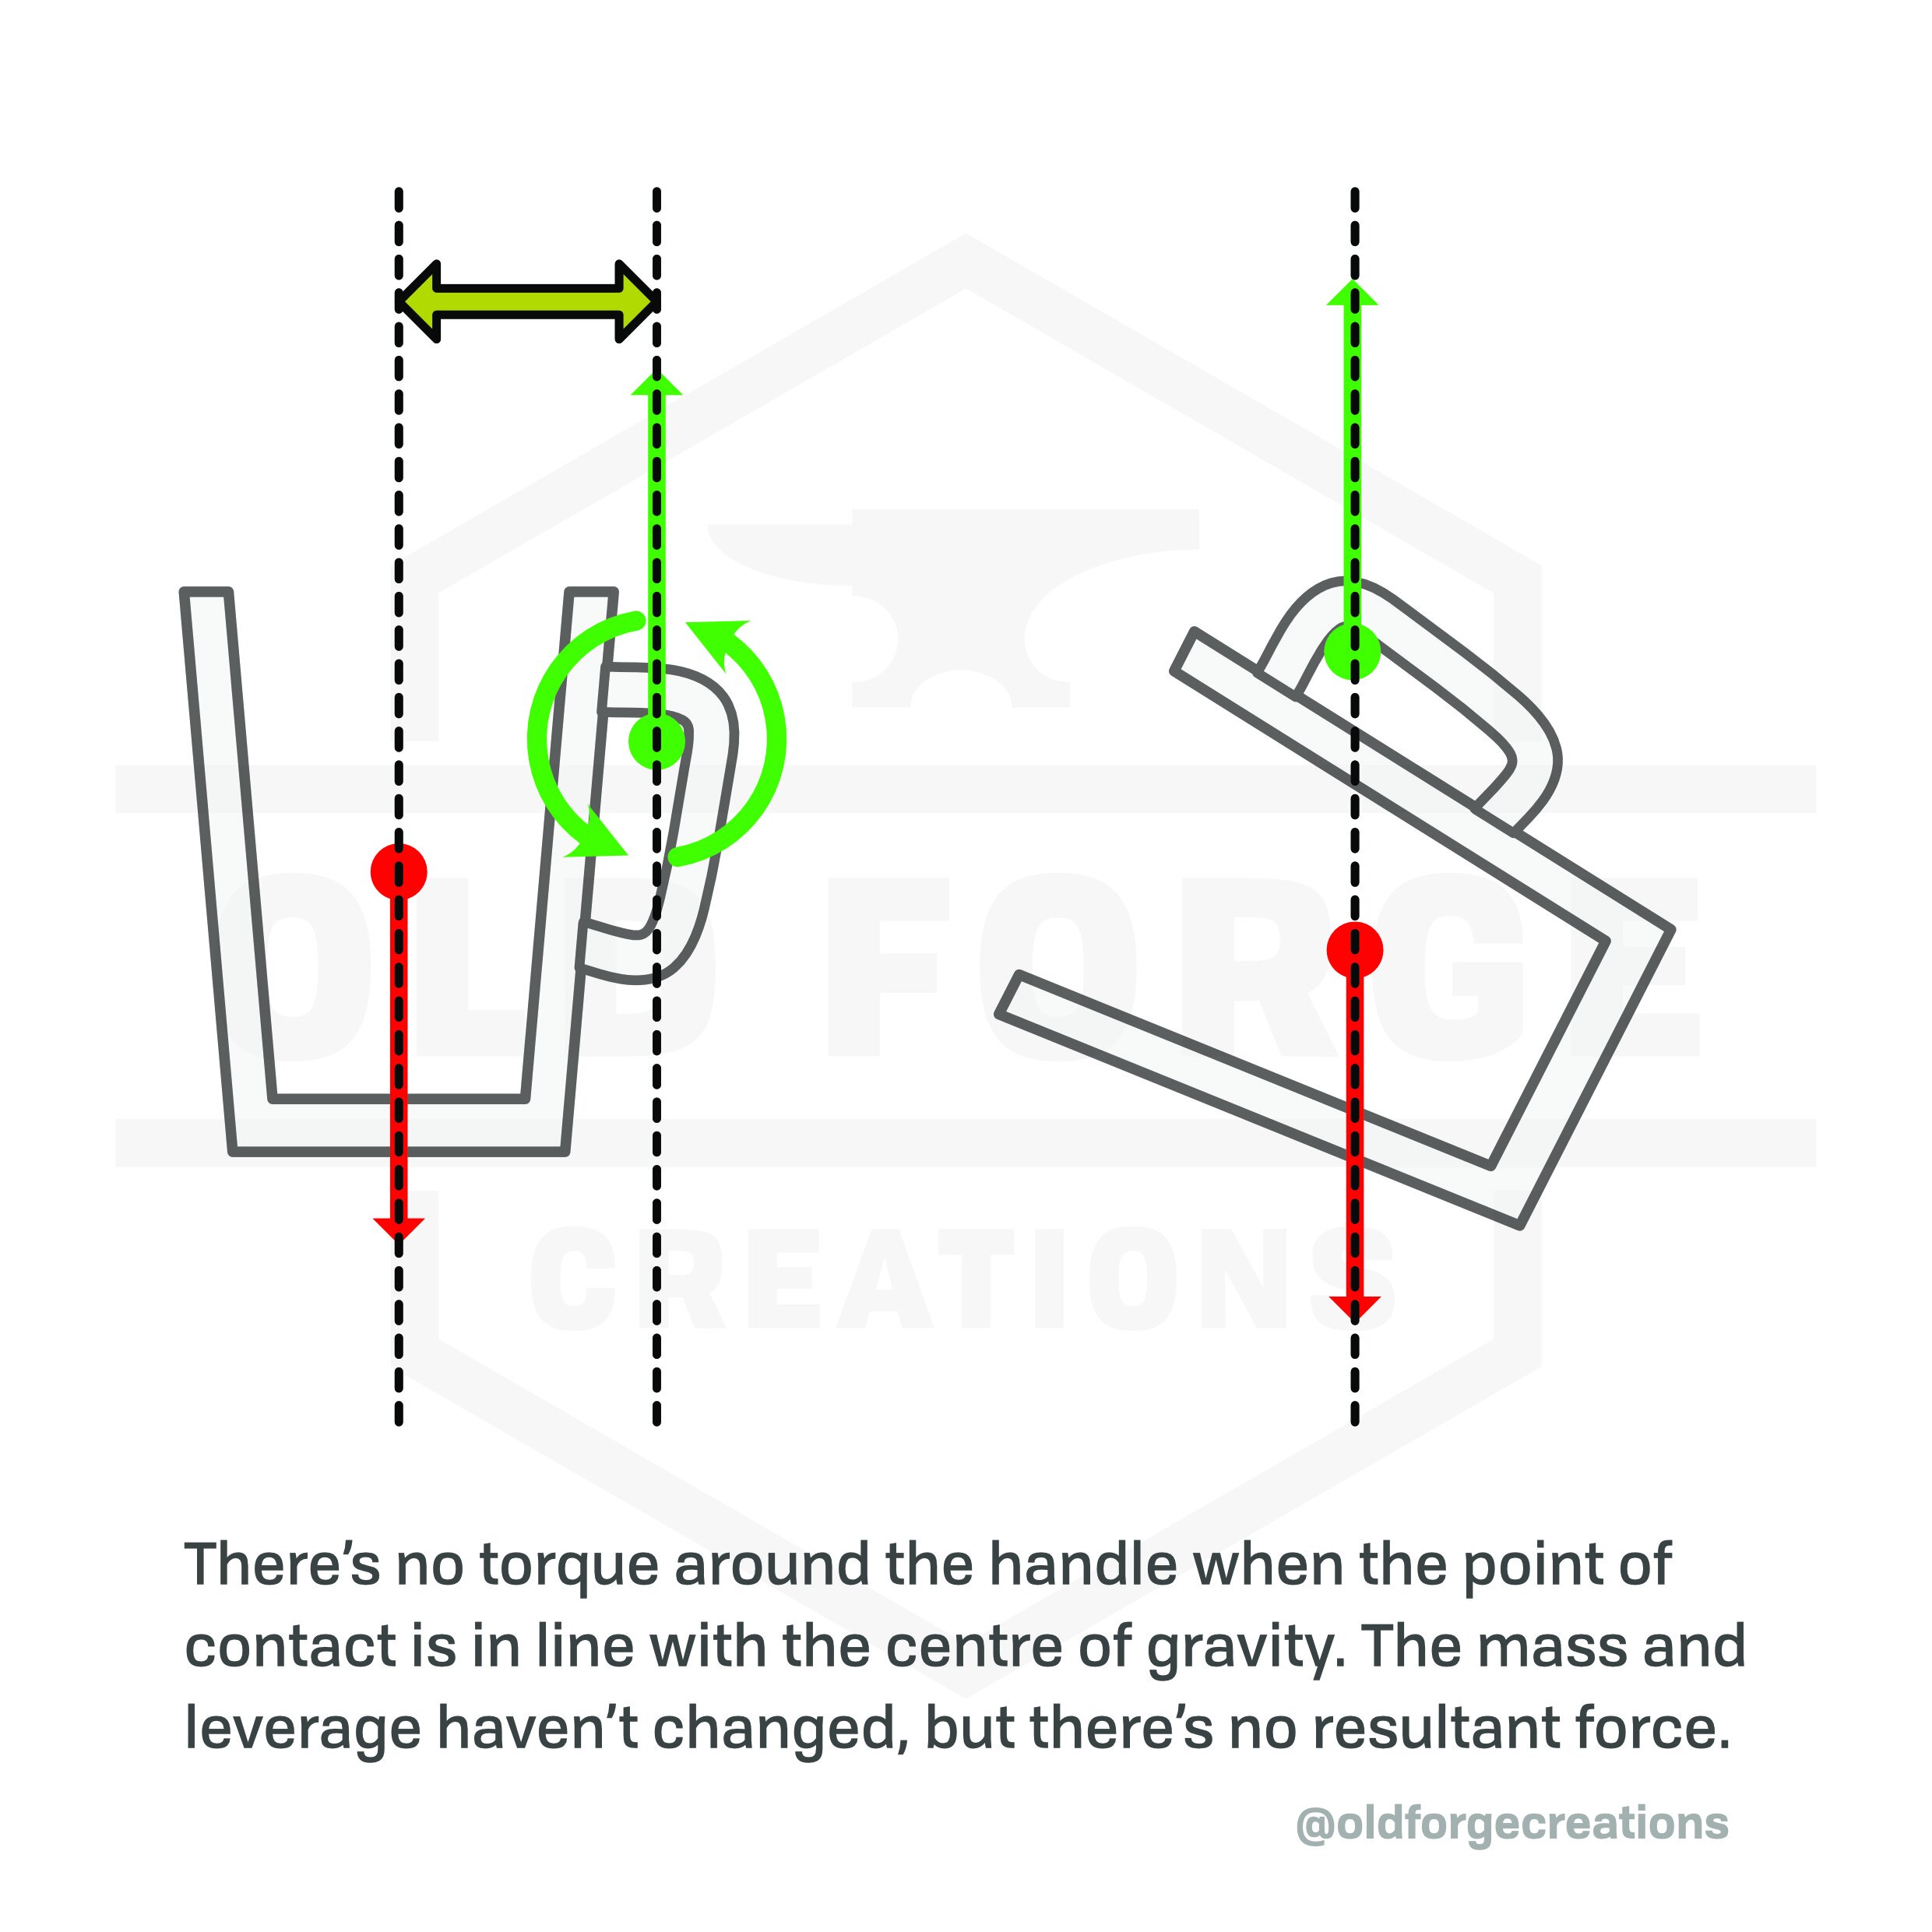
Hanging Out
When a mug is rotating around a single point at the top of the handle, the distance between that point and the centre of gravity determines the leverage. The horizontal distance between them determines the force, meaning if you were to let the mug hang naturally it would reach a point where the COG and pivot were vertically aligned. The lever length hasn’t changed but there’s no resultant force to rotate the mug further.
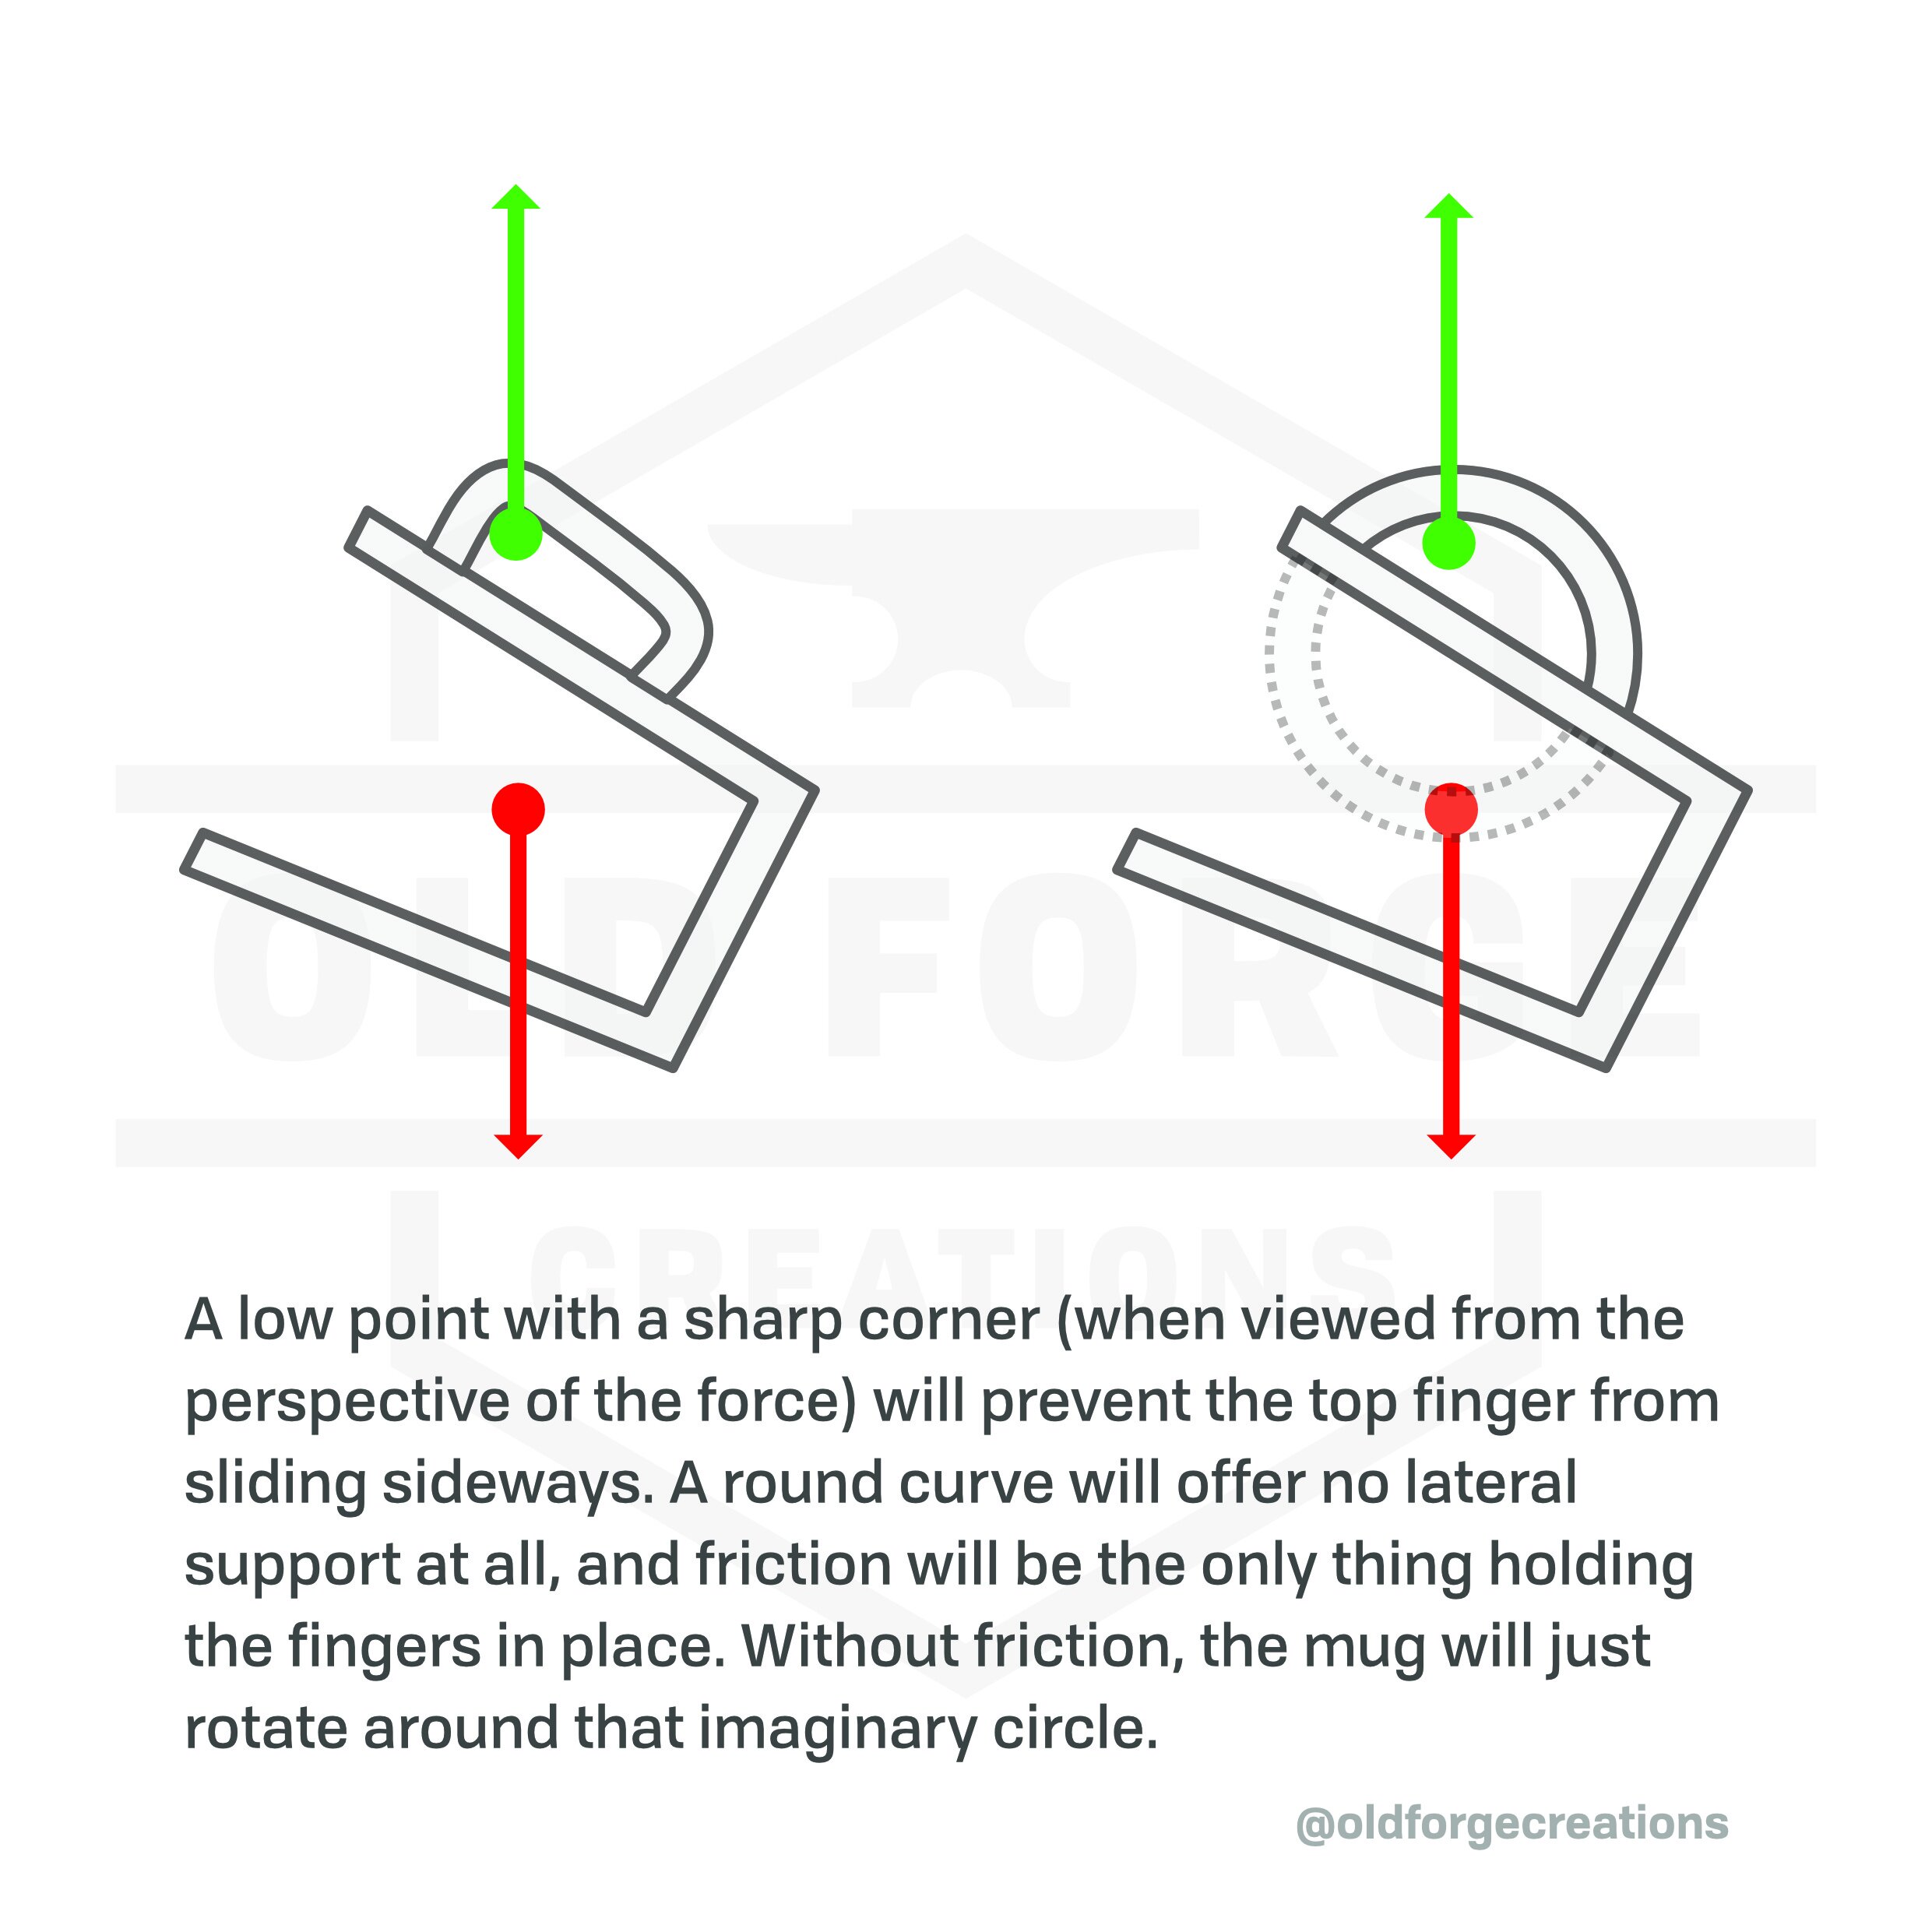
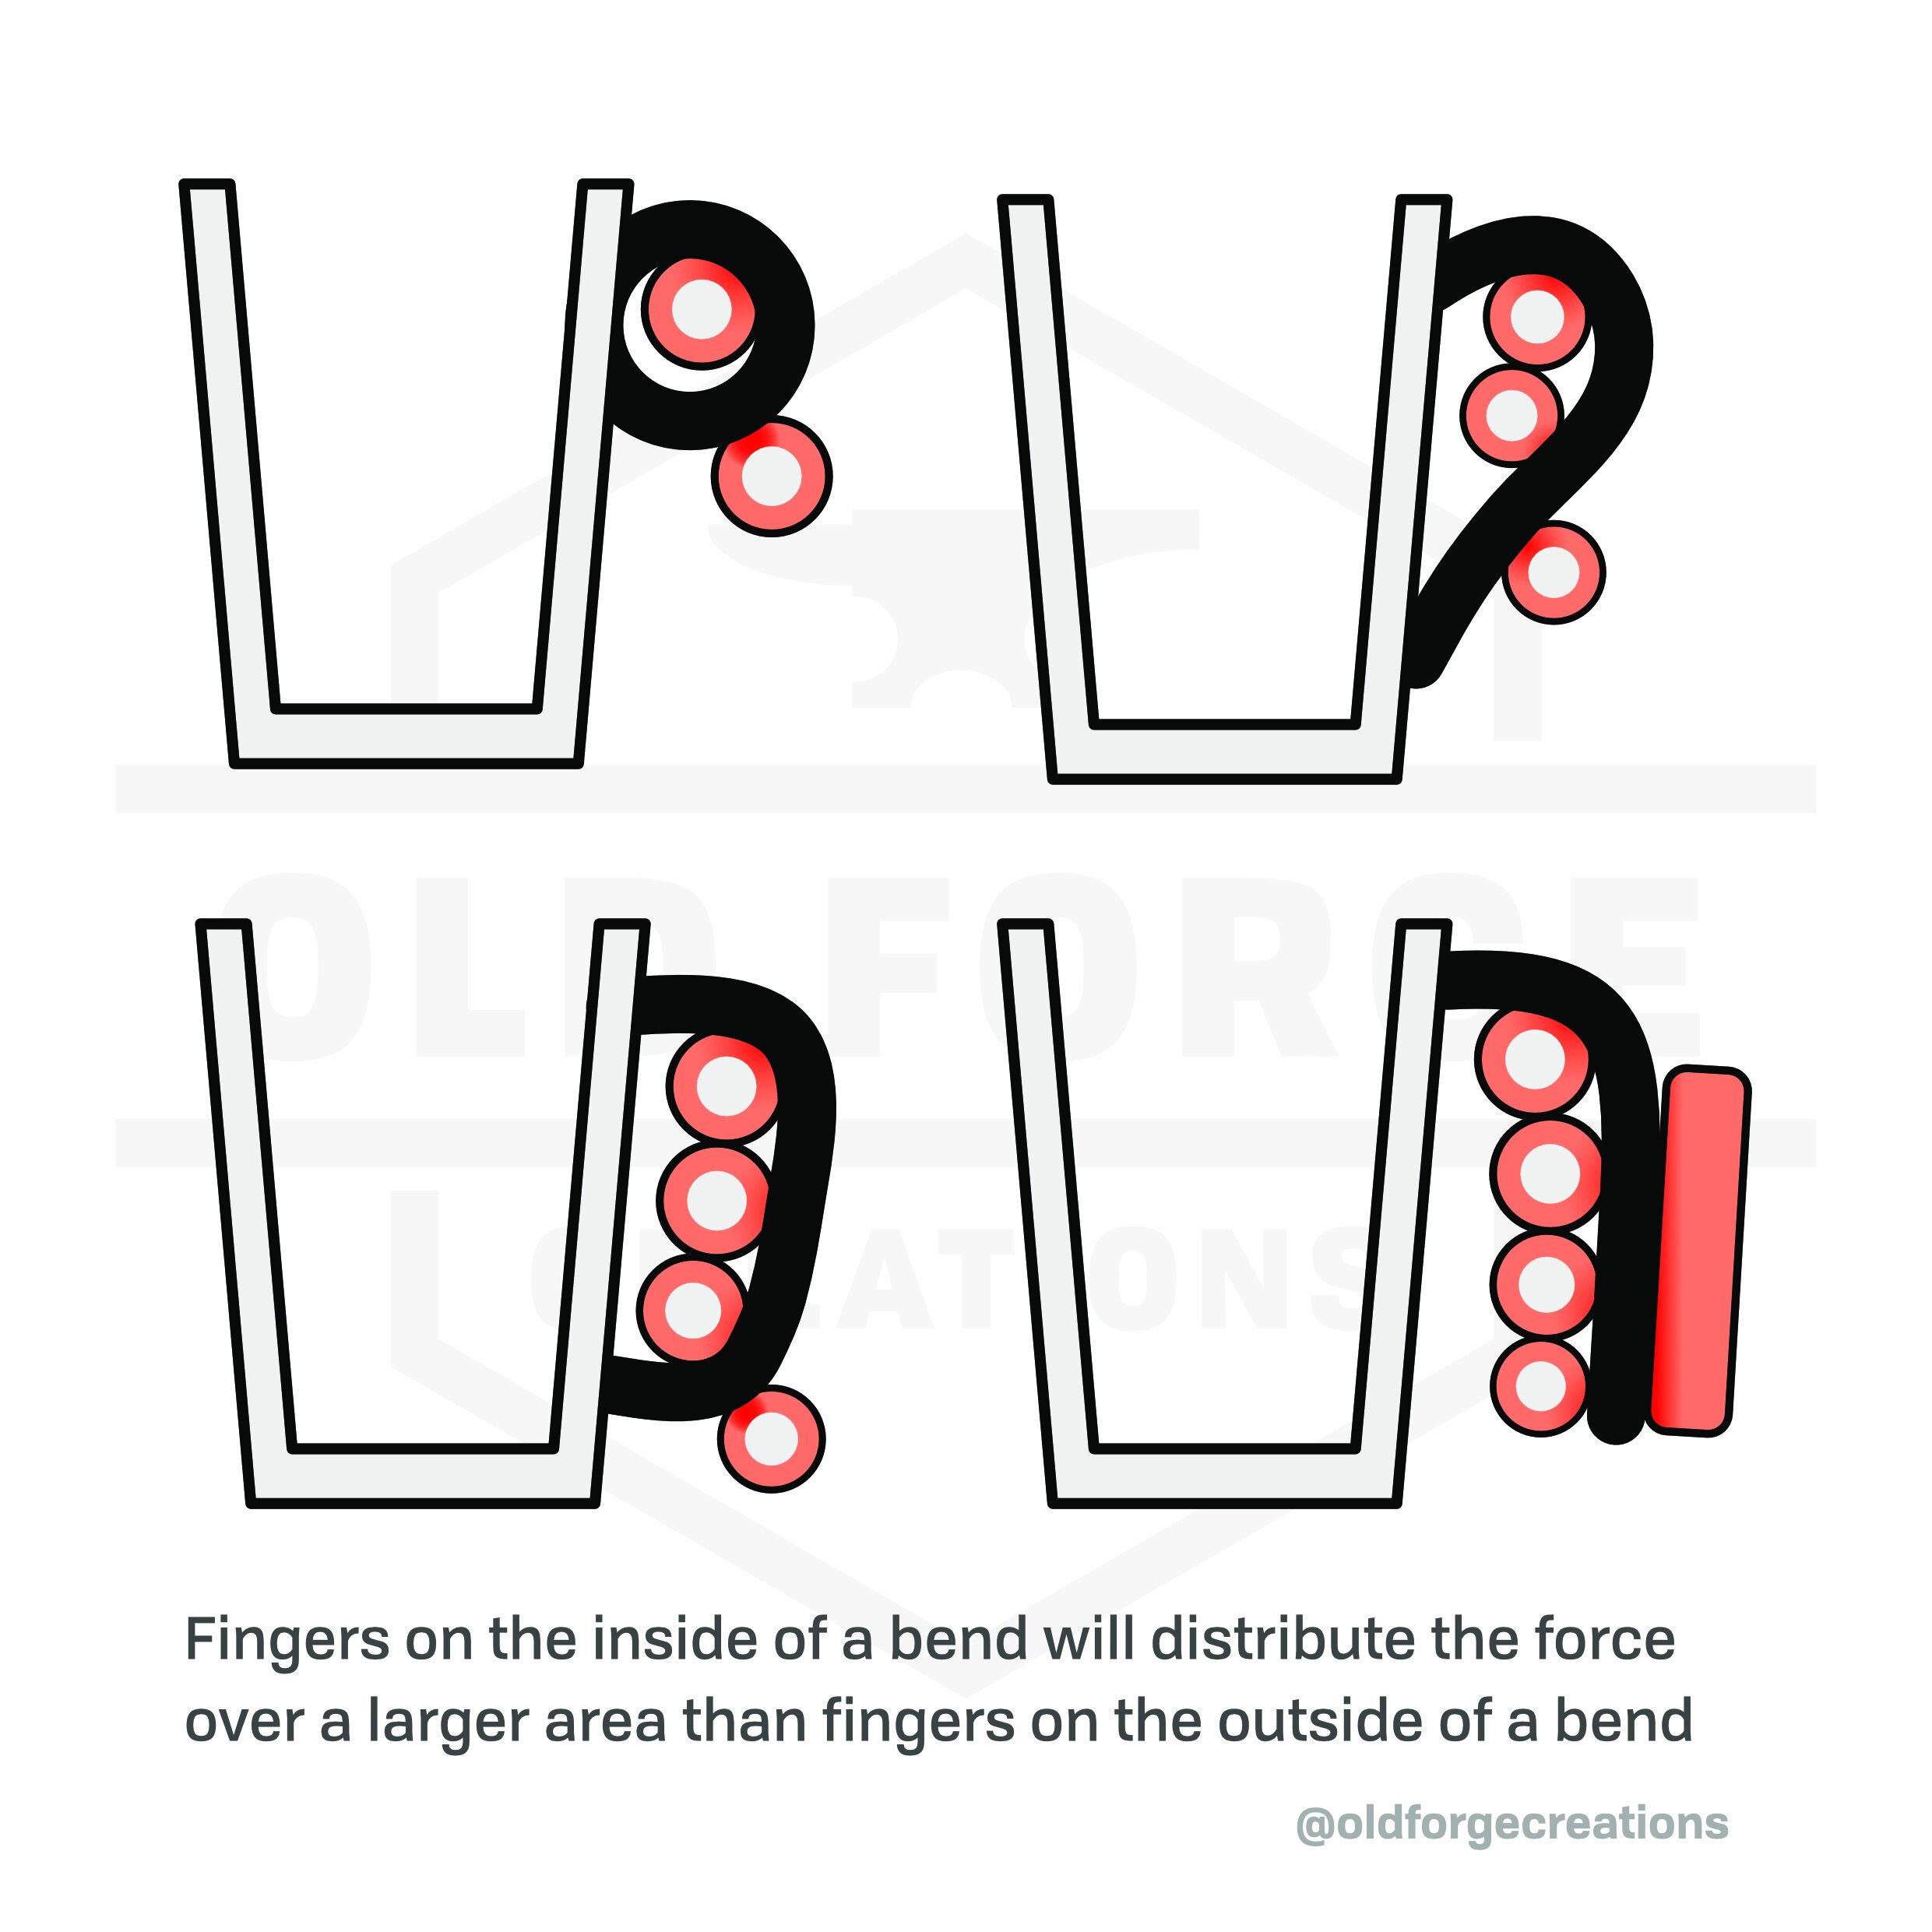
Corners
A handle can have a continuous smooth curve, or defined corners. This isn’t just an aesthetic choice, as these determine whether there’s a fixed point for a finger to sit with a defined surface for the forces to act on, or if the finger placement is variable and those forces can make the hand slide along the handle. If each corner is viewed from the direction of the applied force, the finger will want to sit in the lowest point.
Tilting
When you tip a mug to drink, the distance between the three points (COG, top of the handle, counteracting point) stays the same, but the resulting vector of force from gravity changes angle. That is to say, there is now a component of the force that wants to twist the handle. Gravity still pulls straight down, but the handle is no longer in vertical alignment. This aspect of the force increases as the mug is tipped further, as the handle gets more and more out of alignment.
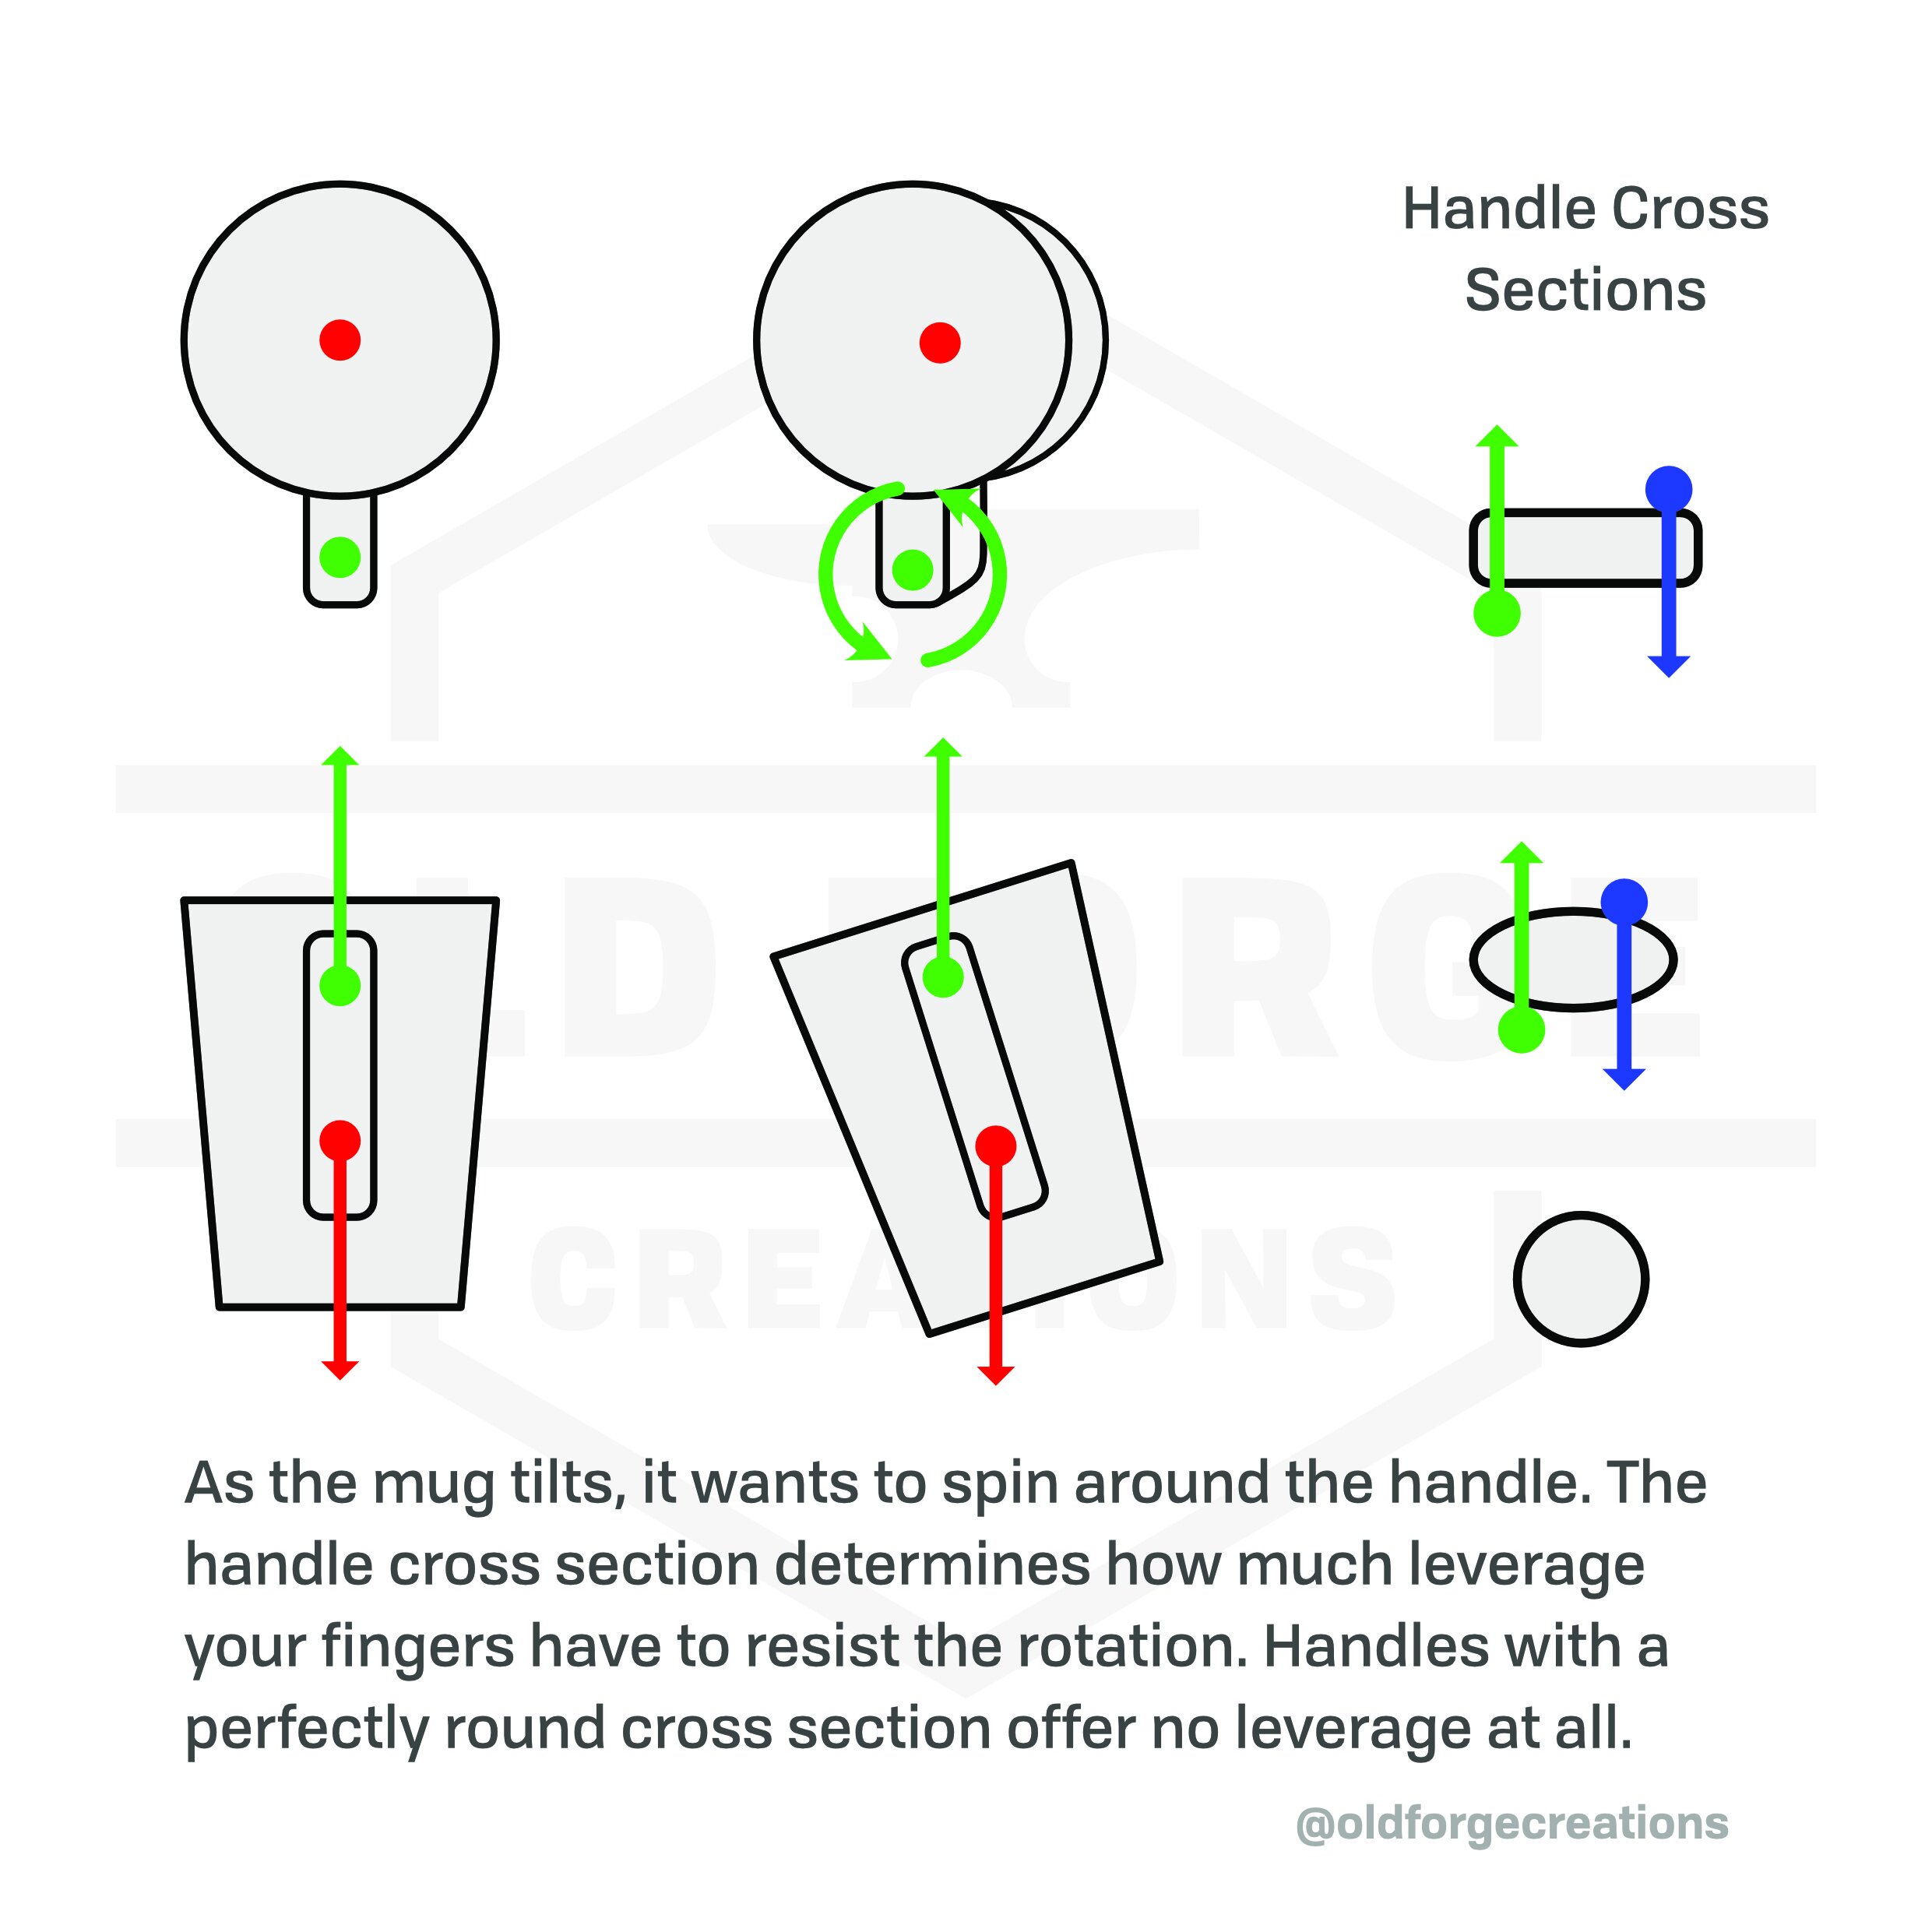
Not a great illustration, but I couldn’t figure out a good way to show the forces here
If this makes no sense (I’m struggling to explain this one well) then hold a mug loosely by the handle, and tip as though you were pouring out of the side. It should naturally start trying to swing.
It will depend where the handle is relative to the axis of rotation, but generally the handle would be at around 90 degrees to the rotation. That is, if the handle was 12 o’clock, most people are drinking from the lip around 3 or 9 o’clock. If you were to drink from 6 o’clock, there would be no twisting force (this is where the mug naturally ends up if you don’t stop it twisting) and the mug will be more comfortable to hold. If you prefer drinking from the side of the mug opposite the handle, this might be an unconscious factor in that.
The effort required to resist this additional rotation is largely determined by the handle cross section. A wider handle will give your grip a degree of leverage, whereas a handle with an entirely round handle will give no leverage whatsoever and relies entirely on friction.
The thumb can also be used to resist this rotation. It can help from just gripping the top of the handle, but will get far more leverage if placed on the rim an inch or so from the handle attachment.
Friction
Friction is the extent to which two touching surfaces resist movement. It’s affected by many factors such as surface quality (glossy, matte, unglazed, etc), contact area, lubrication (wet or moisturised hands, for example) and more.
Some handle designs can function well with no friction, other handles rely entirely on friction. You’ll know the difference if you’d ever picked them up with slippery hands! In general, the more angular a handle design is (in overall shape and in cross section) the less it relies on friction to function.
Pressure
The way in which all these forces are distributed across the fingers will change the amount of discomfort they cause. Different handles will focus the force on a smaller or larger surface area. This compresses the soft tissue of the fingers between the handle and the bones. The extent to which that is felt as discomfort will depend on the weight of the mug, the surface area of contact, the shape of the handle, and the hand holding the mug.
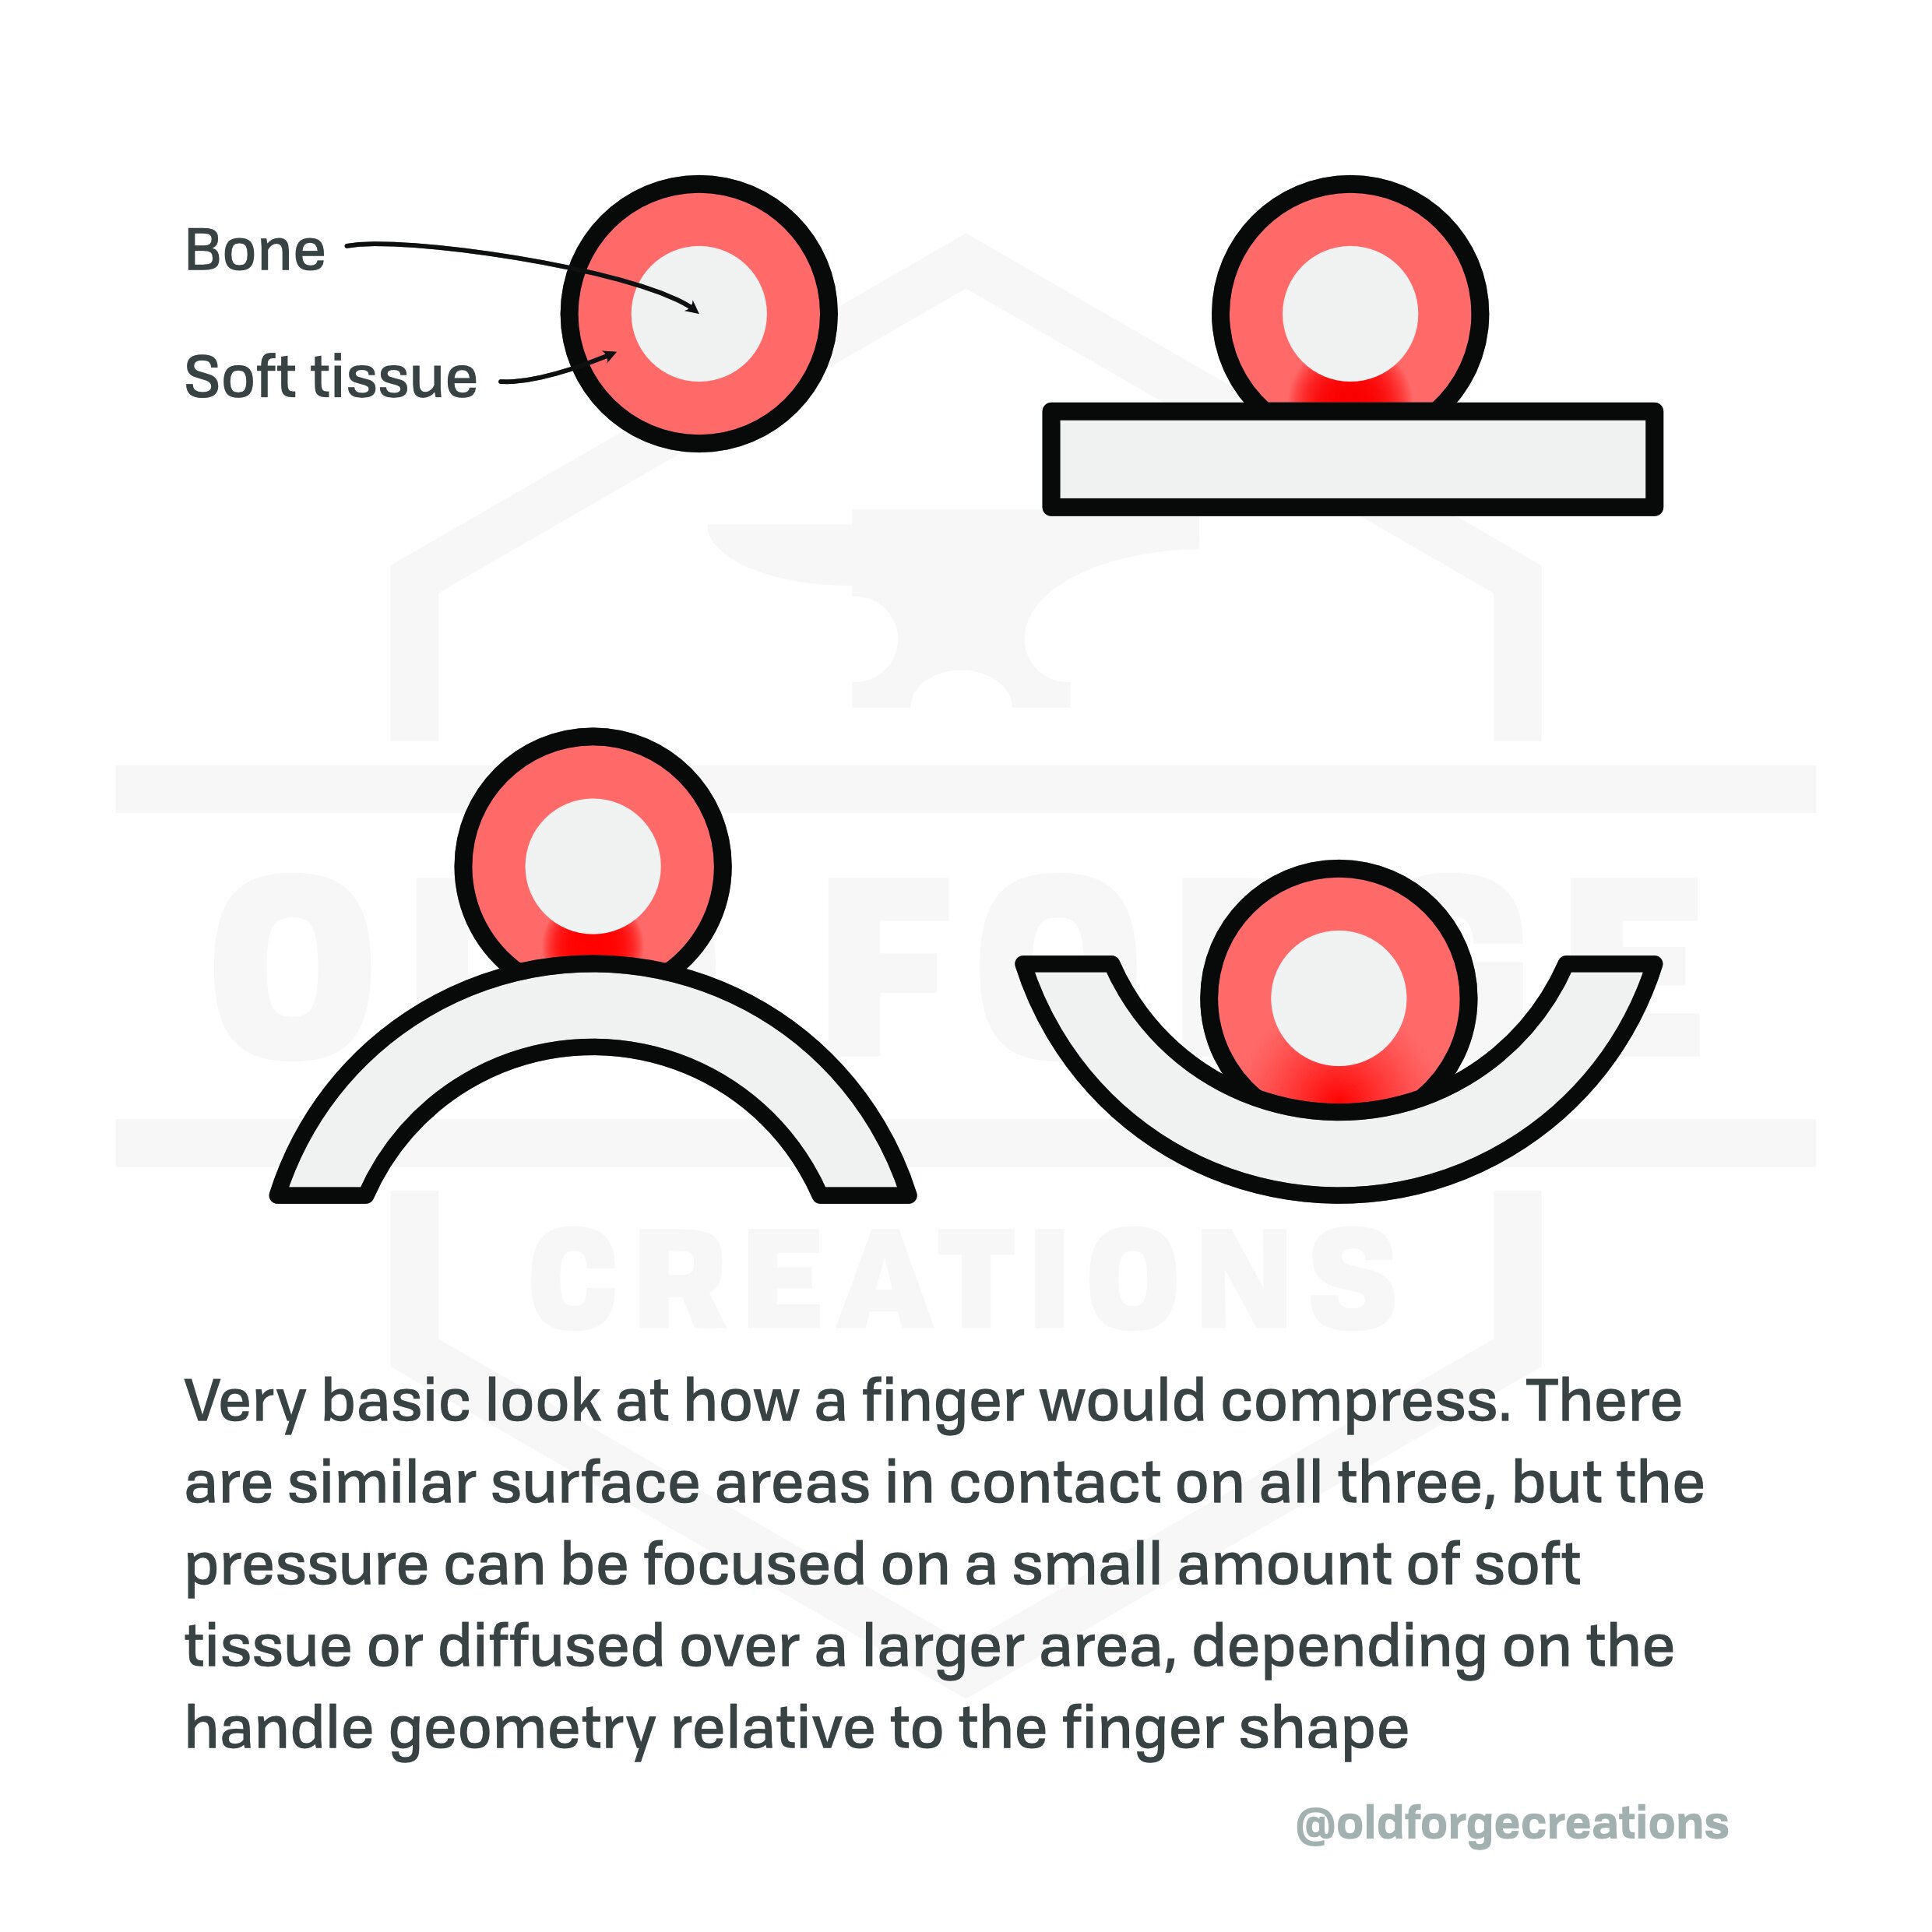
The point here is that it’s not exactly down to surface area of contact. The two will likely be closely related, but the more a handle pinches a small amount of tissue against the bone the less comfortable it will be. This will show in sharp bends, added surface design that is raised enough to noticeably focus pressure, and handles with a round cross section (imagine two cylinders touching at 90 degrees, the point of contact between the two curves is tiny).
If you’ve ever held a mug where the handle felt like it was cutting into you, this was likely a large part of why that was.
Additional Force
This is all in addition to supporting the weight of the mug and its contents. There’s a given amount of effort required just to hold the physical mass. There is a second amount of effort required to control the movement of the mug. The handle design can’t do anything about the first part, but can drastically change the comfort or difficulty of use.
Hand Sizes
This is a huge variable in any handle design (and makes it impossible to have a single perfect handle). There is plenty of very specific ergonomic information available but the research is usually answering a specific question that limits the sample group to a small subset of the population, so it’s been hard to get data that I think is universally applicable.
However, from what I’ve seen this seems like a reasonable estimate of the size range:
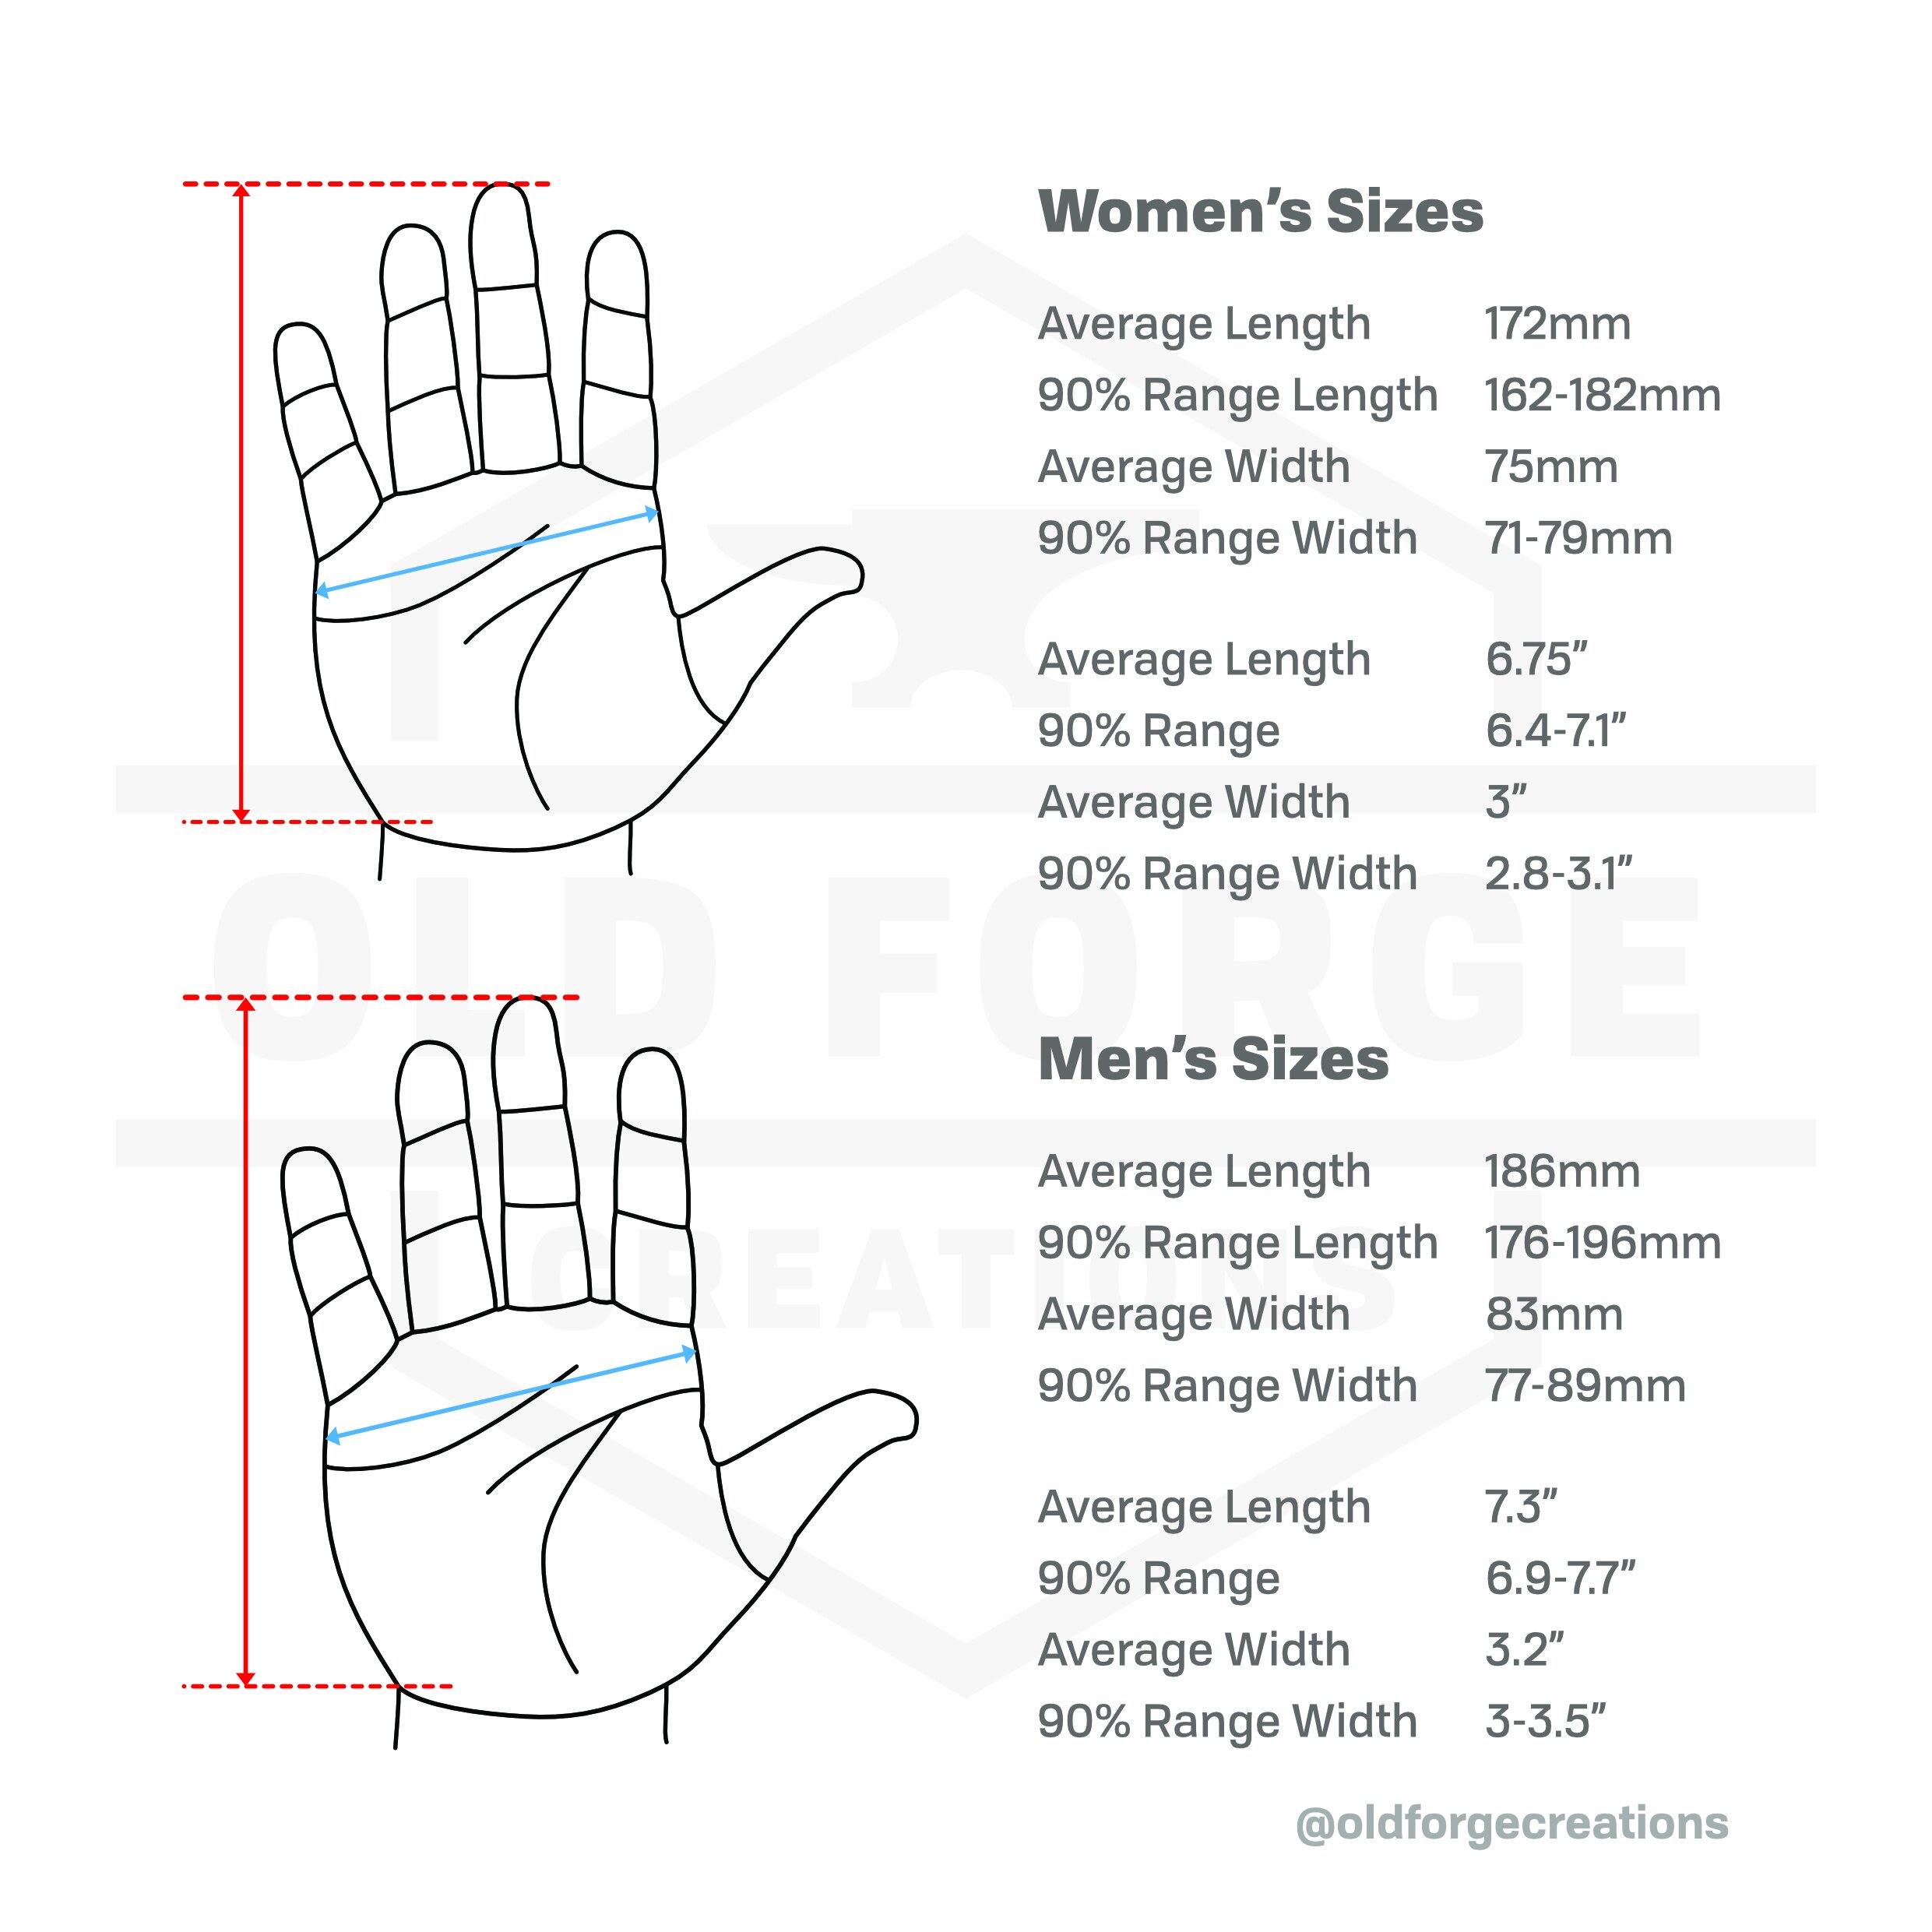


This is more detail than we need, and there are many more dimensions of hand measurement available. What I really want to establish was a reasonable range of overall hand sizes, and finger widths at the point of contact with the handle. I feel these numbers should be sufficient to do that. The gendered way of looking at the data is a choice the researchers made, but the data could be thought of as Smaller Hands vs Larger Hands if you find that preferable.
The Best Handle
The following will be my theories about what makes a handle more or less comfortable. This is all based on my preference, how I use a handle, etc. If it doesn’t align with the handles you make or like to use, that’s absolutely fine.
Minimise Forces
For the minimum amount of additional force through leverage, we want the top of the handle to be as close to the COG as we can reasonably get it. This reduces the torque.
We need a place to put the second point of contact on the outside of the handle, and we want that farther from the top to increase the leverage this point of contact has. This reduces the force that both fingers have to exert inwards and outwards.
The catch is that hands are a predetermined size, and people have a preference for how they hold each handle type, so large changes in distances are unlikely to be possible. Mugs of a certain capacity will have limits on their realistic dimensions, so moving the handle closer to the COG is also limited.
Handle Shape
There’s no right answer for overall design here, as it absolutely depends on how many fingers are going to be inside the handle loop and which fingers (if any) are going to be outside and resisting the rotation.
However, the vast majority of the people who responded to my story on Instagram used a two finger grip with the third finger outside (even when the handle didn’t explicitly dictate that grip) and this makes sense from a comfort point of view. It puts more distance between the two points of contact than a one finger grip, but still uses a relatively strong finger outside the handle.
It’s also my preference for grip, so it’s the one I’ll be focusing on here. I will address one finger and full hand handles too.
I feel like we can immediately rule out C-Shaped handles. They’re aesthetically pleasing, but the continuous curve offers no defined points of contact and relies on friction to stop the mug rotating.
There are merits to both the D-Shaped and ?-Shaped handles. The angle at the top gives a good place for the first finger to sit. The second finger sits more comfortably on the D-Shaped, but the third (and more important) finger sits more comfortably on the ?-Shape as it naturally curves towards the mug.
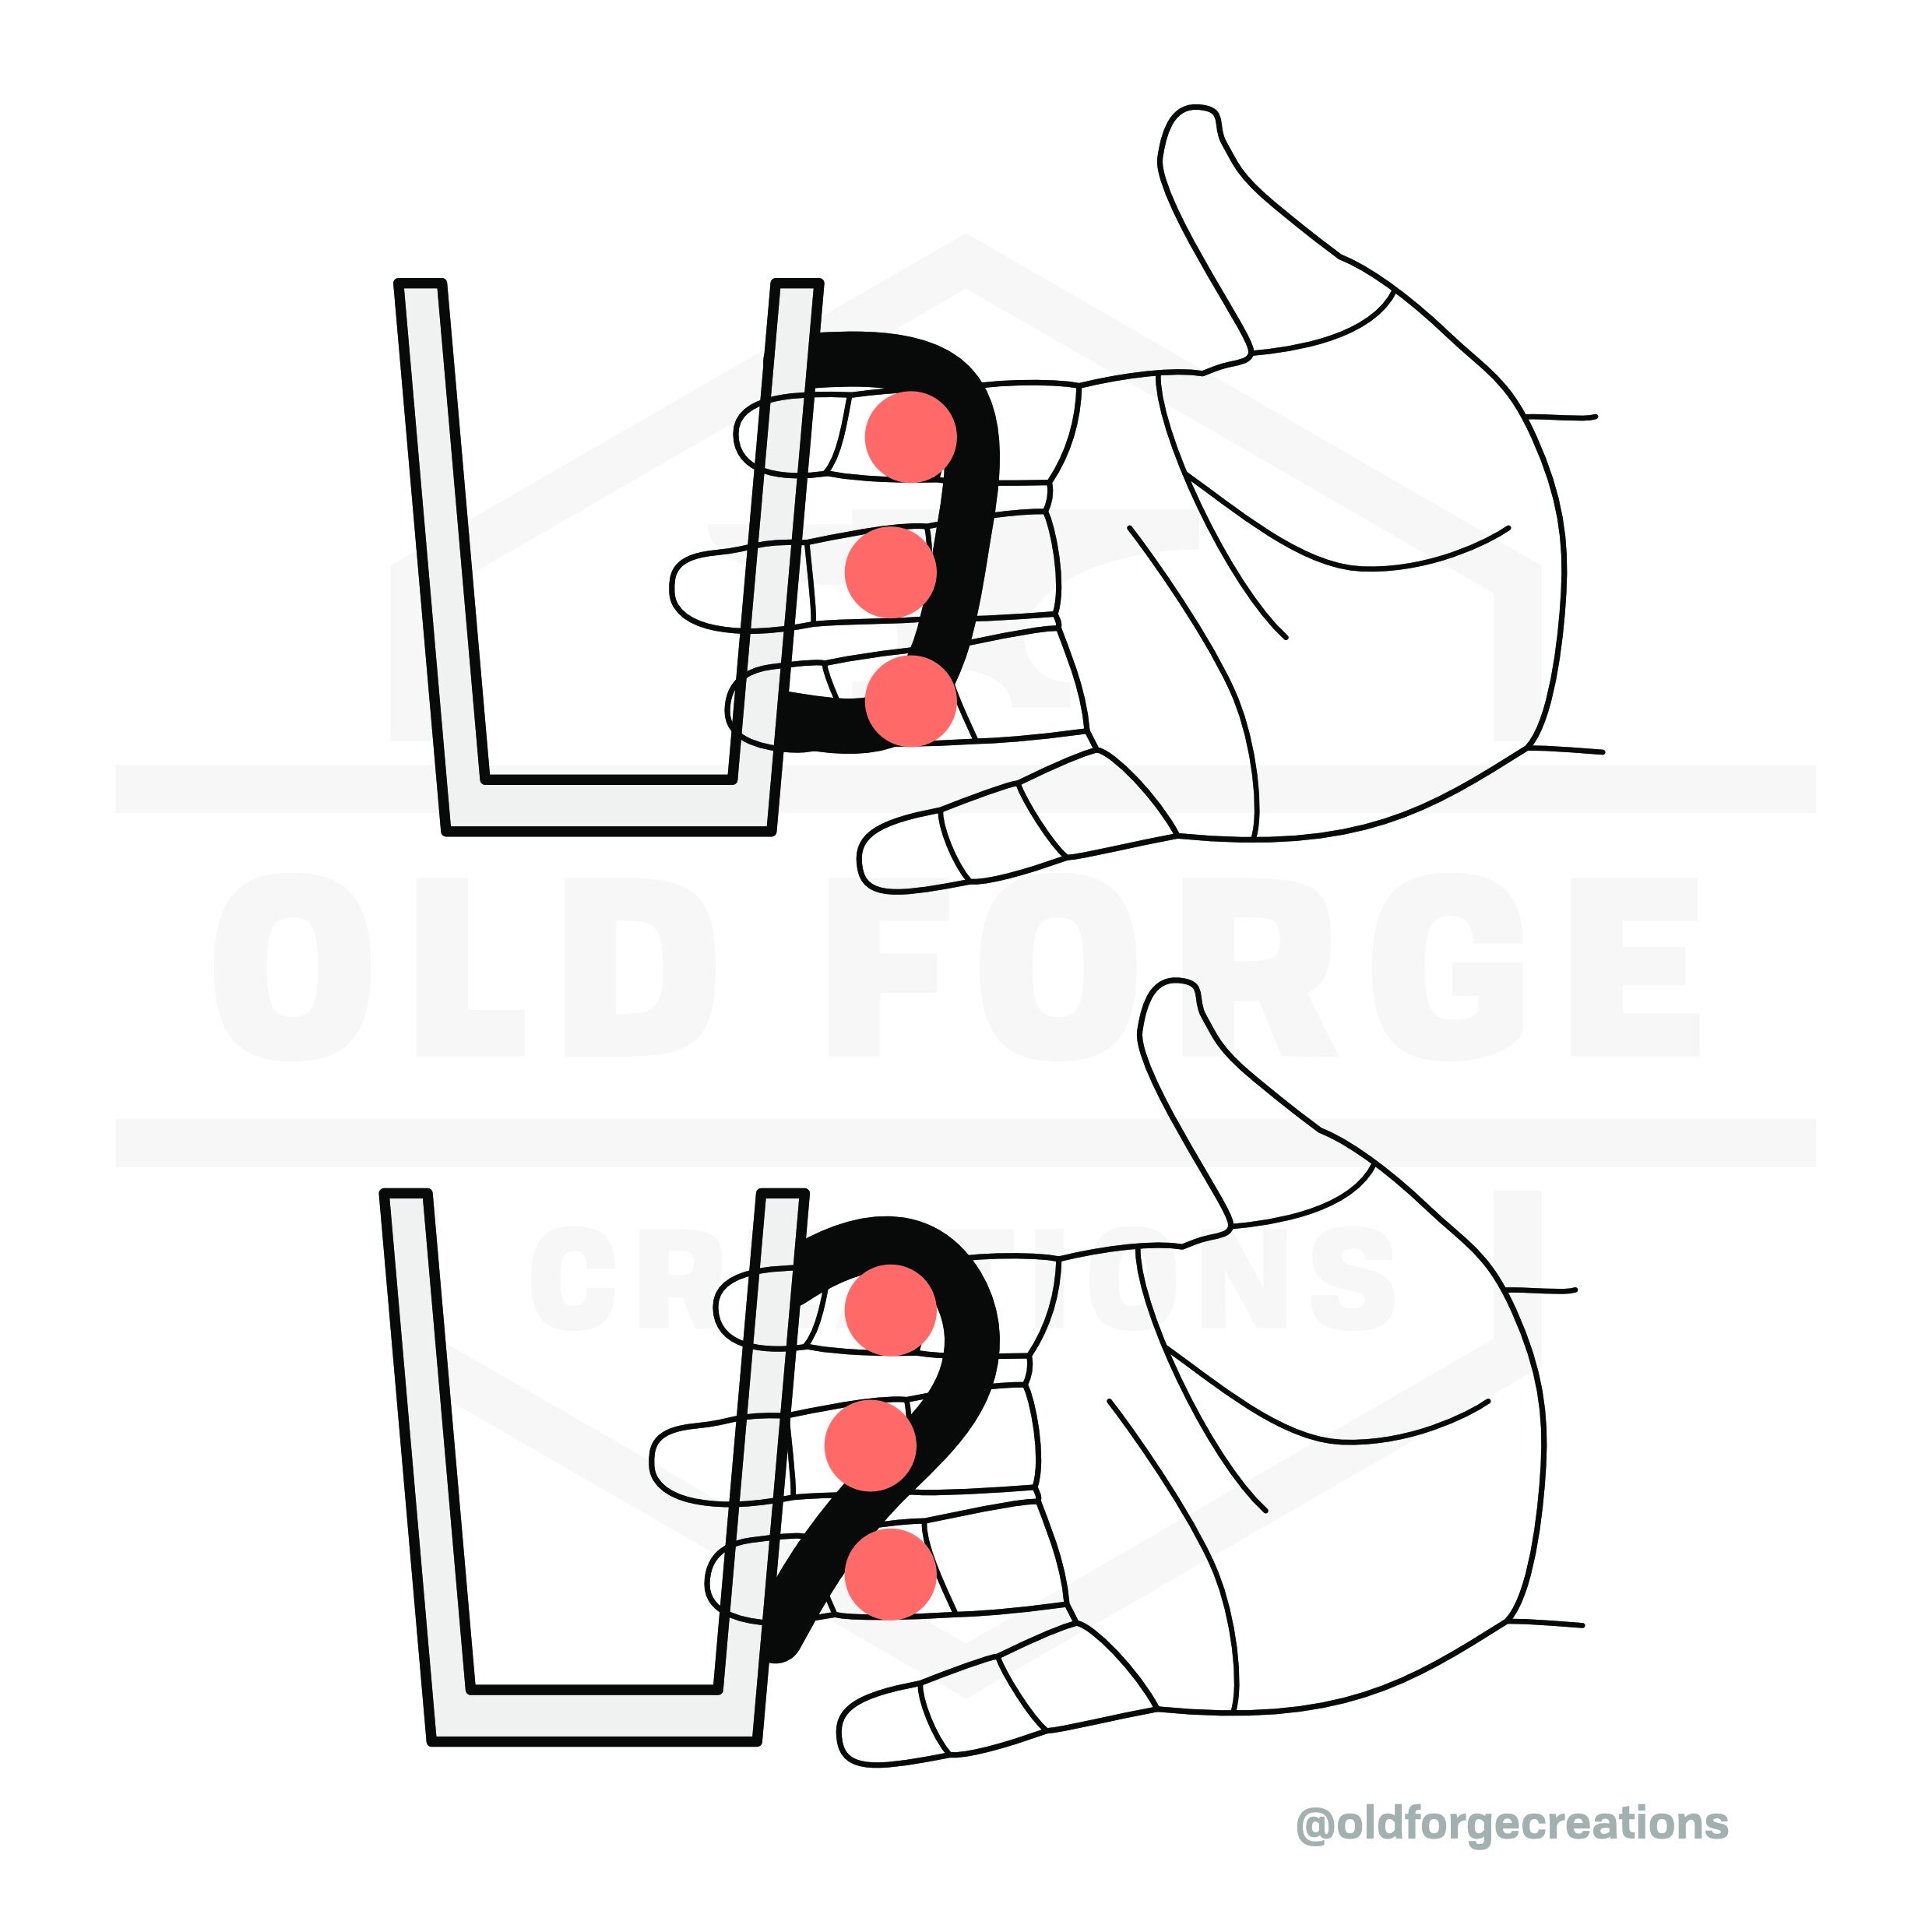
I feel that the stepped D-Shape is the most sensible compromise. It’s not a new design but it’s not common, and I’d never used one before.
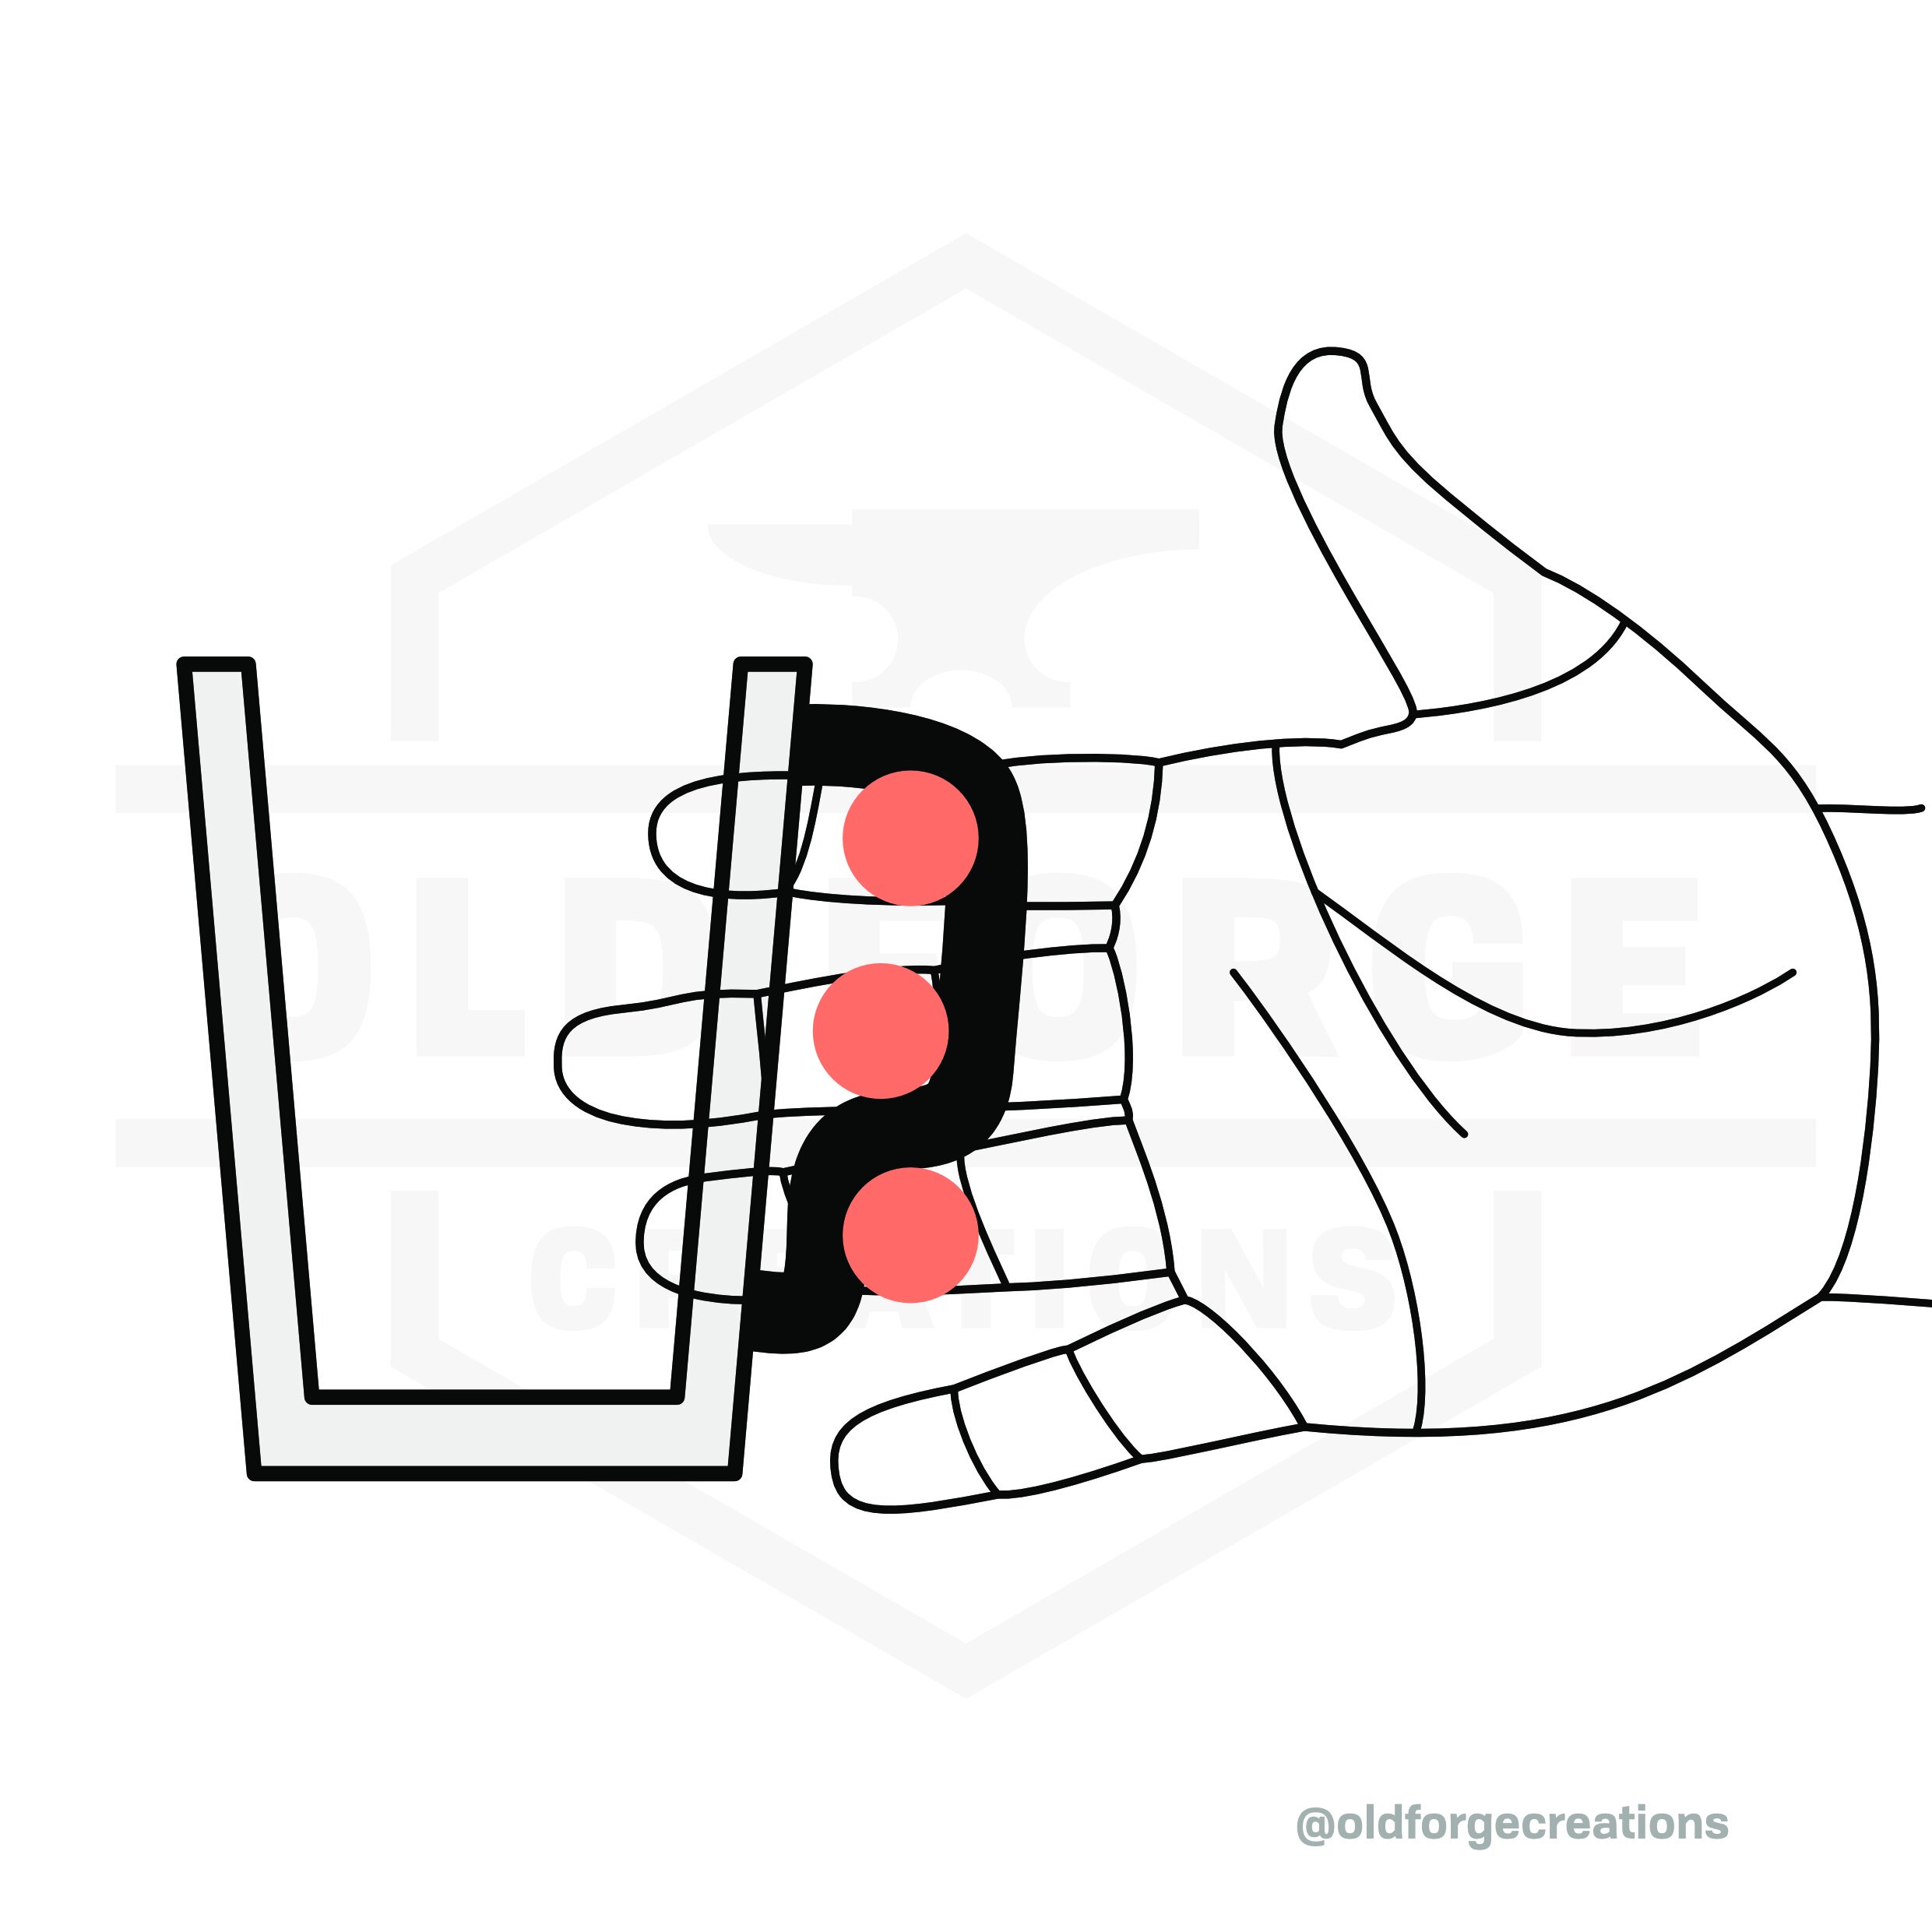
The reason I think it’s sensible are:
It offers a comfortable place for all three fingers, particularly for the third finger.
The step gives a defined spot for the third finger to apply pressure inwards and upwards, and gives a larger surface area for it to do so.
It doesn’t rely on friction, as the defined points of contact form natural low points when viewed from the direction that the force is applied.
The bend assists with preventing the mug rotating around the handle when it’s tipped.
Handle Size
This is tricky, as there’s no single size that is correct for everyone. If the size data above is correct, then we can assume 97.5% of first and second fingers will have a width of ~20mm or less. This would mean that a gap of 40mm would fit the majority of (ungloved) hands.
The distance of the step inwards will vary depending on the hand proportions. The second finger is longer from base to tip and attaches higher than the third, meaning that the step doesn’t have to be the full thickness of a finger. Instead, a difference of 10-15mm will probably be enough.
These numbers could be increased or decreased depending on the requirements of the user, but that should be a sensible starting point.
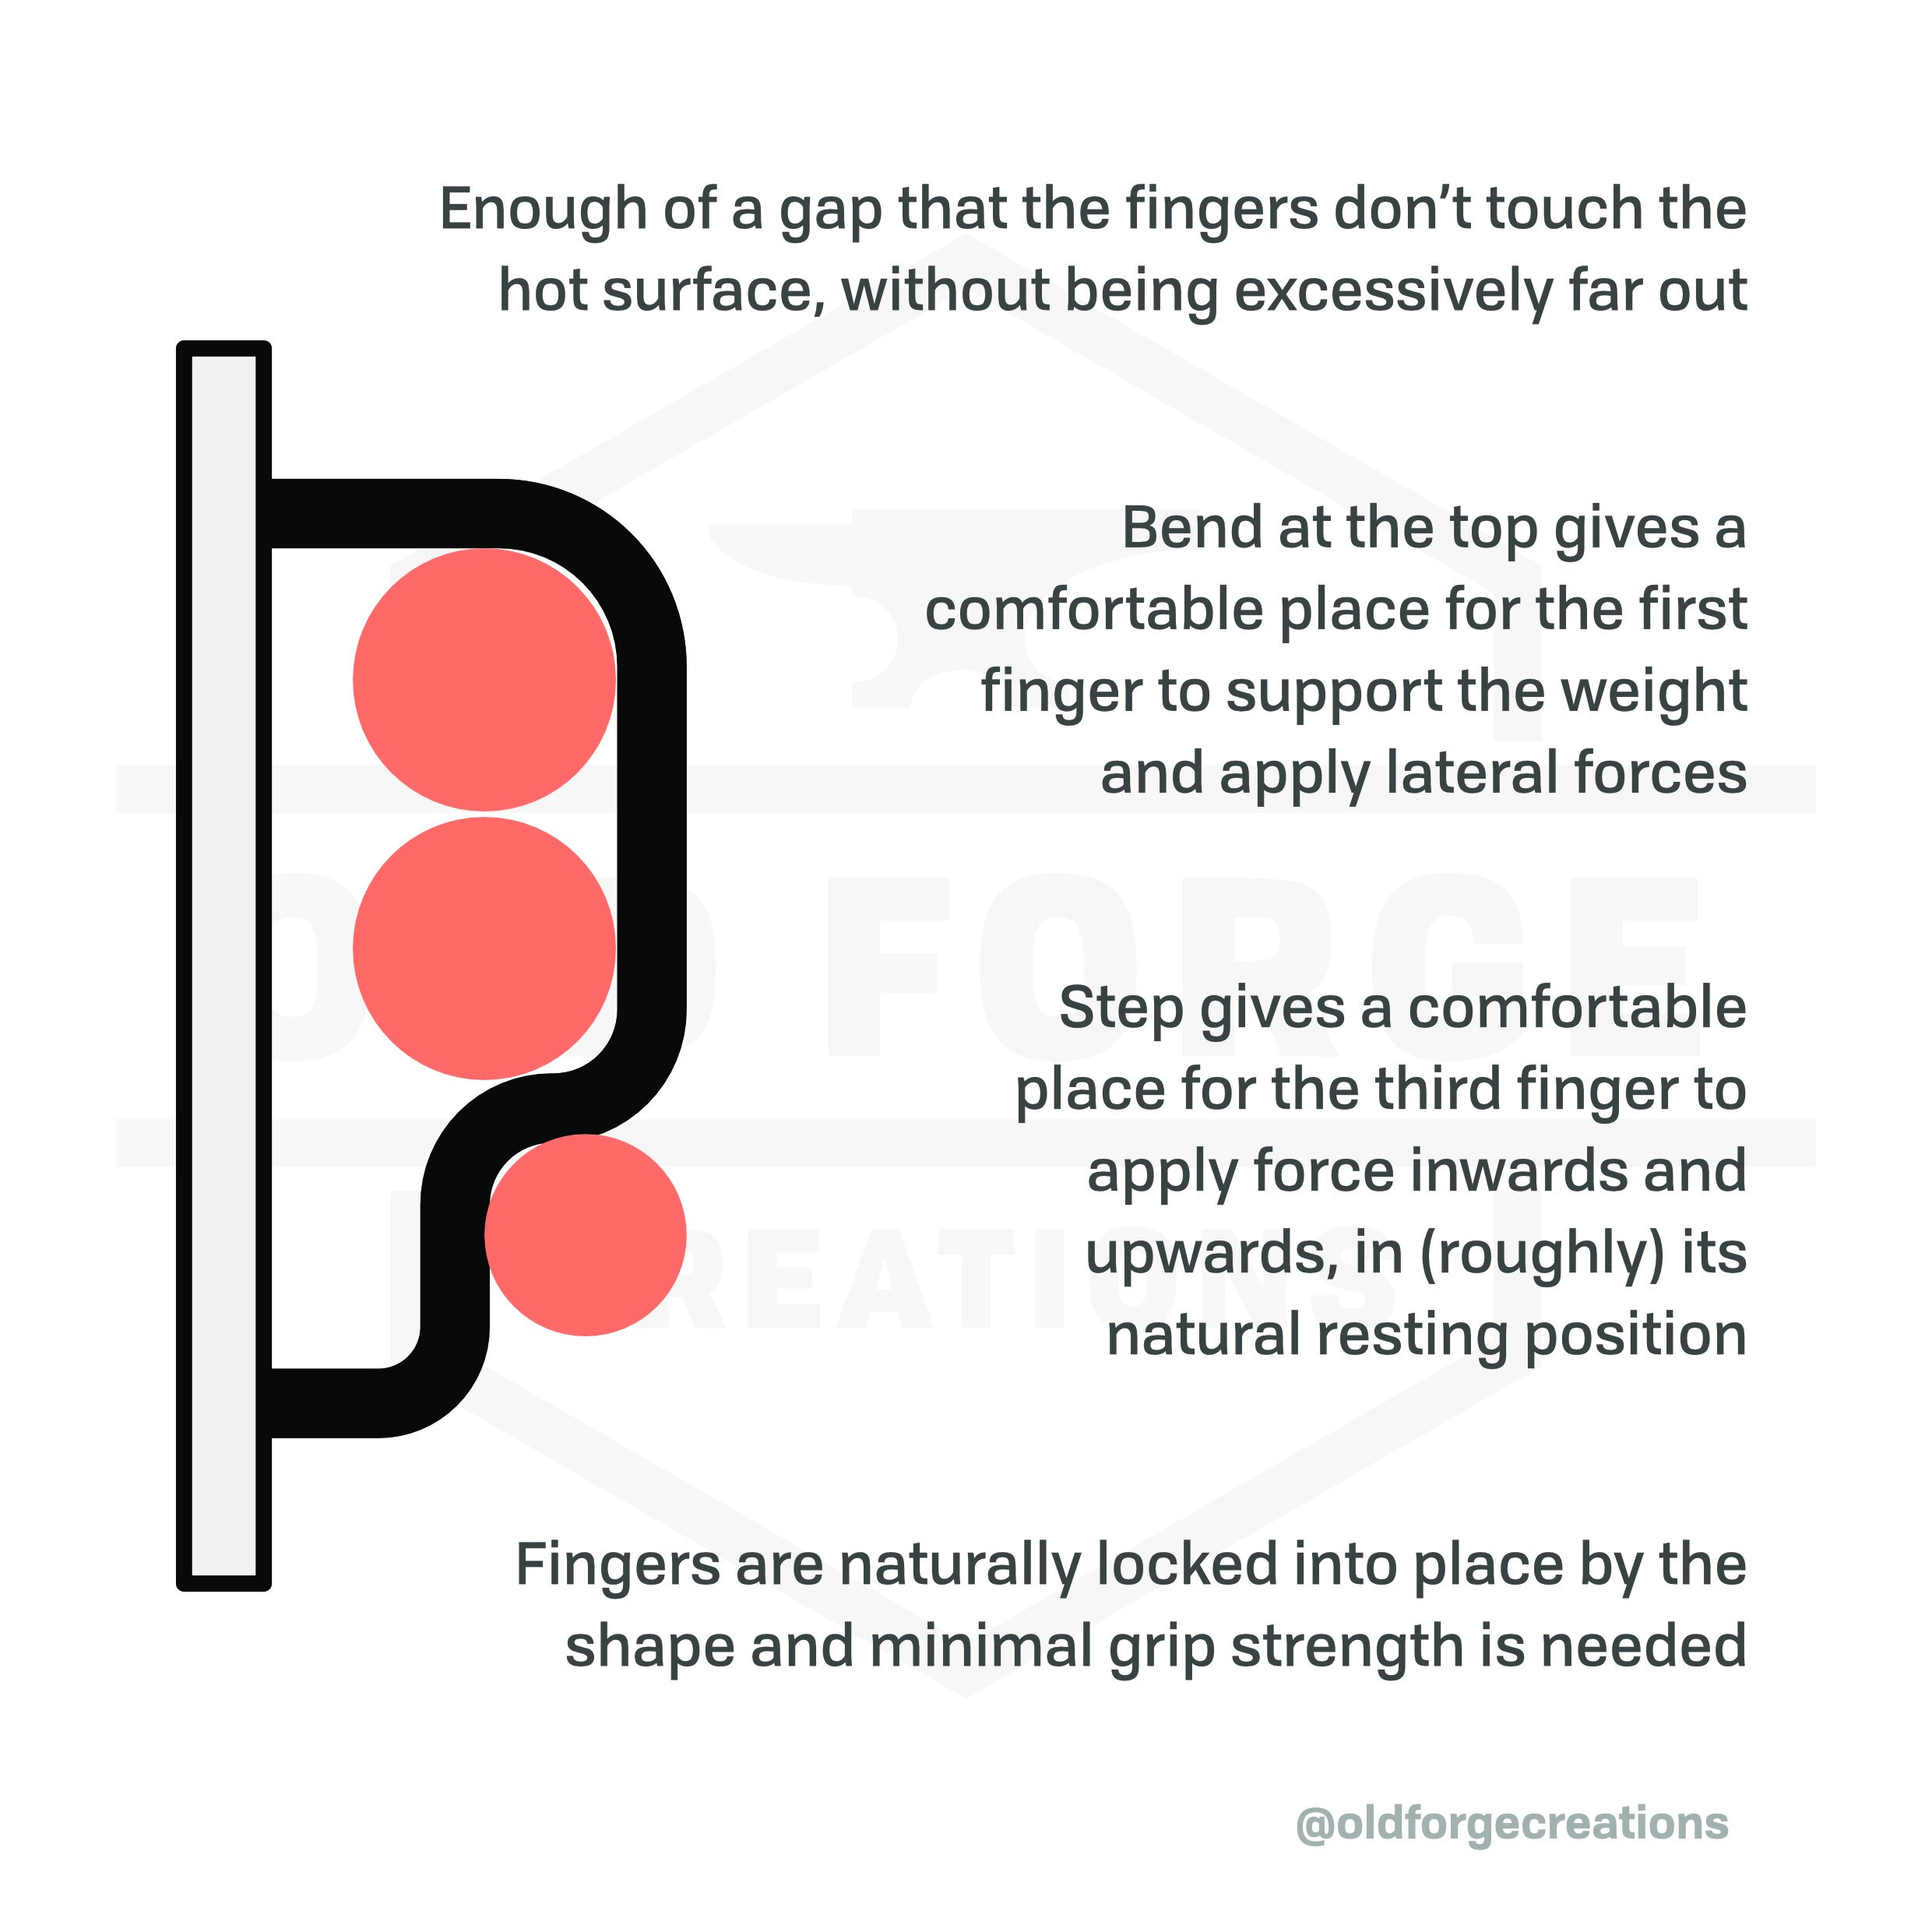
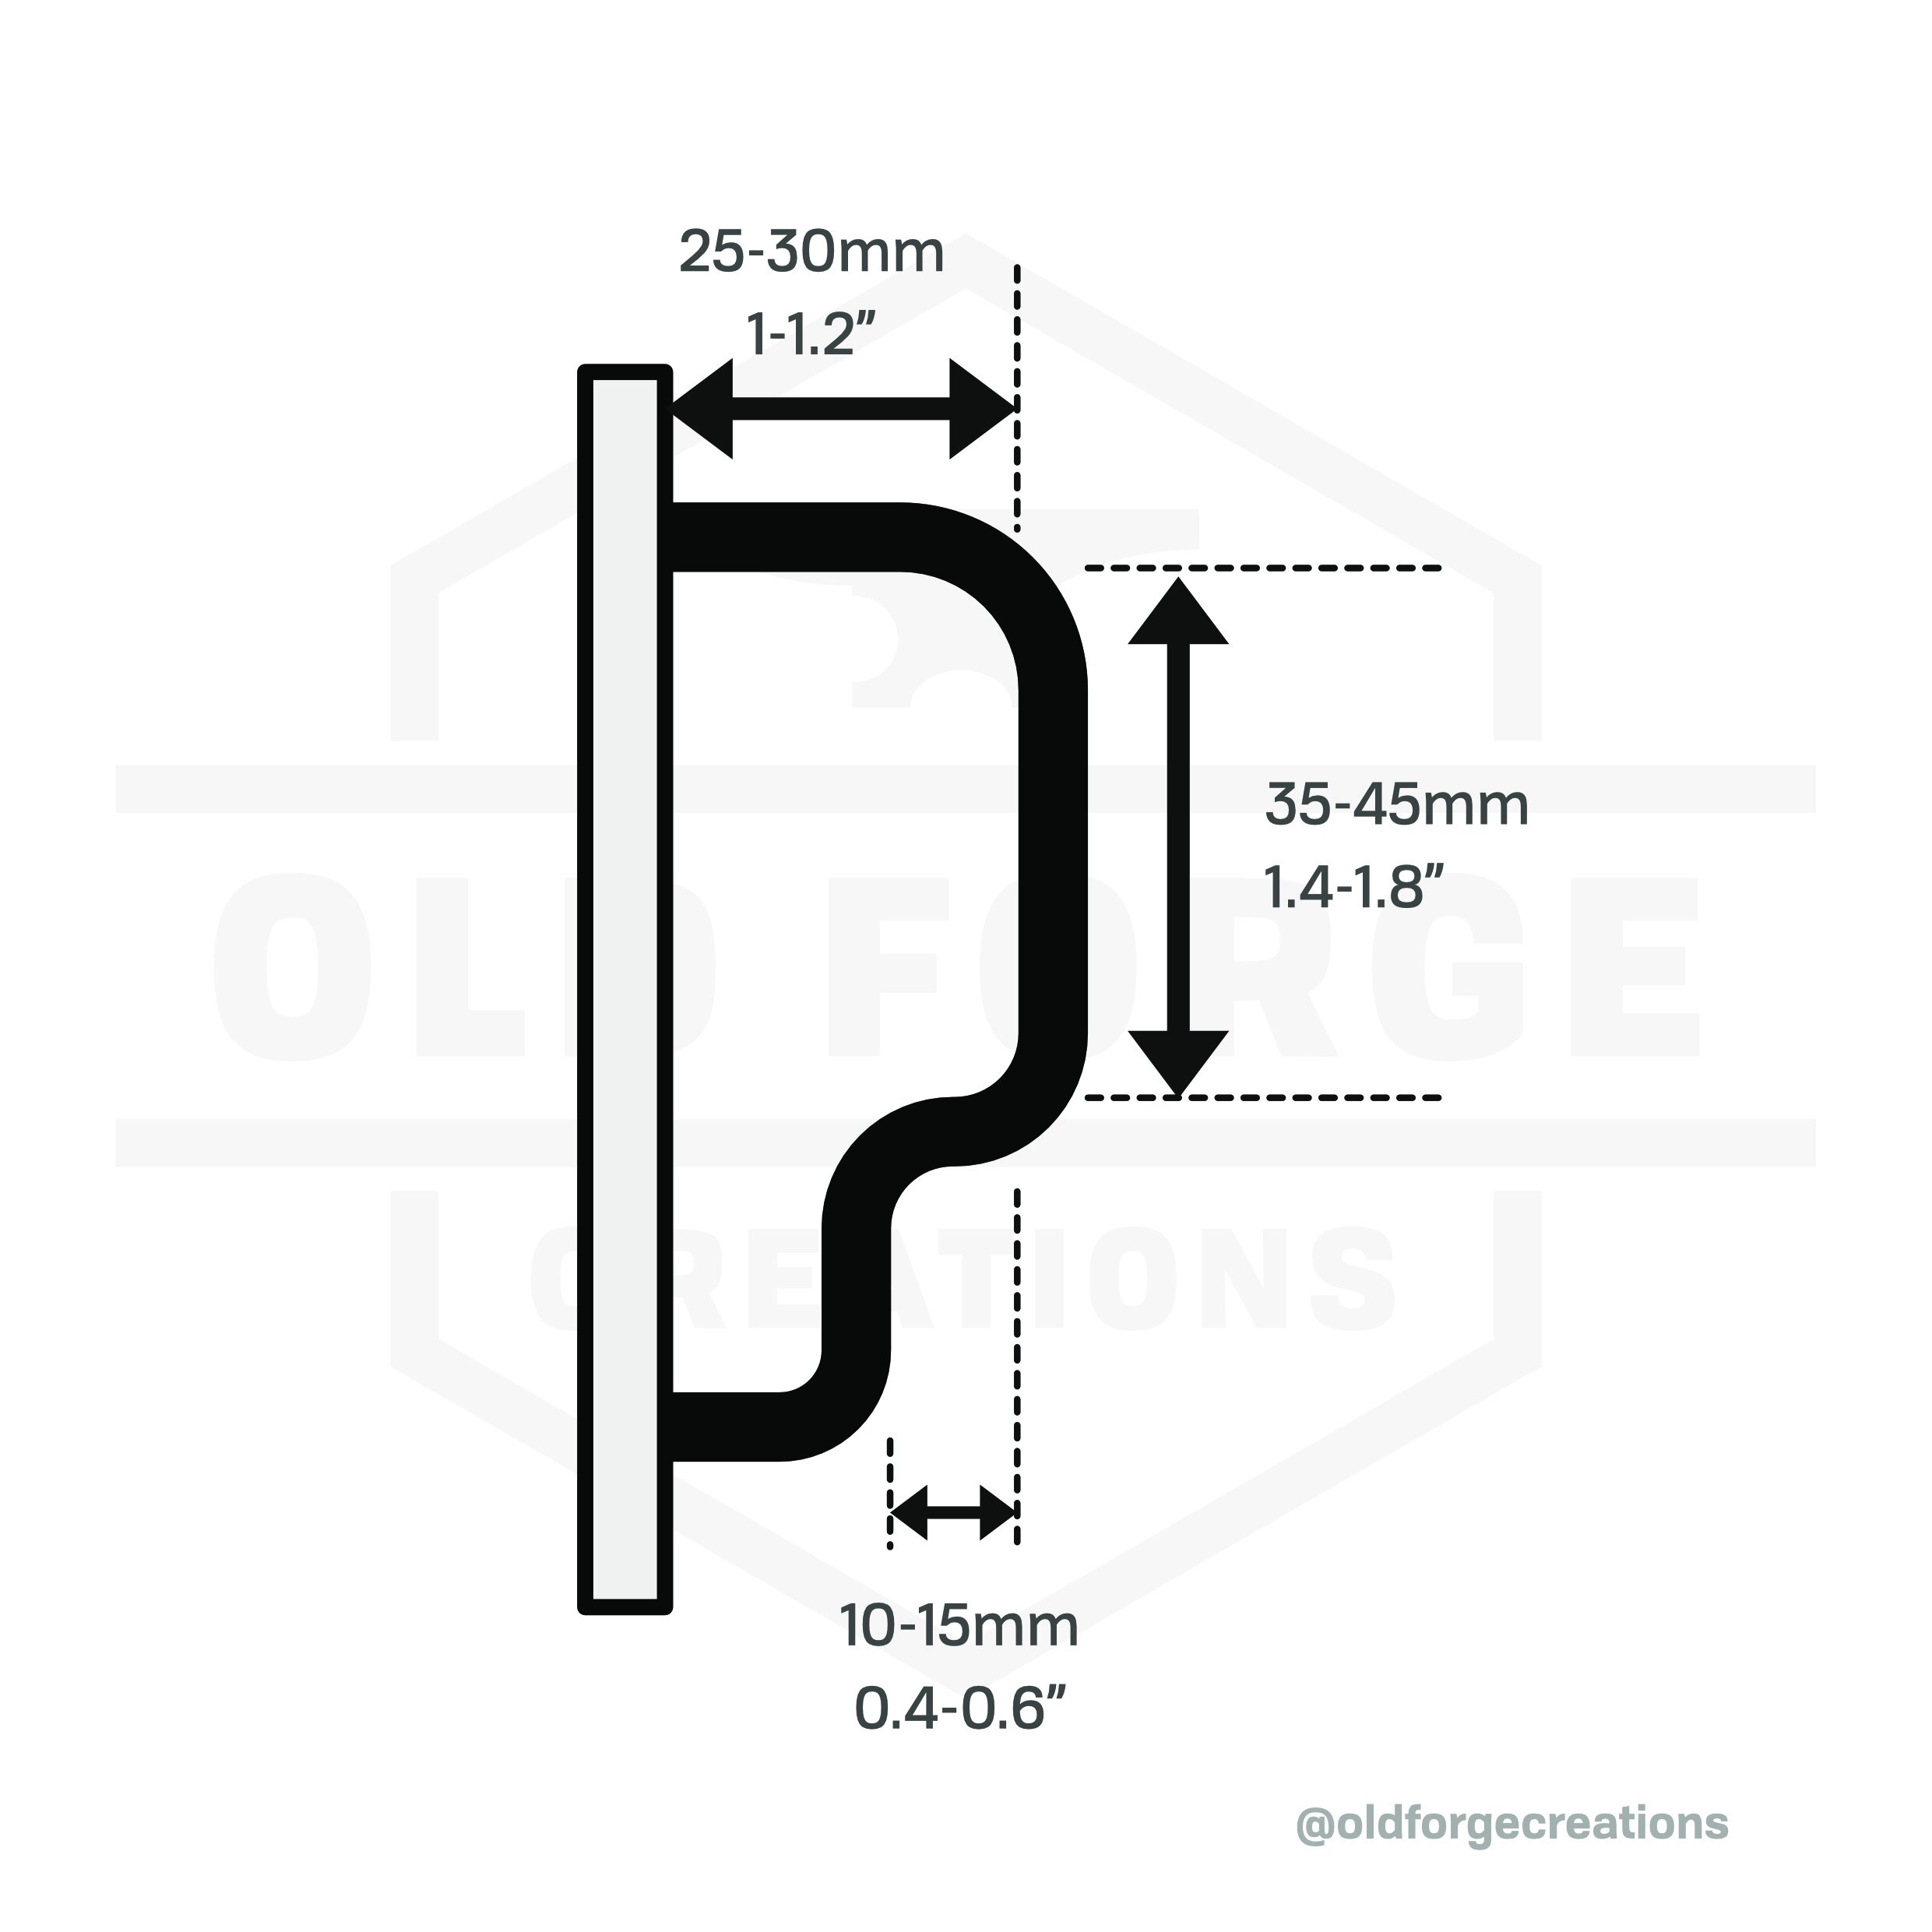
The main goal of a handle is to avoid burning your hand when the mug body is too hot to hold. This means the handle has to space the fingers away from the mug, and we want to avoid a handle gap so small that the fingers are forced into contact with the mug wall. This means a minimum spacing of around 25-30mm between the wall and the inside of the handle.
Handle Cross Section
Ideally, relatively wide and thin with defined but rounded corners.
A round cross section is the least desirable for numerous reasons, particularly with the stepped design. It relies on friction to stop rotation around the vertical part of the handle. It gives a relatively small surface area for each finger (which means more focused pressure, and more discomfort), but also forces a larger vertical distance between the inside and outside fingers (so potentially a more uncomfortable hand position).

There are numerous advantages to having the handle wider and flatter, whether this is as a rounded rectangle with flat sides or an oval with a continuous curve. It offers much more rotational stability. It doesn’t force the inside and outside fingers as far apart. From a making perspective, it’s easier to bend thinner clay without issue.
If you go too far with increasing width and decreasing thickness, it could become uncomfortable and fragile, so I believe there will be a sensible limit. Where this is will depend on some variables like your clay properties and mug size, but I would expect that having the top two thirds of your fingers inside the loop would be fine (there’s not much point in making it longer than this) and that would be around 50mm width. The thinness will be dependant on your clay and process, but I can’t imagine that going below around 3-4mm would be sensible. From a making perspective, it becomes increasingly awkward to join the wider handles to a rounded much body, as more of the curvature needs to be accounted for.
My 22x8mm extruder die size was picked without exhaustive testing, but those was the size I felt was the best compromise in the testing I did do when I created the dies. You could definitely go wider and thinner if you wanted.
Positioning
There probably isn’t much positioning choice with a three finger handle. It’ll take up the majority of the height of the mug. I put mine a few mm below the rim, and my logic is that I want it as high as possible to make it as easy as possible to pick up from the table. A lower handle can actually put your ideal hand positioning below the table surface, making it awkward to pick up and forcing grip readjustment (the handle only accounts for 3 fingers, if it’s attached at the bottom of the mug there can be insufficient room for the fourth finger).
I don’t ever want the handle to extend above the rim, as it’ll then sit on the handle when inverted to dry after it’s been washed, making it unstable and more likely that the handle gets damaged.
Overall - My Ideal Two Finger Handle Design
The top should have a defined corner with a radius of around 8-11mm.
It should bend fairly vertically downwards, allowing around 35-45mm height for two fingers. Note: 35mm should be a comfortable size for smaller hands, but will be too small for larger hands
This section of the handle should be 25-30mm away from the wall of the mug.
There should be a step inwards to accommodate the third finger.
The handle should be relatively wide and thin.
I don’t know why this popped into my head
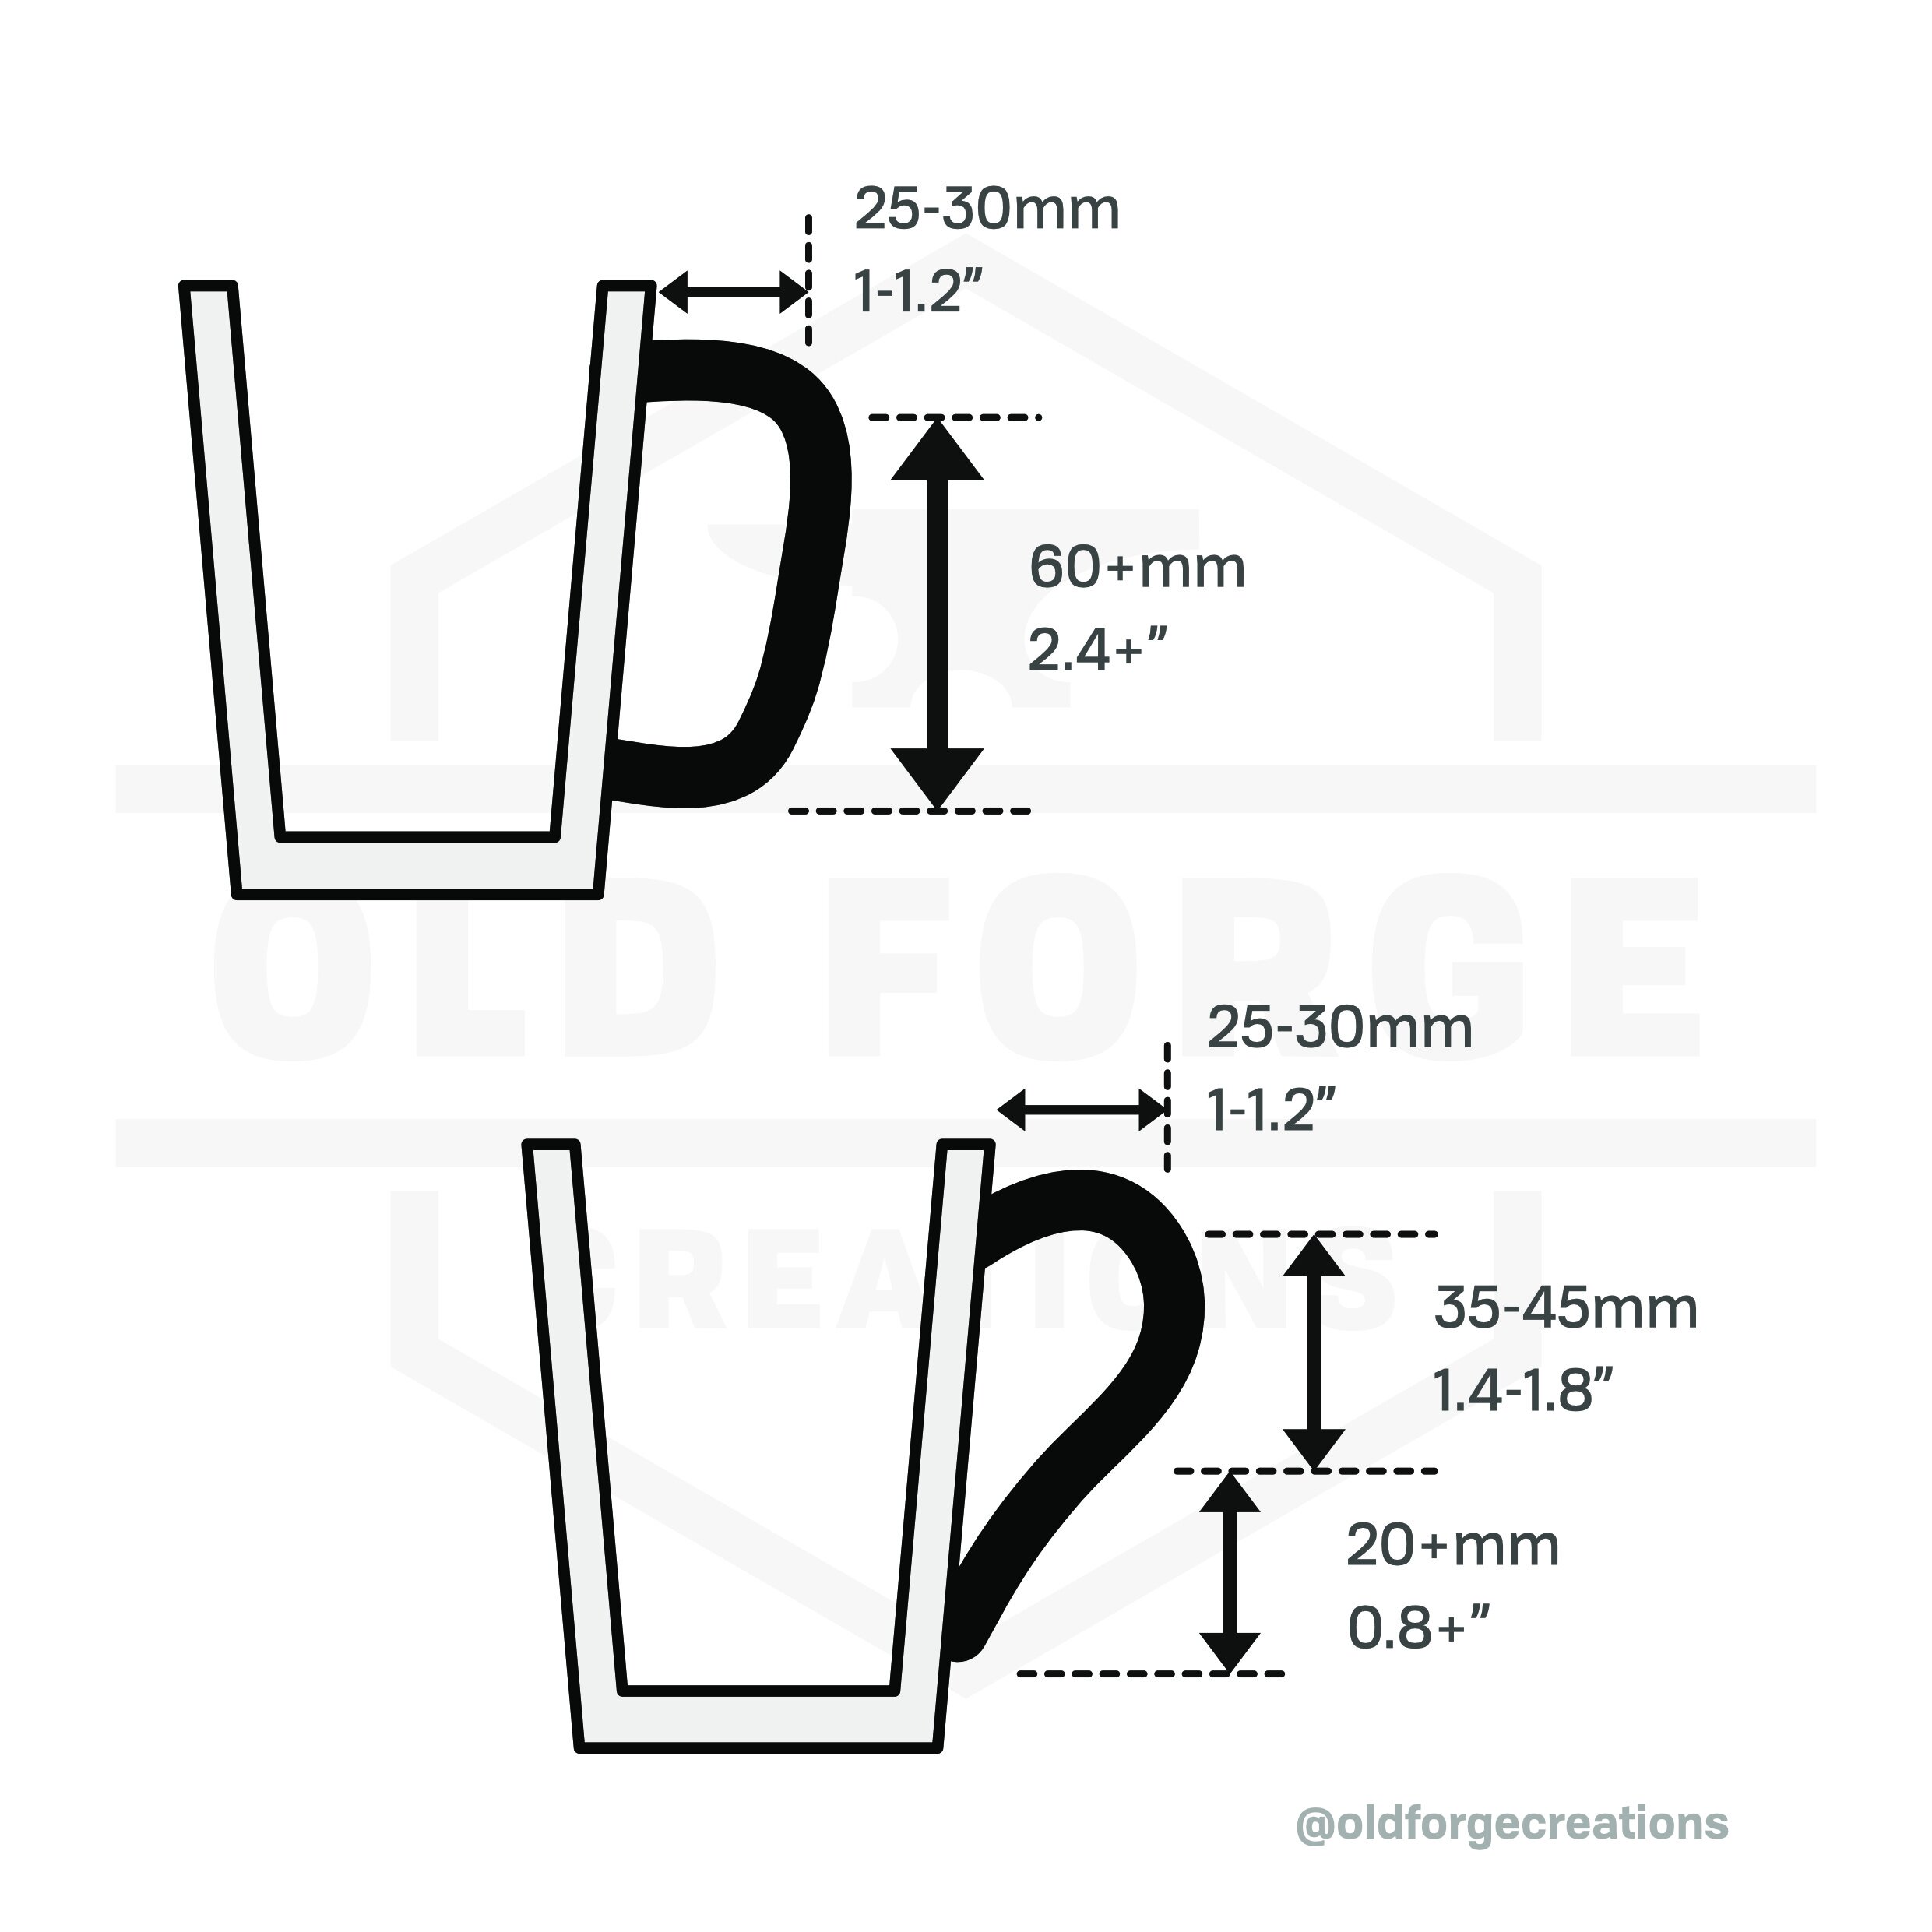
And how those sizes might look in more conventional handle designs
One Finger Handle
A lot of these concepts translate pretty directly to a one finger handle. In my opinion, one finger handles are best reserved for small mugs because of the unfavourable leverage on the supporting finger, but I can understand the appeal of them on certain larger mugs too.
The handle loop should be at least 21mm in diameter if you want it to be usable by the majority of people.
Designing a comfortable resting spot for the second finger that diffuses the pressure over a larger area and keeps it away from the hot mug body would be preferable.
Allowing space underneath the handle (around 60mm) or designing it such that it’s held with the hand angled will make it more comfortable to pick up off a table
Wider and flatter handle cross section will allow more control over the mug when tipping it to drink.

If you imagine sliding the top design down the mug, you quickly end up with the bottom of the hand inside the table. This tends not to work very well.
Full Hand Handle
These are a totally different proposition to the previous handles. There are certain aspects that remain the same, but it’s now the palm that’s supporting from the outside and all fingers wrapped around the handle. These are only an option on larger mugs (you’ll need the inside of the handle to have around 80mm of height to accommodate 4 fingers for the larger end of hand sizes), but should also be far more comfortable for heavier weights.
The handles can be much thicker. When designing ergonomic handles for tools there’s a concept of the Power Grip handle which would have a diameter of 30-50mm (1.25-2 in) and a length of 100-120mm (4-5 in) (Note: a lot of the tool ergonomic research is specifically looking at comfort for the average man, women’s hands are often overlooked entirely. I believe this is the case for the power grip numbers).
I think a power grip handle would be overkill. A solid handle of that size could easily have a fired mass of 500g on its own, which would be fine for a larger pitcher but is a lot to add to even the largest mug. Slipcasting a handle like that would allow you to make it hollow though, so if you wanted to make a handle that large without the weight it is possible.
If you’re not slipcasting it, then slightly scaling up a regular handle design is probably better than going to a full power grip sized handle. A wider cross section will still have the same advantages, but (at least as far as I can see) you’ll need a bit more thickness to comfortably fill the gap between the fingers and the upper palm.
Designing For Inclusivity
I was (perhaps naively) expecting there to be a wealth of information on designing handles for people with reduced grip/wrist strength or who can’t comfortably use conventional handles (e.g. arthritis, MS, injury, tendonitis, etc). There might be, but I couldn’t find much useful info even on product design blogs.
I think the conclusions I’ve reached above (reduce pressure on fingers, reduce reliance on friction, increase rotational leverage, etc) should help make handles more comfortable and make them more inclusive, but within fairly narrow limits.
For anyone who still can’t use a handle with those changes made, there are a few larger considerations. It bears repeating that the majority of the forces acting on a handle aren’t from the mass of the mug, they’re from the leverage of having a single handle offset from the centre of gravity.
There are two easy solutions to this. Either have no handle or have two handles. When you grip a mug around the body, you’re moving your hand much closer to the centre of gravity and greatly reducing the leverage. You’re also distributing any forces across the whole of your hand. When you have two handles on opposite side of the mug you extend the base of support to include the entire mug. There’s no torque, and the weight is distributed between both hands, making it far less stressful on any joints. There’s also better control, so a reduced chance of spilling or dropping anything.
The is a downside to the no-handle design, which is that ceramics conduct heat. A ceramic mug will be a little cooler on the outside than the contents are, but the difference isn’t enough for it to be comfortable to hold without additional insulation. With freshly boiled water inside, I measured the outside 30 seconds later at around 70c. That’s far too hot to comfortably hold. A double walled mug will be colder than that, but will be heavier and larger (plus, they’re far more complex to make).
So, two handles is probably the preferred solution. I would have through more of a power grip style handle would be better for people with restricted finger mobility as the handles are larger, but I’m not sure. If you’re offering a custom mug for people with any issue that would make regular handles uncomfortable, they will probably know which accommodations would help the most.
In Conclusion
After all this, the thing I’m most struck by is Pete Pinnell’s video.
Should a handle always have the same design that attempts to maximise comfort?
No, I don’t think so.
I think you should have good reasons for deviating from comfortable handle designs, and he lists many of them. If you’re drinking an expensive coffee that was prepared slowly and carefully, there is a good argument for your expensive handmade mug being a larger part of the drinking experience than just an efficient way to get it into your mouth.
I think there’s a big difference between handles that just haven’t been thought through fully and handles that have been carefully considered and crafted with a specific goal/aesthetic in mind. A good example of the latter would be a Noah Riedel handle like this. It hits a lot of the factors that make a handle comfortable, but there’s no question that it’s going to make a more unique drinking experience.
There is also a question of whether you want handles that work well enough for everyone, or handles that work amazingly for some people and terribly for others. I feel like the stepped handle I ended up with is going to be great for people with the correct sized hand that hold it in the correct way. For anyone else, it’s going to be worse than a standard D-Shaped handle.
I won’t be switching to the stepped design as standard, although I will now offer it as a custom handle (with the ability to specify size). I don’t think the standard D-Shaped handle design I’ve been using is a bad compromise overall. I will be focusing on making sure I’m hitting the correct size and proportions (where the bends are, and the bend radii), as I think small differences there can make the handle more or less comfortable. And if I ever come up with a handle that merits deviating from a standard design, I’ll make sure I’m doing it in a way that is intentional.
If you made it this far, congratulations! This ended up being infinitely longer than I expected. I actually had previously decided against a handle infographic as I didn’t think I had anything to say about them.
If you like this sort of content and want to support the creation of more, I now have a Patreon specifically for it or a page on my website if you just want to make a single donation.